


This is not your mother's whole wheat bread.
No offense to Mom, of course – but I'm guessing it's probably better than hers.
Did your mom make you PB & J sandwiches on homemade whole wheat bread?
If so, you may well have grown up with "back to the land" parents. This social movement, which took place mainly in the decade between 1965-1975, inspired many young people to leave their urban homes and migrate to rural America, where they were determined to live off the land: growing their own food, and generally living a sustainable lifestyle.
For some, this worked out. But many didn't realize the amount of backbreaking labor it takes to be a farmer/homesteader, and they ultimately settled into suburban life, with all its familiar comforts: running water, electricity, indoor plumbing, and supermarkets.
One particular pursuit seemed to stick, though: baking with whole wheat flour.
You could grow wheat, and grind it into whole wheat flour yourself. Thus whole wheat represented a DIY (do it yourself) culture that was satisfying to dream about, but in the end hard to sustain.
Still, the reverse migration from farm to bedroom community didn't completely squelch those back-to-nature aspirations. And all those whole wheat recipes you'd collected... no need to abandon them.
Which is the reason you may be a 40- or 50-something who grew up eating PB & J on kinda dry and crumbly homemade whole wheat bread.
Well, times have changed. Over the past 40 years we've learned a lot about baking with whole wheat flour.
We've found, for instance, that substituting orange juice for some of the water in a whole wheat bread recipe tempers any potential strong flavor in the wheat.
And that whole wheat dough shouldn't be kneaded as long or vigorously as dough made with all-purpose flour; whole wheat's bran particles are sharp, and can potentially cut the developing gluten strands if the dough is handled roughly.
But the very best thing we've learned about whole wheat flour is that there's a tasty new variety out there, one that was born just 20 years ago:

Unbleached white whole wheat flour, a lighter, user-friendlier 100% whole wheat flour.
OK, folks, we're going to explain this mystery once and for all: What's the difference between regular whole wheat flour and white whole wheat flour?
Nutritionally, none. But as for taste and color – quite a bit.
Wheat grown in America has traditionally been high-protein red wheat. It's dark tan in color, and often somewhat gritty feeling in texture. You'll recognize it as the whole wheat flour you grew up with – if your mom was one of those attentive moms intent on feeding her family whole grains.
About 20 years ago, we received a sample of a new flour, white whole wheat flour, from a consortium of farmers in Kansas (now known as The American White Wheat Producers Association). This new flour was milled from a hard, high-protein wheat, effectively the same strain as red wheat. But it was lighter-colored than red wheat. And after we'd baked with it, we knew we had something really exciting on our hands.
Please understand, right up front: both red and white whole wheat flours have the same nutritional value. White wheat isn't bleached; nor have any of its integral parts (germ, bran, or endosperm) been eliminated.
But we found that white wheat's baking characteristics are just a bit better than red wheat's; yeast loaves baked with white whole wheat, especially organic white whole wheat, seem to rise higher.
And the real difference is in flavor. While traditional whole wheat flour can sometimes have an unpleasant bitter or tannic taste, the cause of that taste – phenolic acid, which lends red wheat its color – has been bred out of white wheat. So white whole wheat has a pleasingly mild taste, one that allows you to substitute it for all-purpose flour much more easily than subbing traditional whole wheat flour.
After all, we know that the real litmus test is this: can you sneak whole wheat flour into your baking without your family knowing it?
With white whole wheat flour, the answer is a resounding yes.
Bottom line: White whole wheat flour is nutritionally equal to red whole wheat flour. But it bakes up lighter colored; often lends lighter texture to breads; and for most of us, it simply tastes better.
Keep in mind, white wheat flour is still whole wheat flour. Because of its bran, it's more of a challenge to make a light-textured, high-rising loaf.
But it can be done – as this cinnamon-swirl loaf demonstrates.

On the left, all-purpose flour. On the right, white whole wheat flour. Little difference in color, or taste.
Try substituting white whole wheat for the all-purpose flour in cookies, brownies, and muffins. In yeast bread, start by substituting white wheat for half of your regular unbleached all-purpose flour, and work up from there if you like the result.
The following recipe uses 100% white whole wheat flour. And it's absolutely delicious.
So, let's get started – with a starter. No, not sourdough; an easy mixture of flour, water, and a small amount of yeast.

Why use a starter to make this bread? It's not sourdough, not particularly "artisan..."
We find that a simple overnight starter both enhances bread's flavor AND its keeping qualities; the short amount of "extra" fermentation raises the bread's acidity level just enough that it stays fresher longer.
So, step #1: Combine the following in a mixing bowl large enough to hold the entire recipe of dough:
1/2 cup (113g) cool water
1 cup (113g) King Arthur White Whole Wheat Flour or Premium Whole Wheat Flour
1/8 teaspoon instant yeast
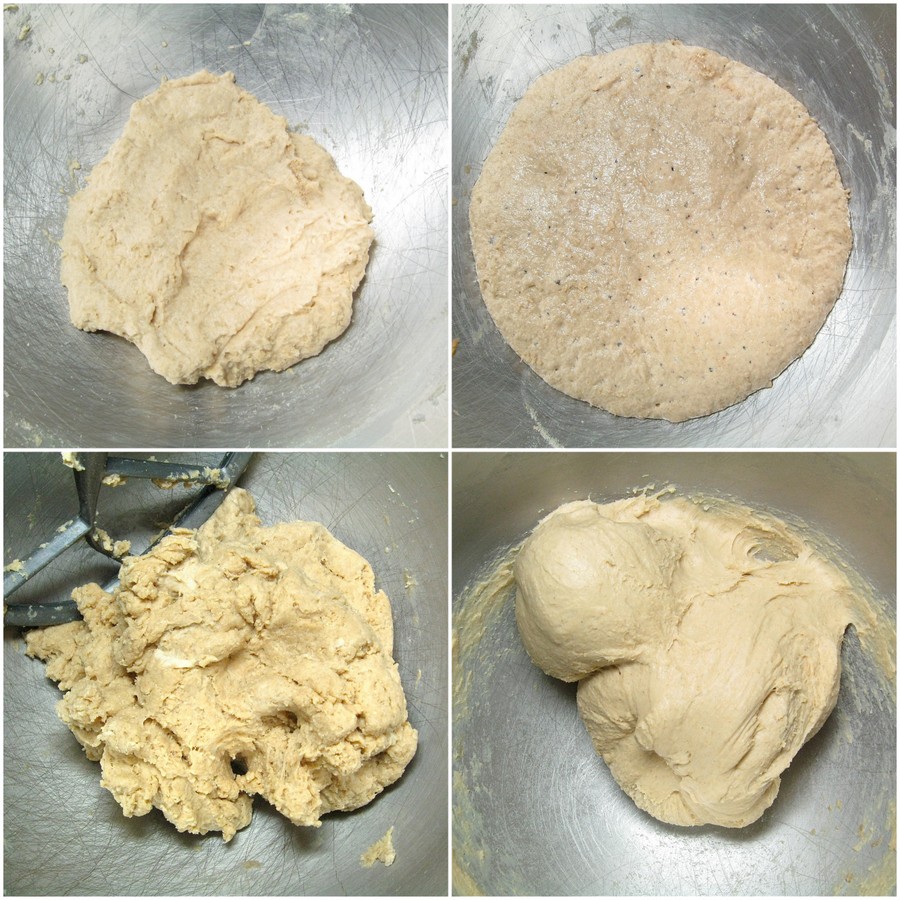
Stir until the flour is evenly moistened (photo, upper left). Cover the bowl, and let the starter rest overnight at cool room temperature, for up to 16 hours or so; it'll become a bit puffy, and flatten out (upper right).
Add the following ingredients to the bowl with the starter:
2 1/2 teaspoons instant yeast or active dry yeast
1/2 cup (113g) lukewarm milk
1/2 cup (113g) orange juice*
5 tablespoons (71g) butter, melted
1 1/2 teaspoons salt
3 tablespoons (35g) sugar
1/4 cup (28g) Baker's Special Dry Milk or nonfat dry milk
1/4 cup (46g) potato flour or 1/2 cup (46g) dried potato flakes
2 3/4 cups (312g) King Arthur White Whole Wheat Flour or Premium Whole Wheat Flour
*Use 2 tablespoons less orange juice in summer (or in a humid environment), 2 tablespoons more in winter (or in a dry climate).
Why use OJ at all? Because, while it doesn't add its own flavor to the bread, it'll mellow any potential bitterness in the whole wheat. Don't bother heating it to lukewarm; you can use it straight out of the fridge.
The amount of liquid you use to make the "perfect" dough will vary with the seasons. Flour is like a sponge; it absorbs water during the humid days of summer, and dries out during the winter. Your goal should be making the dough as it's described (e.g., cohesive, soft but not sticky), rather than sticking religiously to the amount of liquid.
Mix and knead – by hand, mixer, or bread machine – until you've made a cohesive dough.
If you're kneading bread by hand, it's tempting to keep adding flour until the dough is no longer sticky. Resist the temptation! The more flour you add while you're kneading, the heavier and drier your final loaf will be. Note that 100% whole wheat dough will never become smooth and supple like dough made with all-purpose flour; it'll feel more like clay under your hands, and may appear a bit rough.
If you're using a stand mixer, knead at low speed for about 5 to 7 minutes.

Place the dough in a lightly greased bowl (or 8-cup measure, as I've done here), cover it, and allow the dough to rise until it's expanded and looks somewhat puffy (though not necessarily doubled in bulk), about 90 minutes.
Note that dough kneaded in a bread machine will rise faster and higher than bread kneaded in a mixer, which in turn will rise faster and higher than one kneaded by hand. So if you're kneading by hand, you may want to let the dough rise longer than 90 minutes.
And as for rising times, here's a good general rule for yeast bread: Let the dough rise to the point the recipe says it should, e.g., "Let the dough rise until it's doubled in bulk." Rising times are only a guide; there are so many variables in yeast baking (how you kneaded the dough; what kind of yeast you used) that it's impossible to say that bread dough will ALWAYS double in bulk in a specific amount of time.

Next, make the filling. Mix together the following:
1/3 cup sugar
2 teaspoons ground cinnamon
1 tablespoon King Arthur Unbleached All-Purpose Flour

Lightly grease a 9" x 5" loaf pan.
That's right, a 9" x 5" pan, not the usual 8 1/2" x 4 1/2" yeast loaf pan. This is a larger loaf than most.

Gently deflate the dough, and transfer it to a lightly oiled work surface; a silicone rolling mat is a help here. Shape the dough into a long, thin rectangle, about 16" x 9".
Beat 1 large egg, and brush some onto the dough. Sprinkle the filling onto the dough. Note: Scramble or microwave any egg you don't use; the dog will appreciate it!
Beginning with a short edge, gently roll the dough into a log.

Pinch the side seam and ends closed.

Pat the log gently to shape it into a smooth 9" cylinder, and place it in the prepared pan. Cover the pan (a shower cap works well), and allow the loaf to rise until it's crowned over the rim of the pan by about 3/4", about 90 minutes.

Don't let it rise too high; it'll continue to rise as it bakes.
Towards the end of the rising time, preheat the oven to 350°F.

Bake the bread for 10 minutes. It may rise quite precipitously, as mine did here.
Lightly tent the bread with aluminum foil, and bake for an additional 40 to 45 minutes, or until the center registers 190°F on an instant-read thermometer.

Remove it from the oven...

...and turn it out of the pan onto a rack.
Run a stick of butter over the top of the hot loaf, if desired, for a softer crust.

See this "shred" on the side? This sometimes happens when bread rises very quickly in the oven, and the crust doesn't expand as fast as the interior.
It's not pretty, but hey, gives it kind of a rustic look, don't you think?
(Yeah, right, good excuse!)

Allow the bread to cool completely before slicing.

Toast, glorious cinnamon toast!
Trust me – you'd never suspect this is a 100% whole-wheat loaf.
And neither will your family.
[Heh heh heh...]
Read, bake, and review (please) our recipe for 100% Whole Wheat Cinnamon Swirl Bread.
