Glossy, blistery, crackly crust and a big, open crumb: These are two of the most sought-after hallmarks of sourdough bread. How do you get them? There are so many factors that get you there, but one of the biggest is the open secret all professional bakers know: You need steam. And a lot of it.
Steam at the beginning of baking does a few things. For one, it keeps the outside of the loaf moist and flexible, which prevents the crust from forming before the loaf has achieved full oven spring. (Oven spring is the volume the loaf achieves as it hits the hot oven.) As a result, bread can expand to its full potential, producing lofty height and an open crumb. Steam also gelatinizes the starches on the outside of the loaf, causing that glossy, shatter-y finish. While steam can technically be used in pan loaves, it's typically most important for hearth loaves (those baked freeform) since more of their crust is exposed and because they're characterized by being lofty and having a crisp crust.
Most professional bread ovens have a steam-injection function. During the first half of the baking process, a baker will fill the chamber with steam; then, during the last half of baking, the ovens vent the steam out so that the crusts can brown and firm up. A few home ovens do have steam functions — if you have one of these and you’re a bread baker, lucky you! But for the most part, home ovens — particularly gas ovens — are made to consistently vent out steam. This means that home bakers have to be strategic about steaming their bread, employing a number of tools, tricks, and techniques to ensure loaves get the steam they need for great crust and crumb.

With any method of steaming, you’ll want to vent the steam away from the loaf once it has achieved maximum oven spring and the crust has started to color — this dry finish allows the crust to firm up and become crisp and crunchy. If you’re using a trapped-steam method like a Dutch oven or a baking cloche, remove the cover about twenty minutes into the baking process. If you have introduced steam by putting a pan of water in the oven, remove it around the same point (after twenty minutes or so). If you’ve used a bug sprayer or spray bottle, all the steam is usually gone by halfway through the bake and you don’t need to do anything.
There are two main ways to steam bread: to capture the steam that a loaf generates on its own while baking, or to introduce steam through an outside source, such as adding boiling water. Here’s a breakdown:
Most hearth loaves are high hydration, meaning they are made with a higher water-to-flour ratio. This results in a dough that is moist and will release quite a lot of steam when placed in a hot oven. If you can trap the steam that the loaf itself generates, it’s enough to get maximum oven spring and a nice shiny, blistery surface. There are a few ways to do this.
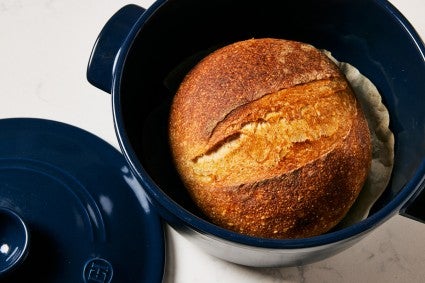
If you’ve baked sourdough hearth loaves (such as country bread), chances are you’ve encountered instructions that include baking in a Dutch oven. Dutch ovens are like their own little self-contained bread oven. They do a great job of trapping the steam generated by a loaf and creating even radiant heat.
There are two main types of Dutch ovens you can use: the classic and the Double Dutch. If you use the classic, you’ll lower your loaf into the deep body of the Dutch oven using parchment or a silicone liner, which you leave in during baking and then use to remove the loaf after baking. Place the lid on for the first half of the bake and remove it for the second half.
The lid of the Double Dutch oven is meant to be used as a skillet when it’s turned upside-down, so it doesn’t have a knob on top. This means that you can place your loaf in the shallower skillet-top of the oven, eliminating the tricky step of lowering the loaf into the hot, deeper body of the Dutch oven. You then place the body of the Dutch oven up-side down over your loaf, like a dome.
The one downside to steaming with a Dutch oven is that it only allows you to bake round loaves roughly the same size and shape as the Dutch oven you’re using. For loaves that are oval-shaped or other sizes, you’ll need a different method.

There are a variety of cloches made just for baking bread. They act on the same principle as the Dutch oven — offering a lidded container that traps steam — but are designed specifically for bread. They also come in various shapes and sizes, so you have more flexibility beyond just shaping a round boule. They can be enamel, silicone, or stoneware — the enamel ones are the best, as they trap both radiant heat and steam most efficiently.
If you have a covered baking dish such as a very large casserole dish, this could work too, as long as your loaf can fit comfortably inside it with room to expand.
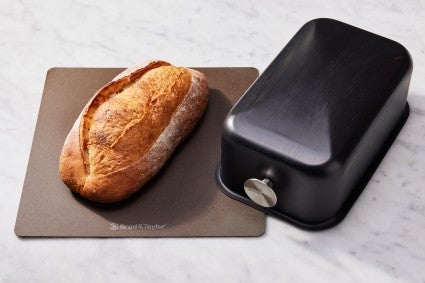
Instead of placing your loaf inside a container and sliding on a lid, you can reverse the setup and place a dome over your bread to capture steam. Any oven-proof vessel large enough to fit over your loaf (without touching the loaf itself) is fair game. I’ve used an aluminum roasting pan from the grocery store (with weights on it) to cover baguettes, for instance. This Baking Shell is designed explicitly for this purpose; it’s lightweight and shaped to fit perfectly over a large oval loaf (bâtard), trapping steam to promote maximum expansion and beautiful browning. With all of these tools, you’ll want to be sure that you’re baking on a solid, flat surface like a baking steel, stone, or sheet pan so that the steam doesn’t escape out the bottom.
In the following methods, you are introducing steam to the oven instead of trapping the steam from the loaf itself. This mimics the steam injection function on a professional bread oven. One of the biggest advantages to these methods is that you aren’t restricted to loaves that are the same shape and size as your baking vessel — these methods will allow you to bake longer oval loaves, baguettes, or even those cute turkey-shaped loaves for Thanksgiving.
A quick note on convection: If your oven has a convection function, you’ll want to make sure it’s off when you load the loaves, as it’s designed to make the oven heat drier. (This setting can be helpful to vent the steam and crisp the crust up at the end of baking, though.)
You can use a spray bottle or pump sprayer (like the bug sprayers available at the hardware store) to spray the bottom and sides of the oven just before and a few times after loading the bread in. This is a less effective method for a few reasons: The steam generated usually dissipates quickly and you lose heat by opening and closing the oven to spray. That said, it is very easy to do.
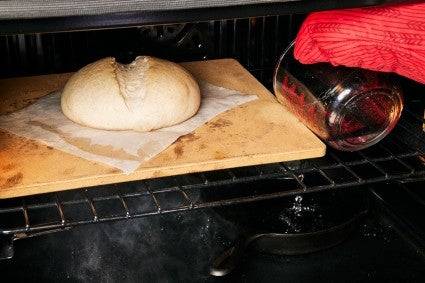
This is a common technique for home bakers. Preheat a deep, heavy-duty baking pan or cast iron skillet in the oven on the bottom rack and fill it with boiling water; some bakers like to add the water a few minutes before loading the loaves, while others do this while they're loading. Either way, your loaf goes directly onto the rack just above the pan. As the water hits the hot pan, it turns into steam. If there are a few inches of water in the pan, it won’t all boil away by the time you’re ready to remove the steam from the oven, but will keep continuous steam in the chamber as long as it’s in there. The biggest pitfall with this method is removing a pan of boiling water from the hot oven after the first twenty minutes of baking, but as long as your pan isn’t over-full and you have a steady hand, it’s a good way to keep a lot of steam in the oven.
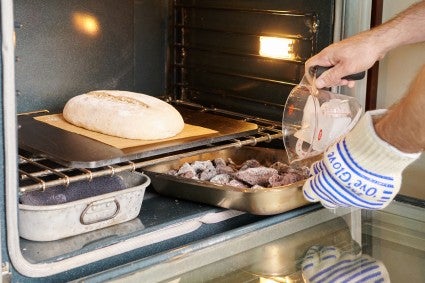
This is similar to the method above, but instead of just adding a pan of hot water, you’re also adding lava rocks to the pan. The lava rocks increase the surface area for water to evaporate, thus increasing the amount of steam. For this method, add lava rocks to the preheated pan before you add the boiling water. It’s a good idea to use an old cast iron skillet or an old roasting pan for this — the high heat combined with the lava rocks tends to warp the pan and deteriorate the surface. As with the pan method above, remove the pan with lava rocks about twenty minutes into baking.
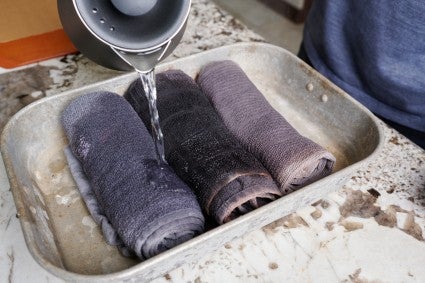
This method builds on the previous two — instead of just introducing an initial blast of steam at the beginning of baking, it ensures continual steam through the first twenty minutes of the bake. Once you have a pan in the oven preheating (either for just water or water and lava rocks) get another roasting pan. Roll up several kitchen towels (enough to fill the pan) and place in the roasting pan. Then soak the towels with boiling water, being sure to fully saturate them, and insert the pan into the oven next to the pan with water (and lava rocks, if using). This towel-filled pan will both increase the overall amount of steam and, notably, will keep producing steam steadily while you bake as the absorbed water inside the towels turns to steam. After about twenty minutes, remove both pans. See more on this method here: For better steam, bake your bread with towels.
Learn more tips for baking bread at home with these guides on How to Bake Bread and How to Bake Sourdough.
Cover photo by Rick Holbrook; food styling by Kaitlin Wayne.