Baking Tips & Techniques
Many bakers who are just getting started have questions about phrases commonly used in recipes. If you weren't lucky enough to grow up with Grandma in the kitchen, where these things were lovingly explained, you may have questions about what we mean when we say, "cream butter and sugar," "scrape down the bowl," or "cut fat into the flour mixture." Even if you're familiar with this baking vocabulary, it can be helpful to know why these techniques are important. What follows is a guide to common baking terms and phrases, arranged alphabetically, for bakers of all skill levels to use as a reference.
Adding eggs, one at a time
After creaming together butter and sugar, the next ingredient in many cookie recipes is eggs. They should be added one at a time, each one thoroughly beaten in before the next is added, to allow the creamed butter/sugar mixture to most effectively retain its trapped air. Be sure to scrape the sides of the bowl so all of the butter/sugar mixture is incorporated.
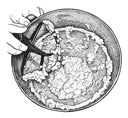
After adding the egg, the mixture in the bowl will look curdled and shiny.
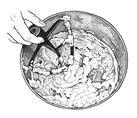
Keep mixing, and the mixture will smooth out.
Baking in batches
After you've removed a cookie sheet from the oven and transferred the baked cookies to a cooling rack, be sure the pan has cooled to room temperature before putting more cookie dough on it. Putting dough on hot pans will cause it to spread or lose its shape before it gets into the oven, increasing the risk of burned edges and flat cookies. If you want to continue scooping or shaping while your first pan of cookies is baking, go right ahead. Deposit the rest of the batter on sheets of parchment, then lift the parchment onto the cooled sheets when they're ready.
Beating egg whites
Beating egg whites properly is the key to creating certain extra-light cookies, such as meringues or ladyfingers. Three things to remember: the bowl and beaters must be clean and grease-free. Use a stainless steel, ceramic, or glass bowl, not plastic. Egg whites will whip higher if they're at room temperature before beating.
When beating egg whites, at first you'll have a puddle of clear liquid with some large bubbles in it.
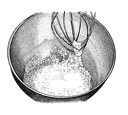
As you continue beating, the liquid will become opaque as it forms many more, smaller bubbles.
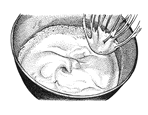
If a point forms and then falls over immediately, the egg whites are at a soft peak.
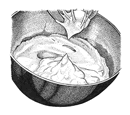
From here, 20 to 25 more strokes with a whisk will bring you to a medium peak, and another 15 to 20 strokes to stiff peaks.
It's extremely easy to go too far. When you start to see grainy white clumps, you're beyond stiff peaks, and every stroke of the whisk or beater is tearing apart the network of air, water and protein you've worked so hard to create. You'll also see a pool of clear liquid under the foam. The good news is that the foam still on top of the liquid will essentially still work. The bad news is that you can't really fix what's happened, other than to start over with new egg whites.
Boiling
When bringing liquid to a boil over a burner, the first sign of that impending boil is very small bubbles atop the liquid at the very edge of the pan; if you're heating milk, this is called scalding the milk. Next, bubbles will begin to rise from the interior of the pan, popping on the surface. These bubbles are small, and spaced apart; this is called a simmer. If directed by your recipe to simmer the liquid in the pan, adjust the heat so that these bubbles continue to form and break at intervals, not constantly. To bring liquid to a boil, keep heat high until so many bubbles are erupting across the surface that you can't distinguish one from another. This is called a full, or rolling, boil.
Chilling
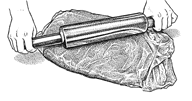
Place dough to be chilled inside a plastic bag, and flatten it a bit with a rolling pin. This will allow dough to chill quickly, and give you a head start on rolling it out later.
After mixing cookie dough, chilling firms up the fat and gives the flour time to absorb liquid evenly. This allows dough to roll out more evenly, without sticking as much, and to hold its shape while being cut and transferred to a baking sheet.
Cooling cookies
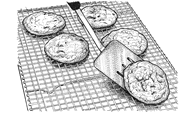 Use a spatula to transfer cookies to a cooling rack.
When baking drop cookies, especially if you like chewy ones, leave the cookies on the baking sheet for 5 minutes after you take the pan out of the oven. This gives the cookies a chance to firm up a bit before you slide a spatula underneath them. After 5 minutes, transfer the cookies to a cooling rack to finish cooling. We prefer a cooling rack that has a grid pattern with half-inch holes, to give fragile cookies better support while they're cooling.
Bar cookies should cool in their baking pans on a rack. Don't cut them while they're warm; you'll make bars with very ragged edges, and they're much more likely to fall apart when you're taking them out of the pan.
Batter cookies that need to be shaped after baking should be transferred while still warm to whatever shaping device you're using: a dowel, custard cup, cone, etc. Some cookies may be shaped while warm by simply rolling them into a tube shape around the handle of a wooden spoon.
Whatever type of cookies you're making, be sure they're entirely cool before you wrap them up to store. Wrapping a still-warm cookie will cause it to steam inside its container, which could yield soggy, stuck-together results.
Creaming
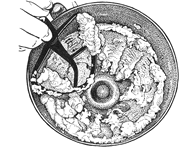
The fat and sugar mixture has a fluffy texture when creamed properly, as shown.
Creaming is responsible for creating the texture of a cookie, particularly crisp ones. It's the process that begins many cookie recipes; it's where sugar and fat are beaten together to form and capture air bubbles, bubbles that form when the edges of sugar crystals cut into fat molecules to make an air pocket. When you first start beating sugar and fat together, the mixture is thick and somewhat lumpy. As you continue to beat, the mixture becomes creamier in texture, more uniform, and lighter in color as air is beaten in.
Cutting in
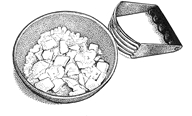
Flattened chunks of fat the size of your thumbnail will yield the flakiest results.
This technique combines fat and flour in a way that preserves shards of fat in the mixture. These shards create a flaky, tender texture in the baked cookie by getting between the layers of flour/liquid in the dough, and keeping them separate as they bake. Cutting in can be accomplished with a pastry fork, two knives, a pastry blender, or a food processor, pulsed gently.
Cutting into bars
Most bar cookies are baked in a square or rectangular pan. The simplest way to divide these cookies evenly is by cutting the sheet of baked dough in half, then cutting the halves in half again. When using uncoated metal pans, we've found a bench knife is a wonderful cutting implement for bar cookies. The handle on top allows you to cut right to the edge of the pan, a more awkward proposition when you're using a regular knife. For pans with non-stick coating, plastic cutting implements are a better choice. Or use your plastic bowl scraper.
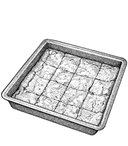
Bars in 9 x 9-inch pans are cut four across and four down to yield 16 squares.
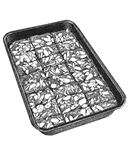
Bars in 7 x 11-inch pans are cut three down and eight across to yield 24 rectangles.
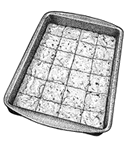
Bars in 9 x 13-inch pans are cut four down and six across, to yield 24 squares.
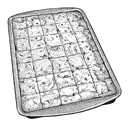
A 10 x 15-inch jellyroll pan yields 35 squares, when cut five down and seven across.
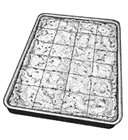
Bars baked in 13 x 18-inch (half-sheet) pans can be cut four down and six across, to yield 24 large squares; or eight down by six across to make 48 rectangles. For small squares, cut eight down and 12 across, for a total of 96 squares.
Docking
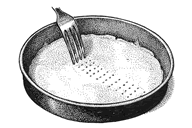 Vent holes for steam can be made with a fork or a dough docker.
Pricking holes in a short dough (one that's high in fat, and has a flaky or crisp texture after baking, such as shortbread or the crust of some bar cookies), helps to vent the steam created in the oven while baking. You can use a fork or a dough docker to prick small holes all over the surface of the dough. By venting the steam, docking keeps the dough from billowing or heaving as it bakes. It's an important step for crisp cookies or that are baked all in a single sheet and not cut up until they come out of the oven.
Doneness
How do you know when your drop or shaped cookies are done? Cookies will continue to set from the heat of the pan after being removed from the oven, so how do you know when to take them out? Open the oven door, and insert the edge of a turner or spatula under the edge of one cookie. Lift gently. If the cookie stays flat across the bottom, and doesn't bend or break in the middle, it's ready to come out of the oven.
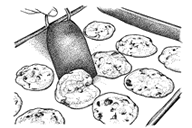
This cookie doesn't hold together when lifted off the baking sheet, a sign that it needs more baking time.
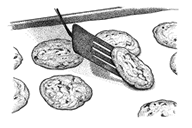
This cookie holds its shape when lifted off the baking sheet. It's ready to come out of the oven.
When ready to take out of the oven, bar cookies will pull away from the edge of the pan just slightly, and batter cookies will be golden brown at their edges. Filling cookies: Soft fillings, such as marshmallow or sandwich cookie fillings, can be scooped onto the flat side of a cookie with a teaspoon-sized cookie scoop. Firmer fillings can be spread with an offset spatula or a table knife.
"Drop the dough by the tablespoonful": A typical drop cookie recipe directs you to drop the dough by either the teaspoonful, or the tablespoonful, onto prepared baking sheets. What does this really mean? Do you have to measure out an exact teaspoon or tablespoon of dough?
No. These measurements are idiomatic, and date back to the time bakers used a soup spoon (tablespoon) or regular spoon (teaspoon) to scoop out and deposit their cookie dough. In order to make cookies the same size as the original recipes intended, the modern baker can rely on a cookie scoop. The tablespoon cookie scoop, which mimics the original soup spoon, holds a level, scant 2 tablespoons (5 teaspoons) of dough; the teaspoon scoop holds a level 2 teaspoons of dough. So, when the recipes in this book call for"dropping dough by the tablespoonful," it's expected you'll make a ball of dough, either with a cookie scoop or a spoon, that's measures about 2 tablespoons (about the size of a table tennis ball). To"drop dough by the teaspoonful," make a ball of dough that measures about 2 teaspoons (about the size of a small chestnut). This will yield the size cookies, and thus the yield, the recipe intends.
Filling a pastry bag
Most people wish they had three hands when it comes to filling a pastry bag! Here are some hints to make it easier:
A tall, narrow container with a heavy base is a great holder to steady and support the bag as you fill it, so your hands are free to put frosting or batter into the bag.
Be sure to fill the bag no more than three-quarters full. Overfilling the bag makes it hard to close and hard to control. It should fit comfortably in your hands.
A twist tie is a big help to keep the top of the bag closed, so icing doesn't back up onto your hand when you squeeze the bag.
Folding
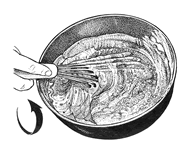 Sifted dry ingredients are being folded into beaten egg whites with a whisk. Draw the whisk down through the bowl and back up in a circular motion.
Ingredients with air beaten in, such as beaten egg whites or whipped cream, are combined with the rest of a recipe's ingredients in a way that preserves as much of the air bubbles as possible. We like to use a whisk for this, because the many wires of the whisk combine the two mixtures effectively in just a few strokes. This results in a light texture in the finished product.
Freezing cookie dough
This is one of our favorite little hints: Cookie dough can be made in advance of baking and frozen for up to three months. An effective way to do this is to form it into logs for slice-and-bake cookies. Form the dough into a log with the help of parchment or waxed paper, and store the logs in a large zip-top plastic bag before freezing. Don't thaw the cookie dough before baking, simply use a bench knife or sharp knife to cut as few or as many as you like, place them on a greased or parchment-lined baking sheet, and let them thaw while the oven is heating.

Rolled cookie dough keeps well when stored inside a zip-top freezer bag. Use a drinking straw to suck the air out of the bag before closing.
You can scoop drop cookies and freeze them on a baking sheet; ditto cookies you roll into balls before baking. Once the cookies are frozen, they can be dropped into a zip-top storage bag and put back in the freezer. Take as few or as many as you like out of the freezer and let them thaw while your oven heats. This is a nice way to have more than one type of cookie on hand whenever you'd like a warm treat from the oven.
Greasing a pan
Preparing your baking pan properly before filling it can save a lot of heartbreak (and cookie-break). We recommend using a non-stick pan spray, for quick, effective coverage, but a thin coat of vegetable shortening also does the trick.
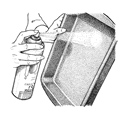
When using pan spray, hold the can upright and the pan perpendicular to it; you'll get more even coverage that way, and less sputtering from the can.
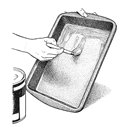
When using shortening, spread evenly with a pastry brush or a piece of waxed paper.
Leveling (smoothing) the crust
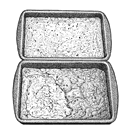
When baking layered or bar cookies, having the crust, filling, or batter level before the pan goes into the oven is very important. Uneven batter will bake unevenly; one section may be burned, while the other is underdone.
Lining a pan
This is by far our favorite technique for cookie baking. Parchment paper is coated with silicone, so cookies don't stick to it; it can be reused again and again. Simply line the pan with parchment that stretches as far to the edge of the pan as possible.
Silicone mats are another popular option. They're more durable than parchment, and can be used thousands of times. Be careful not to cut anything on a silicone baking mat, as the mat can be damaged. For baking cookies, a thin silicone mat is preferable to a thick mat (often sold as a "kneading mat").
Melting chocolate
Chocolate scorches easily, and can seize (become hard and unmixable) if it comes in contact with water when melting. We recommend melting chocolate at medium power in the microwave, in a heatproof container. One cup of chocolate chips melted at half power should be heated for 1 1/2 to 2 minutes, depending on the power of your microwave. Chocolate can also be melted at low heat over a burner, in a double boiler set over simmering water, tightly covered so steam doesn't come in contact with it.
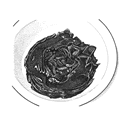
It's preferable to melt the chocolate three-fourths of the way, and allow carryover heat to finish the melting process while you stir the chocolate to smooth it out.
Piping
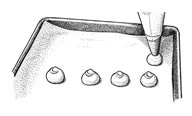
Squeeze from the top of the bag toward the tip as you go, gathering the slack in the palm of your hand to maintain pressure.
Piping is a basic technique that can add a lot of polish to the look of your baked goods. See Filling a pastry bag, above, for hints on getting set up. Remember to use a twist tie to close the top of the pastry bag, to keep its contents from backing up over your hand as you squeeze. Stop squeezing before lifting the bag as you pipe, to have a cleaner separation point.
Rolling out
This process involves flattening chilled dough with a rolling pin to an even thickness, to be cut into shapes before baking. Dusting the work surface and your rolling pin with flour is an important first step. It's a good idea to have a large, thin spatula, and a ruler or tape measure on hand before you begin. The spatula helps you pick up the dough frequently, to keep it from sticking, and the measuring tools help you keep track of the dough's dimensions and thickness as you work. Roll from the center of the dough to the edges, not back and forth, which tends to toughen the dough's gluten. If the dough is soft or sticky, it's helpful to place a layer of plastic wrap between the dough and your rolling pin, and to place the dough on parchment before rolling.
Rolling into a ball
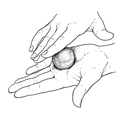
After scooping dough, roll it between your hands to finish rounding it.
Some cookies, like snickerdoodles, are shaped into balls before being rolled in sugar to coat them evenly. This process is made easier with a cookie scoop, which portions roughly spherical amounts to start with.
Separating eggs
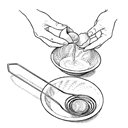
Crack the shell, and use it to pass the yolk from one side to the other as the white drips down. If you're worried about food safety, wash the egg in warm water before cracking it.
Eggs are easier to separate when cold. If you need help separating eggs, try one of the many types of egg separators you'll find in any kitchen store.
Scooping cookie dough
There are two widely used methods to do this: using two spoons, or with a cookie scoop (also known as a disher). The cookie scoop results are more consistent, and it's a quicker way to get the job done.
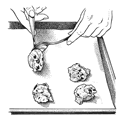
Fill a spoon halfway with a stiff dough or icing. Using another spoon of the same size, scrape the dough off the first spoon onto the baking sheet.
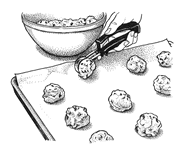
Scoop the dough against the side of the bowl, using the lip of the bowl to level off the bottom, then squeeze the scoop's handle to release the dough onto a baking sheet. When dough begins to stick in the scoop, rinse scoop with warm water.
Scraping the bowl
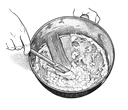
Recipes that combine creamed fat and liquids can be difficult to mix thoroughly, because the butter/sugar mixture sticks to the sides of the bowl. The only sure remedy for this is to stop mixing partway through and scrape the sides and bottom of the mixing bowl with a spatula.
Shaping batter cookies
When batter cookies are still warm, they can be shaped into several kinds of shapes, using any number of kitchen items. Tuiles can be draped over the handle of a rolling pin, or over the back of a custard cup to make a small, edible bowl to hold ice cream, pudding, or berries. Krumkake are traditionally rolled around a cannoli form (a hollow tube), and lace cookies wrap nicely around the handle of a wooden spoon.
Shipping cookies
There are two types of cookies that ship well: bar cookies and crisp cookies. Bar cookies are fairly moist; they can be cut into convenient squares or rectangles; and they stay fresh longer than other types of cookies, so long as they're wrapped well. Crisp cookies have a low water content, and should be well-wrapped to keep them from absorbing moisture. Here are some hints for sending your creations to someone you care about:
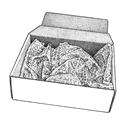
Choose a sturdy corrugated box or large tin to ship your cookies, and line the bottom with soft, food-safe packing material, such as plastic bubble wrap or unbuttered popped popcorn.
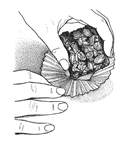
Small paper baking cups are an attractive way to package individual cookies. They also protect the cookies from damaging into each other.
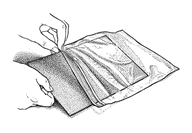
Place heavy cardboard in the bottom of a zip-top freezer bag.
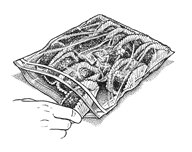
Place bagged cookies in a single layer, covering the bottom of the box completely. The more snugly the cookies fit, the less they'll shift as they travel.
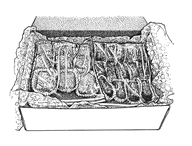
Cushion each layer of cookies with a layer of bubble wrap or other packing material, such as unbuttered popped corn.
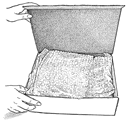
Fill the remaining space in the box with more packing material, to ensure a snug fit.
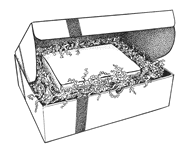
Place this box inside a larger box, with packing material all around it.

Close the box, seal, label, and ship.
Slice and bake
Shaped cookie doughs are frequently rolled into a log shape, and sliced before baking. Any sturdy drop cookie batter can be treated the same way; thick slices of dough will make a chewier cookie, and thin slices will create crisper ones.
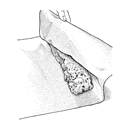
Spoon drop cookie dough in a log in the center of a piece of parchment.
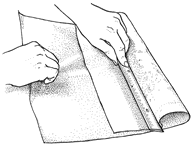
Take a straight edge and place it on the top piece of parchment, as shown. Hold the edge in place as you pull the bottom edge of the parchment toward you. This will cause the dough to form a smooth, round shape. To keep cookies round as you slice them, roll the log away from you as your knife goes through it.
Sifting flour
Sifted flour has been passed through a strainer or screen to aerate it, sometimes in concert with other dry ingredients. Sifted flour is usually folded in with wet ingredients, in recipes where the desired result is a light, spongy texture.
Storing cookies
The first thing to keep in mind when storing cookies is that they need to be completely cool before you put them away, otherwise they'll steam, soften up, and stick to each other. Cookies can usually be stored at room temperature, in airtight containers, for up to a week. Appropriate containers can be cookie jars or tins, screw top plastic jars or snap-top plastic boxes, or a tightly closed plastic bags. Bar cookies with lots of fruit or dairy ingredients should be refrigerated, well-wrapped. If you plan to store cookies for more than a week, we advise wrapping them so air can't get to them, and freezing for up to 3 months.
Straining unsweetened cocoa
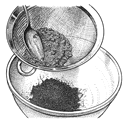
Push the cocoa powder through a strainer, after measuring it and before adding it to your recipe.
Unsweetened cocoa contains cocoa butter, which can cause it to clump. To make sure it combines evenly with the rest of the dry ingredients in your recipe, it's best to strain it.
Stir
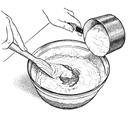
Whisk together the dry ingredients, then add them to the wet ones, stirring until the mixture is evenly combined.
Many cookie doughs and batters need no more than a bowl and spoon to prepare.
Sugar syrups
Several recipes on our site call for sugar syrups to be cooked to a specific temperature in order to make marshmallows, meringues, or caramels.
When sugar and water are combined and cooked, the water evaporates as the mixture boils. This concentrates the sugar in the solution, and allows the temperature of the syrup to climb. By stopping the cooking process at different points along the way, sugar will behave differently. These stages can be identified with a candy thermometer, or by certain physical characteristics.
The chart below shows some of the most commonly called for stages of cooking sugar, what they're used for, and how the sugar behaves at each temperature.
| Temperature | Physical properties | Used for |
|---|---|---|
| 235-240°F - Soft ball | When 1/4 teaspoon of the sugar syrup is dropped into a dish of cold water, it can be shaped into a pliable ball. | Fudge, pralines, seven-minute frosting, classic buttercream frosting, and Italian meringues. |
| 245-250°F - Firm ball | When 1/4 teaspoon of hot syrup is dropped into a dish of cold water, it will form a firm ball that doesn't flatten when removed from the water, but will compress when squeezed. | Soft caramels |
| 250-265°F - Hard ball | Hot syrup will form thick threads when dripped from a spoon. | Marshmallows, divinity, rock candy, nougat |
| 270-290°F - Soft crack | Hot syrup dropped into ice water can be separated into hard threads. When taken out of water, they'll bend slightly before breaking. | Taffy |
| 300-310°F - Hard crack | Hot syrup dropped into ice water separates into hard, brittle threads that break without bending. | Toffee, nut brittles, stained glass cookie filling or lollipops |
| 338°F - Caramelized | 1/4 teaspoon of hot caramel will make a brittle ball in cold water. The clear syrup begins to turn brown, and more complex flavor compounds begin to form. The sugar gets less sweet as it continues to cook. | Hard caramels |
Toasting nuts
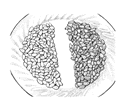
On the left, untoasted pine nuts. On the right, toasted pine nuts.
Nuts will take on a deeper color when toasted.
Toasting nuts enhances their flavor. Since nuts are high in fat, they can scorch easily. Always toast nuts in a shallow container in a single layer. A low to moderate oven (300-325°F) is best. The nuts are done when you can smell their aroma and they've become golden brown. Remove them from the oven when their color is just a shade lighter than what you're looking for, as they'll continue to cook a bit as they cool. Once the nuts are done, remove them from the oven and transfer them to a cool surface immediately, to minimize this carry-over cooking. If you're toasting sweetened coconut, remove it from the oven and stir it on the baking pan every five minutes to ensure even browning.

