Oh happy day, oh happy day! The first fruits of summer are starting to appear and it's time to start the feast.
While fresh berries, warm from the sun, are a perfect breakfast or snack, to me they need a little bit more to elevate them to dessert status. A scoop of ice cream is good; fresh whipped cream is better.
But how about when you need a knock-their-socks-off showcase dessert for graduation, a bridal or baby shower, or 4th of July celebration?
Consider pavlova.
Pavlova is a perfect warm-weather treat because it's light and airy, doesn't heat up the kitchen, and uses sweet juicy fruit, instead of heavy chocolate or caramel.
What is pavlova? Essentially, it's baked meringue topped with fresh whipped cream and fruit. It doesn't get much easier than that. The dessert was created for and named after Russian ballet dancer Anna Pavlova, who wanted a dessert that was as light and graceful as she was.
Pavlova hails from New Zealand, where Kiwi refers both to the people, and the bird that's their national symbol; and kiwifruit is known as Chinese gooseberry. Many pavlova are served with fresh kiwifruit on top, its bright green color sparkling like a gem in the cream.
Meringue in general is best made on dry days. Humidity can cause weeping in meringue, and a soggy meringue is no fun. You can also whip this dessert up right before bedtime, as it only bakes for an hour at 200°F and then sits in the oven overnight. You won't heat up the kitchen, and it'll be cool when you get up. It's almost like having magical elves making the meringue while you sleep.
Eating pavlova is a bit magical, as well. The crisp shell crumbles just a bit as you cut through the layers. You get a bit of sweet crunch followed by the cool melting sensation of the sugar on your tongue. A burst of berries followed by sweet cream will make you want to get up on your toes and pirouette across the room. Of course if you do, please send us the video!
Come on Twinkletoes, let's make Pavlova.
First, preheat the oven to 200° F. Prepare a piece of parchment paper by tracing the outside of a 9" round pan or other large circle.
Be sure to flip the parchment paper pencil-side down, so that your meringue will stay clean and safe.

Now that the parchment is prepared, let's talk sugar.
On the left, you see regular table sugar, on the right Baker's superfine sugar. Normally we think of granulated sugar as very tiny grains, but compared to superfine sugar, granulated looks enormous. In a cookie or brownie, the difference would never be noticed, as the sugar is dissolved and blended into the batter. In meringue, though, the size of the sugar grain can make a huge difference.
If you only have regular granulated sugar in the house, grind it in your food processor or blender to break it down into finer crystals. Work with more than you need for the recipe, at least 2 cups. It's easier to grind a larger amount than a smaller amount. Just use the extra in any recipe as you would regular granulated sugar.

Beat 3 large egg whites with a pinch of salt on medium-high speed until soft peaks form. You want to use medium-high rather than high speed at this stage, to form slightly smaller bubbles for a finer-textured foam.

With the machine still running, slowly pour in 1 cup (198g) superfine sugar mixed with 1 tablespoon cornstarch. Aim for the sweet spot between the whisk and the side of the bowl to reduce the amount of sugar that's spun off to the side. Once the sugar is all in, blend in 1 teaspoon lemon juice by hand.

The meringue will be thick, fluffy, and glossy, but won't hold a stiff peak.

Rub a bit of the meringue between your fingers. You should feel no grittiness from the sugar.

So, let's say you used regular table sugar in your meringue. At this stage, you'd still be seeing grains of sugar in your meringue. It's worth the extra effort to grind your sugar finely, or use superfine.

Can you use confectioners' sugar? Yes, you can. You need to increase the amount to 1 1/2 cups, and eliminate the cornstarch from the recipe, as it's already an ingredient in most commercial confectioners' sugars. Check the label to be sure.
Be absolutely sure to sift your confectioners' sugar before adding to the egg whites. Little clumps won't always beat out of the meringue.

Let's get back to our meringue. Place your pencil-side down parchment on a half sheet baking pan and spoon a large dollop of meringue in the center. Save about 1 1/4 cup of meringue in the bowl for later.

Use an offset or flat spatula to spread the meringue into an even layer over the entire circle.

Don't worry about a perfectly flat disc. It's a nearly impossible goal, and the swirls add character and make the meringue look cloud-like.

Spoon the reserved 1 1/4 cups meringue into a piping bag and snip a wide hole. Pipe a rim around the entire disc. You should have enough for 2 rounds.

Smooth the ring to the base with your spatula. This will bake up to a nice edge to hold in your cream and fruit.

Place the pan in the 200°F oven and bake for 1 hour. The meringue will billow up beautifully. Don't worry about cracks; they're normal.
At the end of the hour, turn off the heat and leave the pavlova inside the oven to cool for at least another hour, or up to overnight. This helps the last bits of moisture wick away, and leaves your meringue very light and crisp.
The pavlova will color slightly, going from pure white to light beige.

If you'd like to do individual pavlovas, just trace smaller circles on your parchment. The yield you get from one batch will depend on how large you make your pavlovas.

When making smaller discs, it's easier to pipe your meringue onto your circles. A disposable piping bag or even a zip-top bag with a corner cut off makes this a snap to do.

Use a spoon to form a slight depression in the meringue instead of piping an extra ring. You can also leave the smaller pavlova flat.

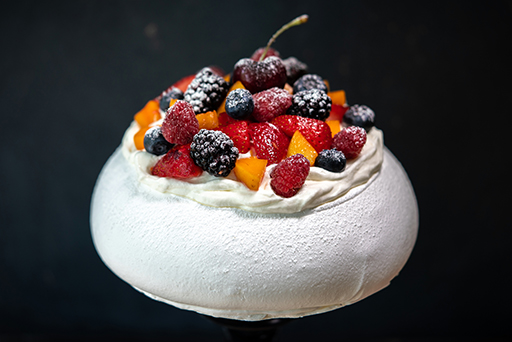
While I was piping away Sue Gray, our test kitchen leader and baker extraordinaire, told me about a friend of hers in New Zealand who said that the traditional Kiwi shape for pavlova is a soft mound, as opposed to the American flat style. This keeps the outside crisp but the inside very soft, fluffy, and moist. There was just enough meringue left over from my last batch to make a small 6" mound, so into the oven it went.

Here's the finished large pavlova. You can see it cracked a wee bit too much. Unfortunately my oven fluctuated during the bake, so it was at nearly 300°F for awhile. Fortunately, it will still taste amazing!
Did I mention that this is a light dessert, and that I mean that literally? I weighed the empty shell, and it clocked in at 7 1/4 ounces. Now that's light!

To fill the pavlova, whip up some sweetened whipped cream and mound it in the center of the disc. It should fill the center and slightly over the inner edge of the ring, but should not overflow onto the sides. About 1 1/2 cups (340g) of heavy cream should do it.

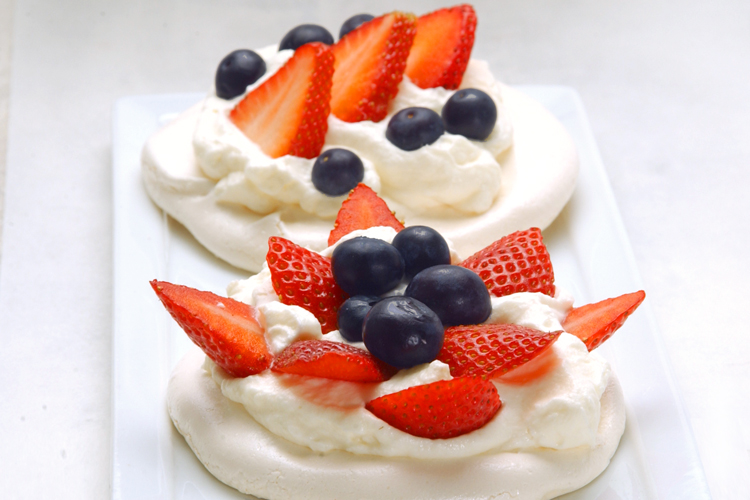
You can toss your fresh fruits together and pile that on the cream, or you can arrange patterns. With July 4 around the corner, I chose red and blue berries.
A couple of rounds of berry slices...

And some plump blueberries make for a pretty presentation.

If you chose the traditional mounded pavlova, place it in the center of the serving plate.

Cover the outside of the mound with the whipped cream all the way down to the plate.

Arrange your fruits over the entire mound. I really like the height on this style of pavlova.

Inside, you can see that the top 1/2" of the meringue is crisp, while the center is set but still soft and creamy. It was like eating sweet air that just collapsed in your mouth.
Whatever shape, style, or size pavlova you choose, it will make a stunning presentation at your next party or picnic. Your guests, including vegetarians and those eating gluten-free, will delight in this cloud of crisp, creamy, colorful goodness.
Please bake, rate, and review our recipe for Pavlova.