There’s nothing better than making cinnamon rolls at home, and soaking up the heavenly smell that wafts from the oven. The sweet scent of cinnamon, butter, and sugar promises it’s going to be an extraordinary day. But the look of cinnamon rolls isn't always as enticing — they're usually just straightforward swirls.
Not anymore!
Whether you've never tried making cinnamon rolls or you’re a seasoned pro, there are a few simple shaping techniques that truly make this classic breakfast treat worth jumping out of bed for in the morning.
The magic of homemade cinnamon rolls starts with the right recipe. When I’m making cinnamon rolls, I use our Big-Batch Frosted Cinnamon Rolls recipe so there’ll be more than enough to bake and share.
Plus, with so much dough, you have options! You can shape the dough the traditional way, making classic spiraled buns. Or if you’re looking to try something new and whimsical, you have the freedom to try another shaping technique to make your breakfast treats extra-special.
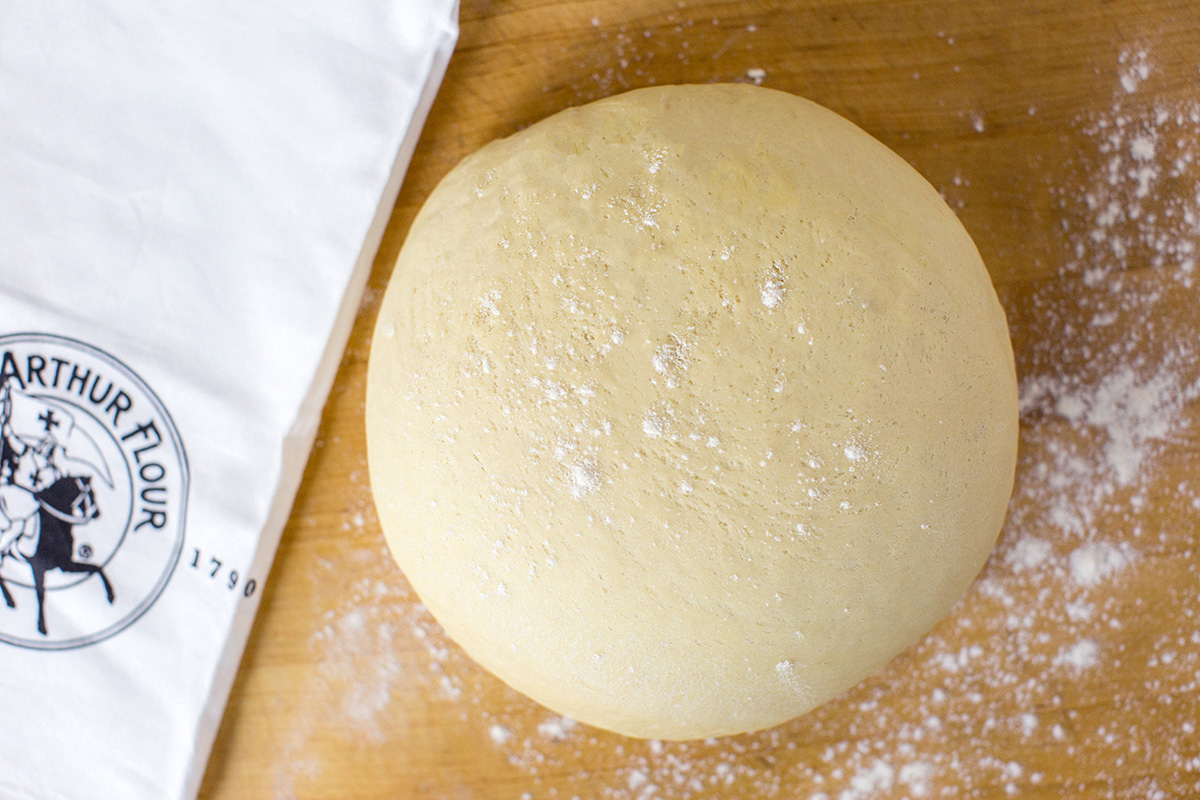
Whether you’re making our Big-Batch Frosted Cinnamon Rolls or using your favorite recipe, prepare the dough through kneading. Let the dough rise once as instructed. It should become visibly expanded and puffy.
Then it’s time to turn the dough out of the bowl and deflate it gently.
Now comes time to decide how you’re going to shape your cinnamon rolls — perhaps the standard spiral is calling your name. Or if you’re looking for something unique and elegant, we also have four additional techniques for you to try.

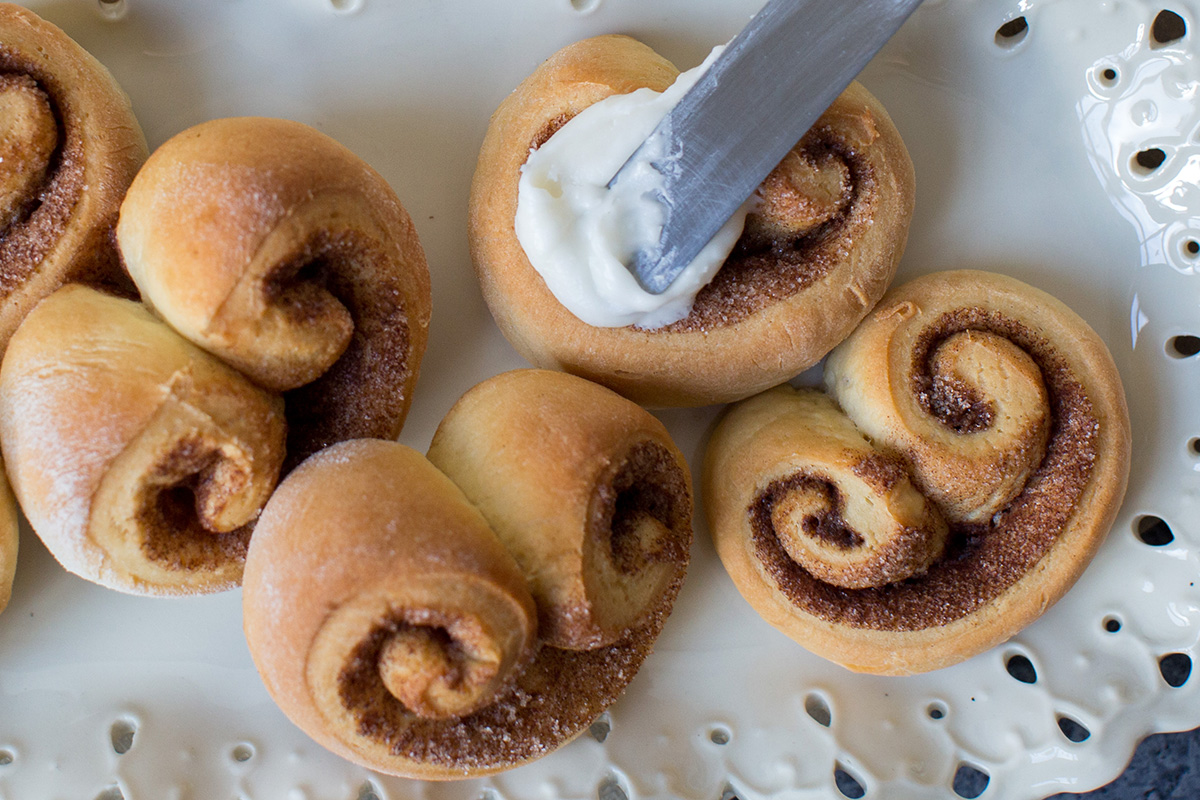
Before we get fancy with our shaping, let’s make sure we master the traditional spiraled bun. Start by rolling your dough into a rectangle about 1/4" thick. Don't worry about exact dimensions — it's more important that the dough is the right thickness.
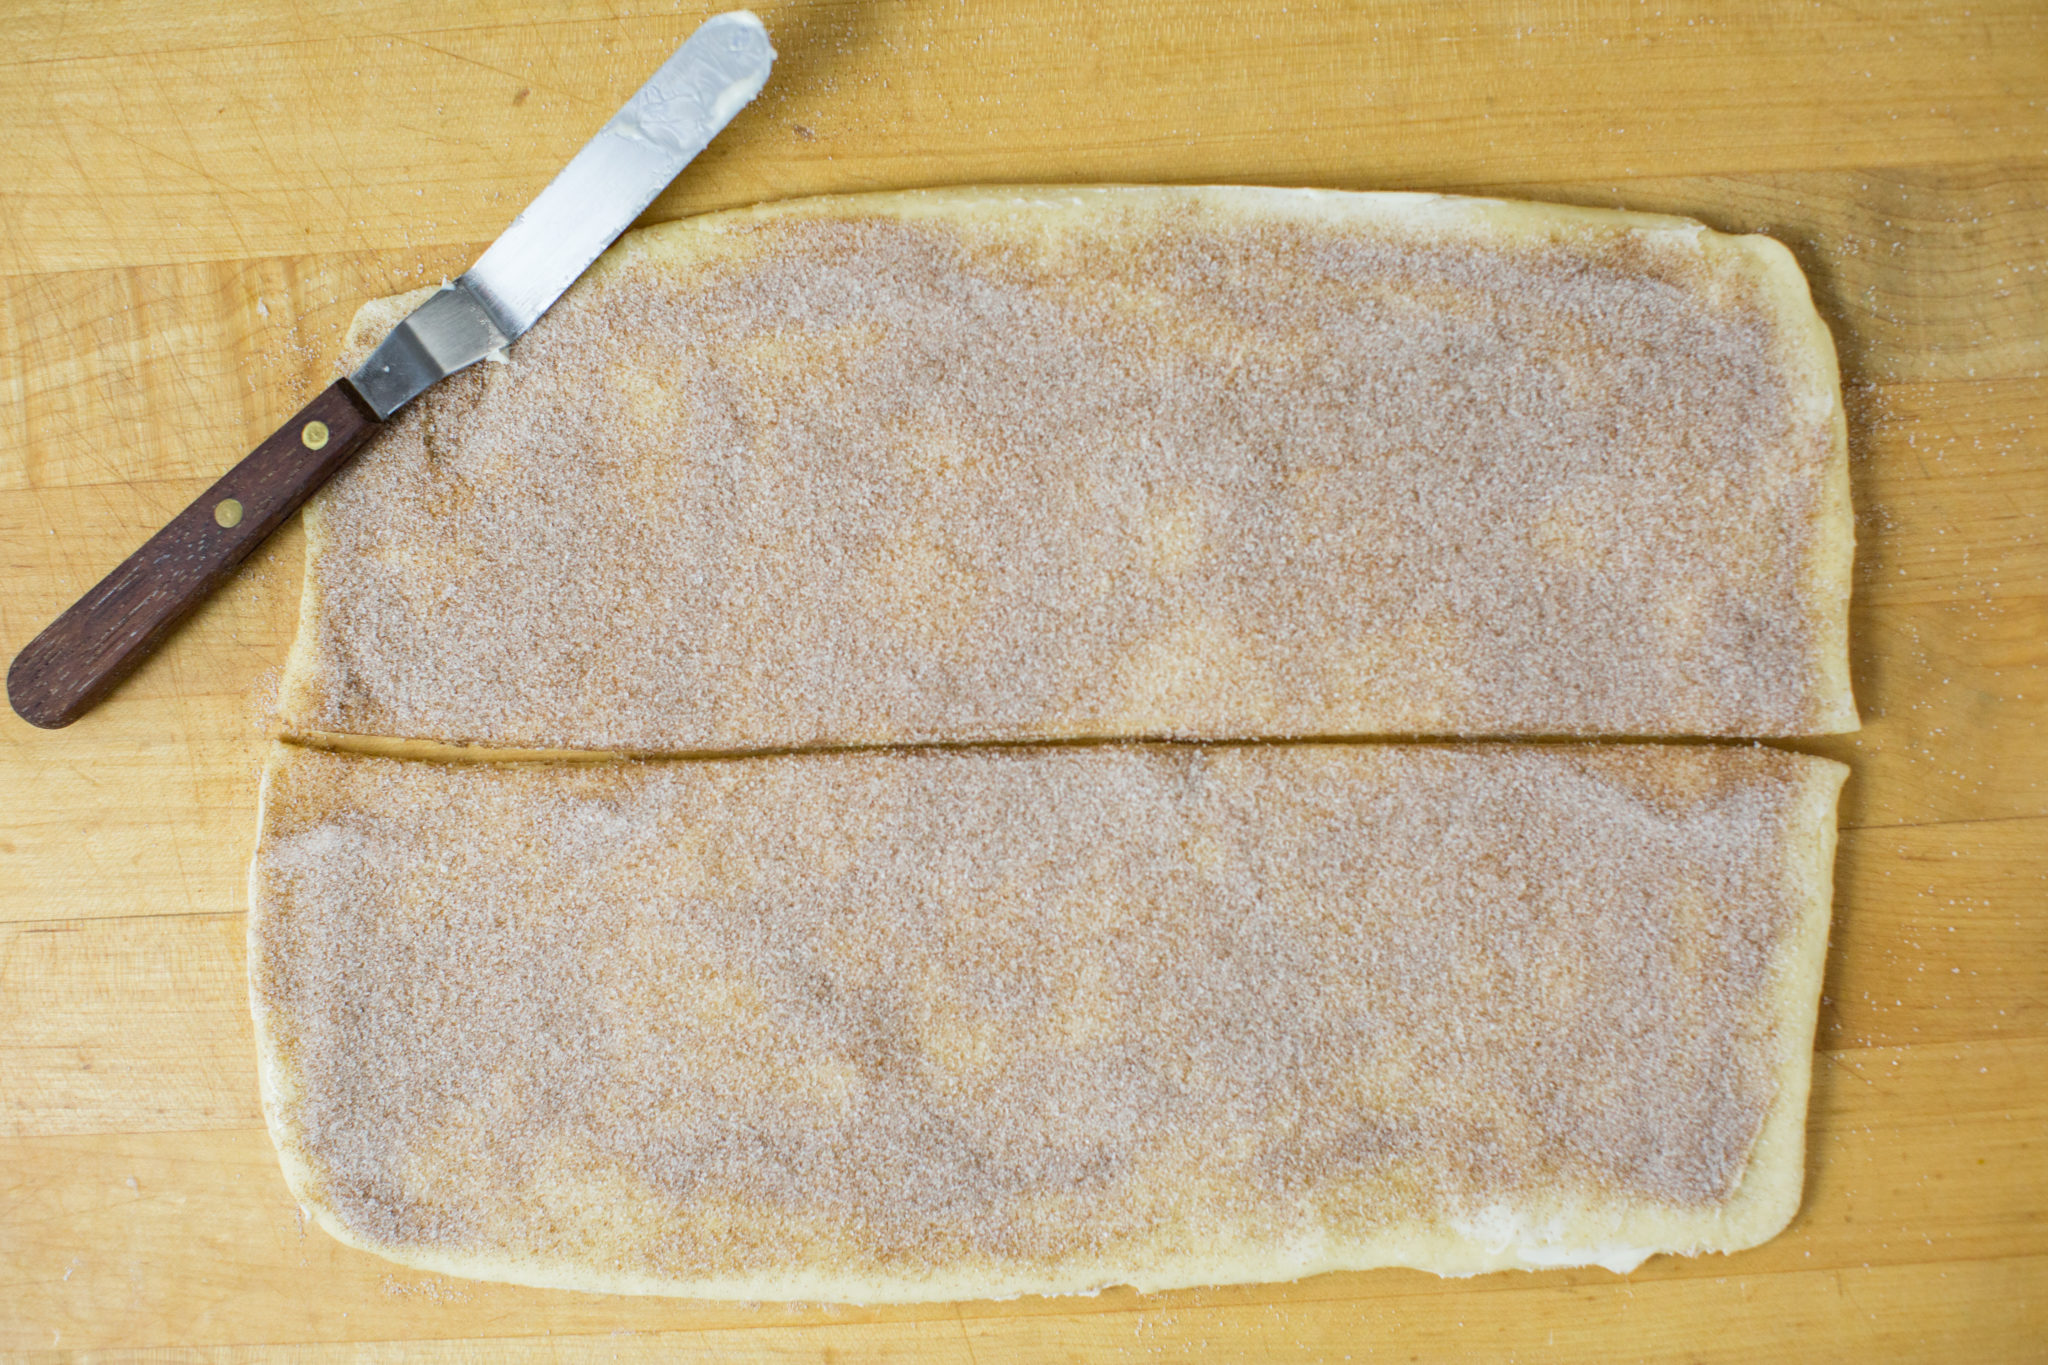
Next, spread soft butter over the dough (if your recipe calls for this step). Then sprinkle cinnamon filling evenly on top, leaving a 1/2” border exposed along one of the long edges.
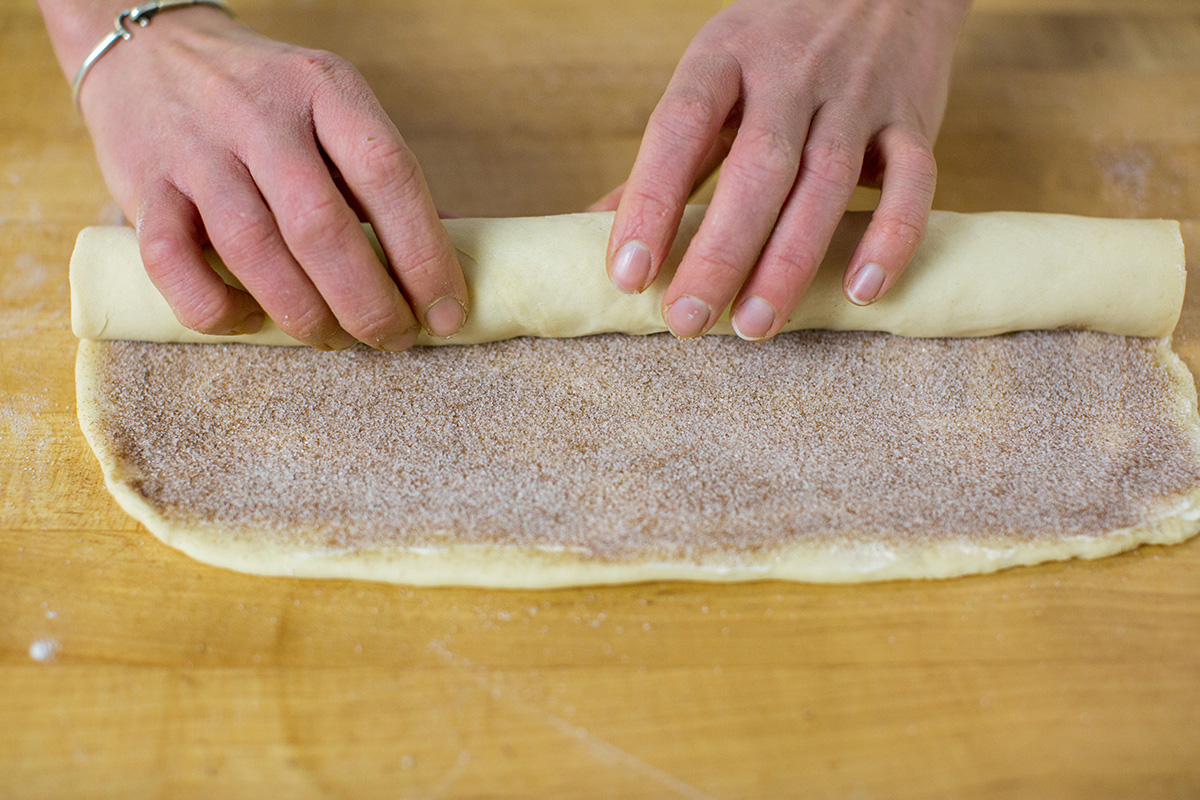
Then roll the dough into a log, starting with the long edge that’s covered with filling. Roll the dough somewhat tightly so the spiral is nicely defined — but not so tightly that the center of the rolls pop up during baking. A snug roll is what you’re aiming for.
Once the log is rolled up, slice evenly into rounds. (See our post featuring a simple trick for cinnamon buns to learn how to slice your rolls perfectly.)
Thicker slices will give you fewer, taller cinnamon rolls that require a bit more time in the oven. Or you can slice the rolls a bit thinner (about 1" thick) to make shorter rolls. You'll end up with a higher yield if you slice them thinly — choose what works for you.
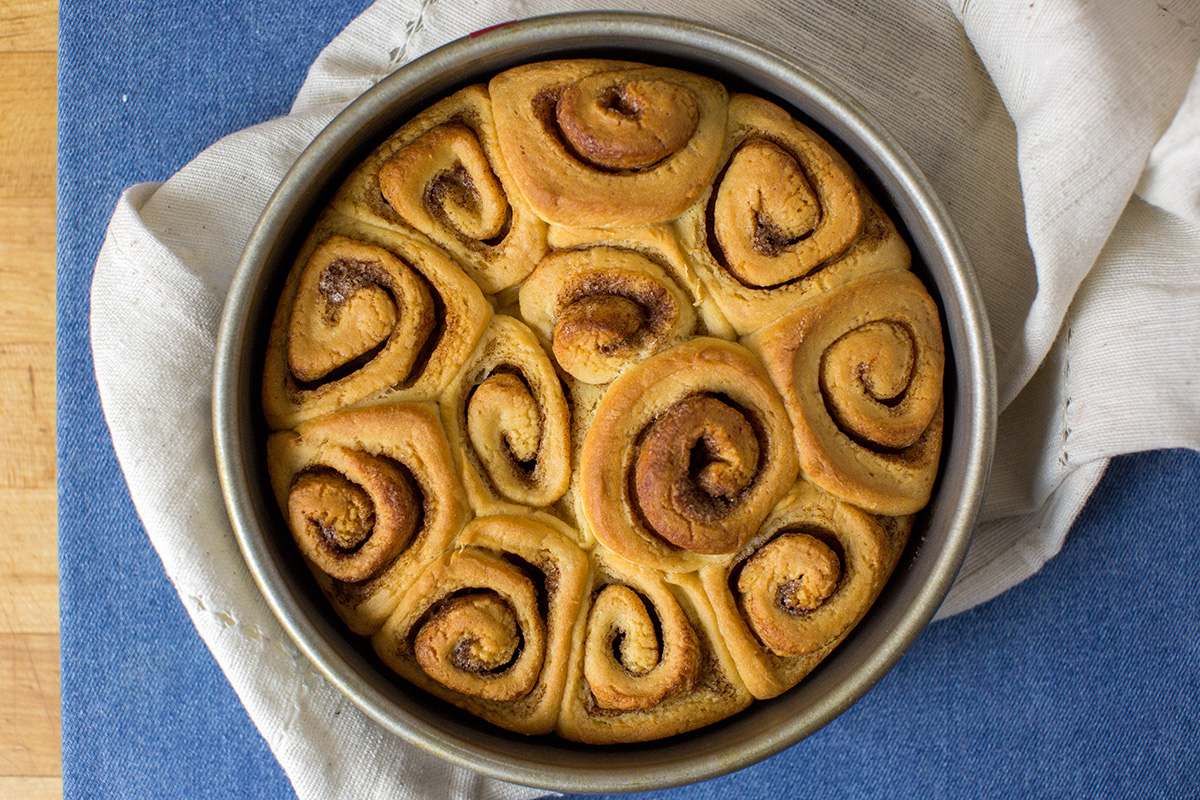
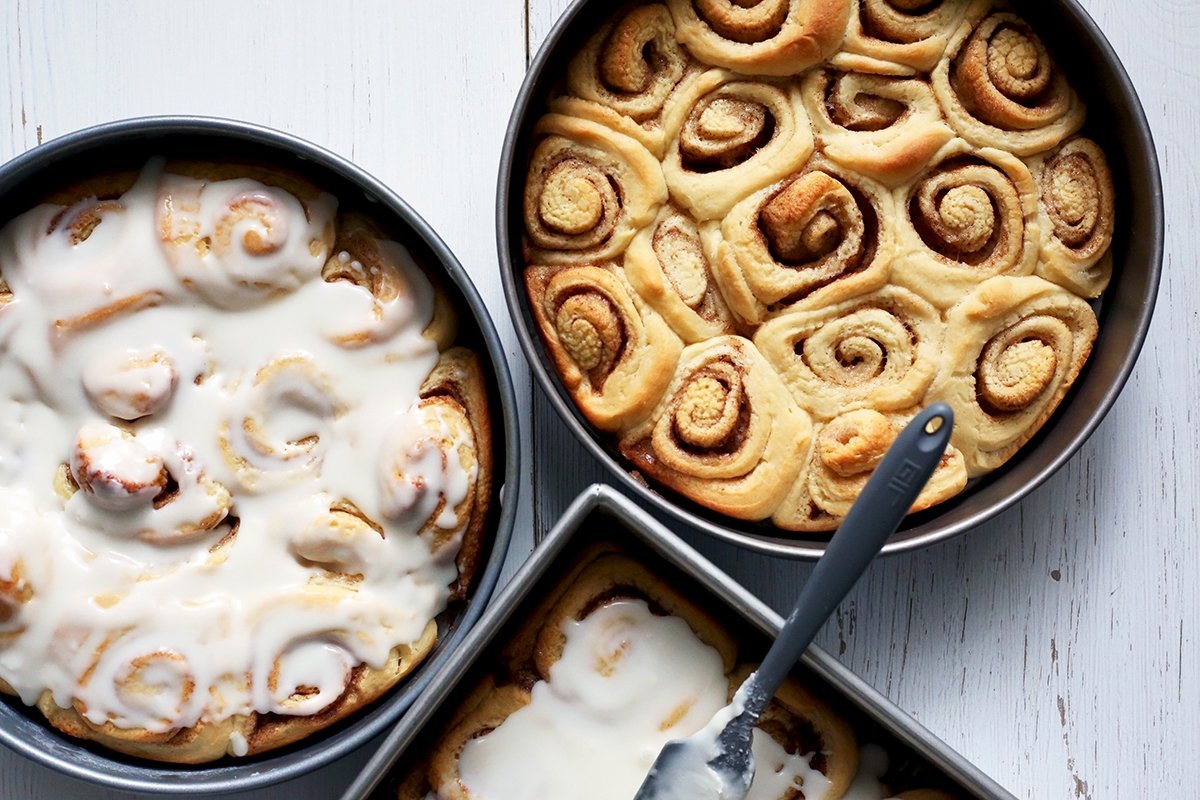
Place the sliced rolls onto a baking sheet or into a pan as the recipe directs. Nestling the rolls somewhat close together will result in tear-and-share style cinnamon rolls. Use this approach if you want the sides of the rolls to be tender and soft after baking.
Bake the cinnamon rolls using the temperature and time provided in the recipe. The rolls should be golden brown, and your kitchen should smell like pure heaven when they're done.
The final result is simple but timeless: a perfect cinnamon roll spiral!
If you like the look of spiraled cinnamon rolls but want to take it one step further, a double spiral is for you.
Start with your dough rolled into a 1/4”-thick rectangle with the filling spread evenly over the top. Spread the filling all the way to the edges for this shaping method.
Working from the long edge closest to you, roll the dough towards the center. Remember to roll the log somewhat tightly so the spiral is snug.
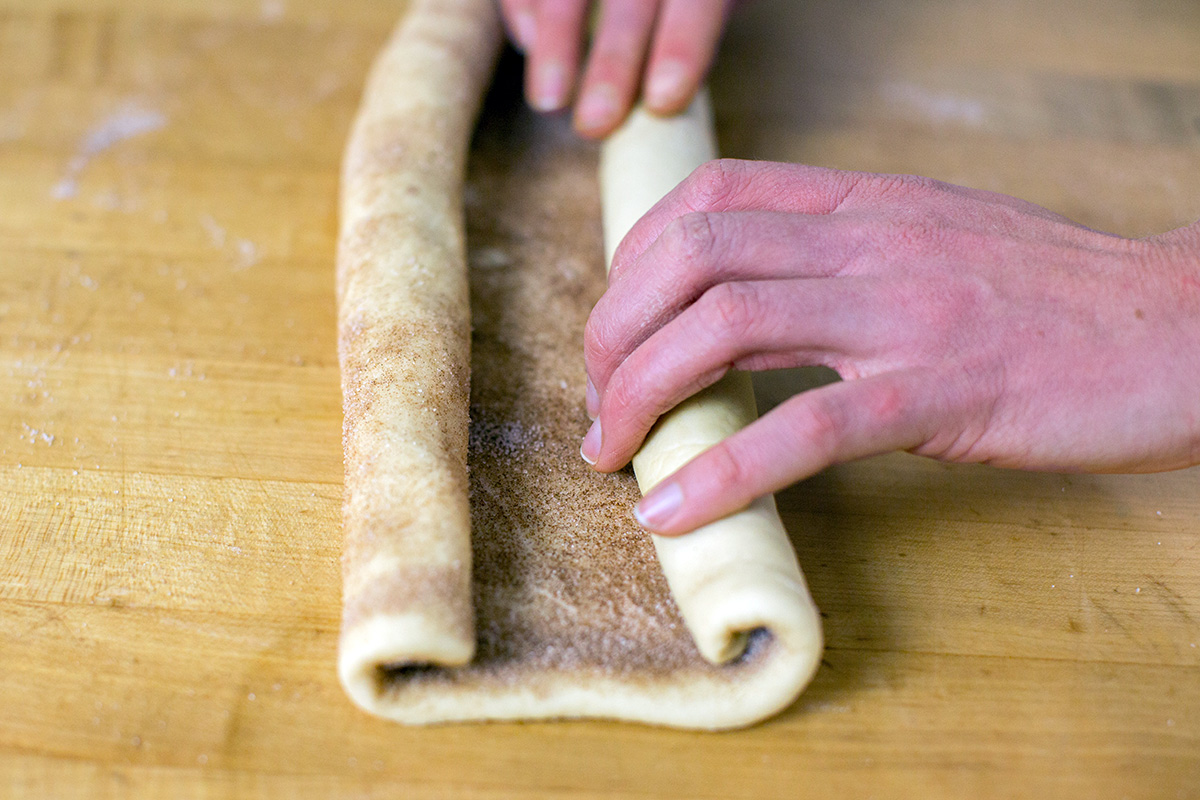
Once you get to the center of the dough, rotate it so that the other long edge is facing you. Roll this edge toward the middle until it meets the other log in the center. (If you’ve ever made palmiers, this shaping method will be familiar.)
Pinch the two logs together slightly so they stay rolled up. Now you’re ready to slice the rolls as you normally would. (Remember to use dental floss for neat slicing!)
Place the sliced rolls on a baking sheet or in a 9" by 13" pan, being sure to leave 1" to 2" of space between each of the shaped rolls. (Otherwise, the rolls will form together as they bake and you'll lose the distinct design.) Let the shaped rolls rise until puffy and then bake as directed.
This shape is familiar but fancy. It’s perfect for smearing with lots of frosting on top since there’s extra surface area — bonus!
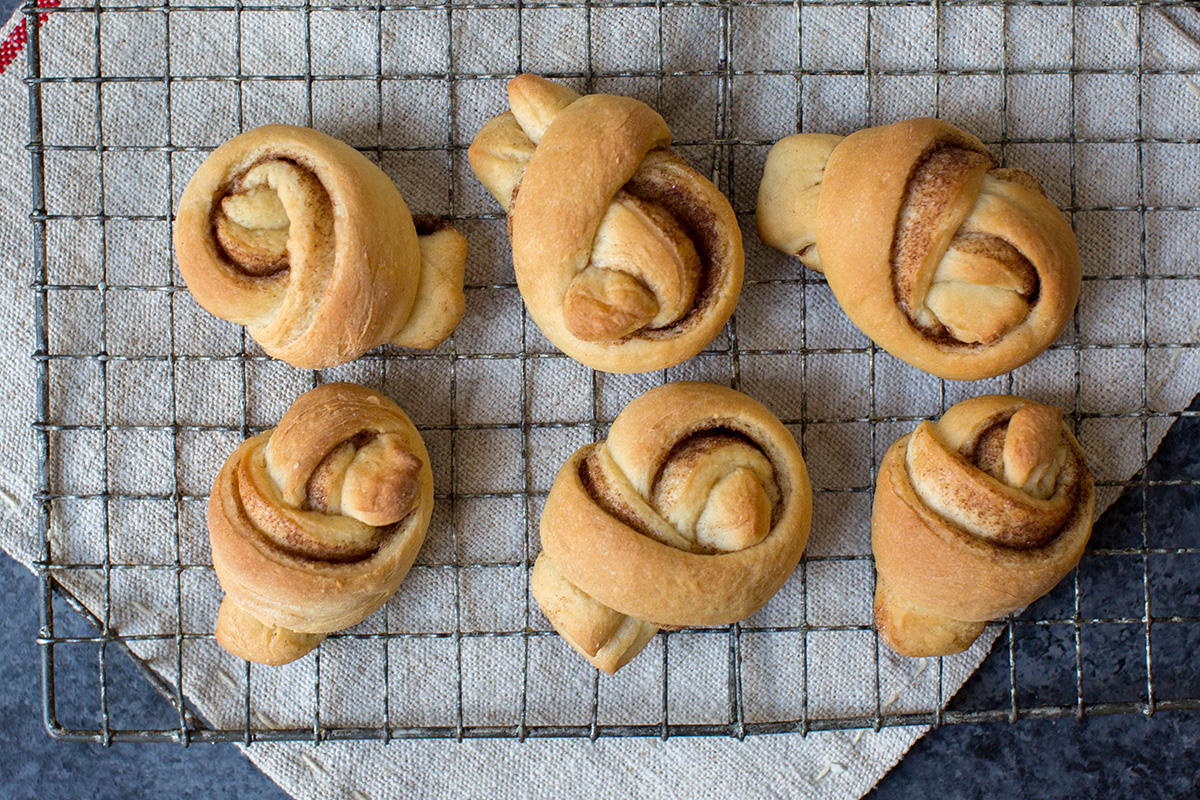
If you’re a baker who likes to get a little creative, try making your cinnamon rolls into basic knots.
This shaping method also starts with a rectangle of dough about 1/4” thick. Cover it with butter and cinnamon filling, leaving a 1” border along both long edges bare.
Next, fold the dough over onto itself so that the two long edges meet each other. Pinch the long edges of dough together to seal.
Now it's time to pull out your pastry cutter, pizza wheel, or kitchen scissors. (If you don’t have one of these tools, you can also use a careful hand and sharp knife to do the following step.)

Slice the dough into strips about 3/4" to 1" thick.
Working with one strip at a time, pinch the strip closed, sealing in any cinnamon filling. Elongate each strip slightly by pulling gently on the ends.
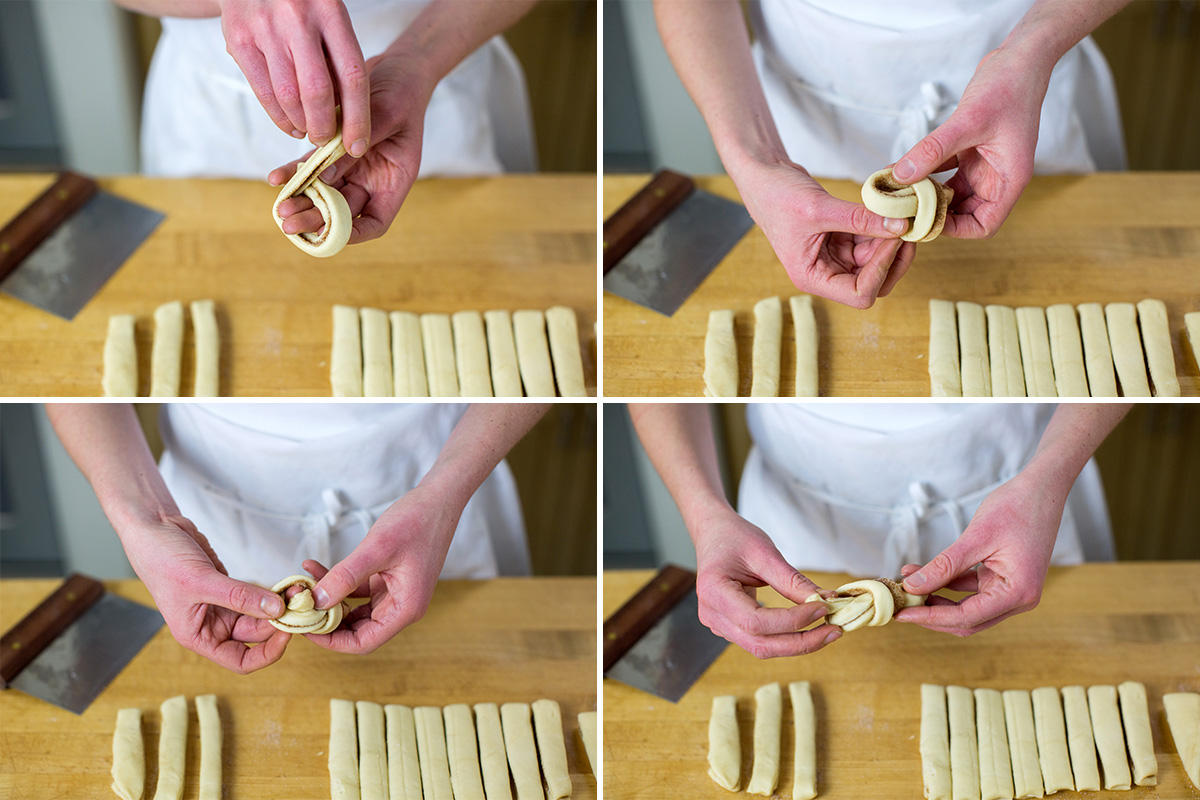
Now you’re ready to tie a basic knot! Make a loop in the middle of your strip. Cross one of the ends behind the loop and pull it through the middle.
Gently pull the ends of the strips so that the loop closes slightly and the knot tightens. If the ends are overhanging the knot by a few inches, tuck the ends around the back of the loop and up through the center.
If you’re a visual learner, check out our video demonstrating how to shape a basic knot. It’s easier than tying your shoes, I promise!
Repeat with all the remaining strips of dough, placing the finished knots on a baking sheet as you work. Let the knots rest until they're puffy and then bake.
These cinnamon roll knots give garlic knots a run for their money! They’re just as delicious as they are whimsical.
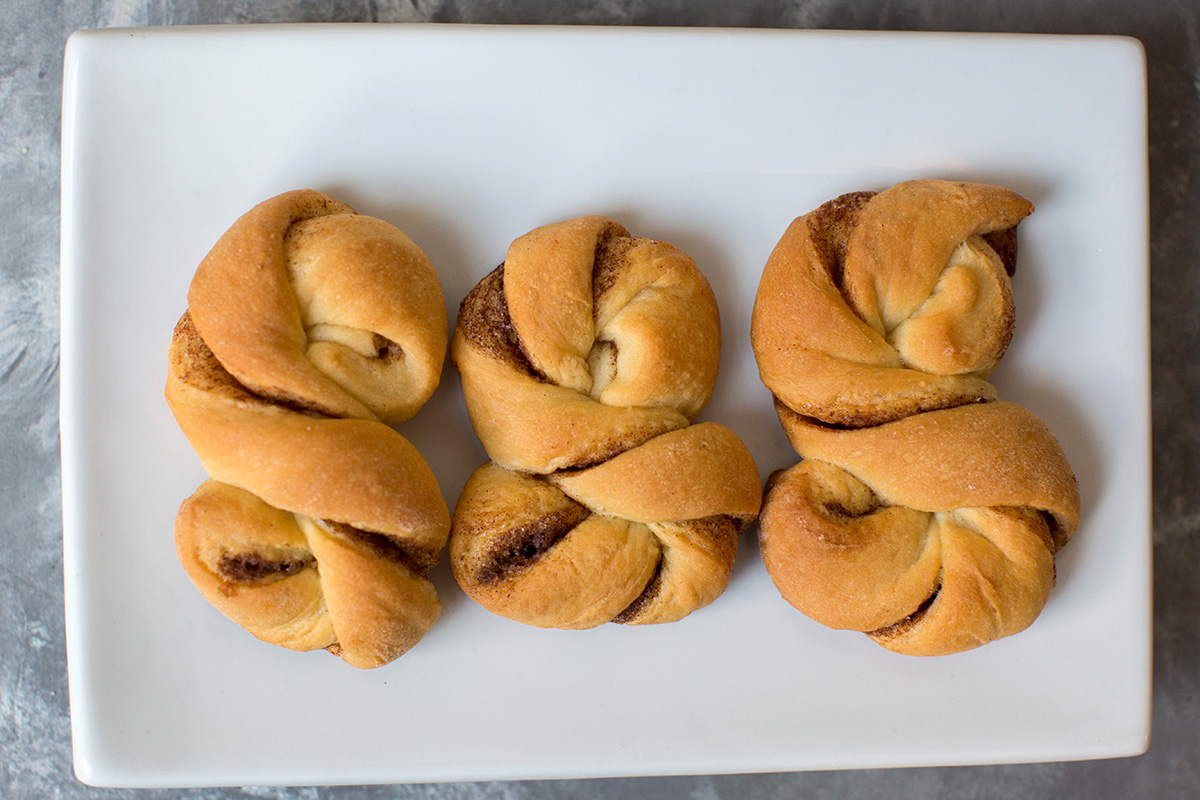
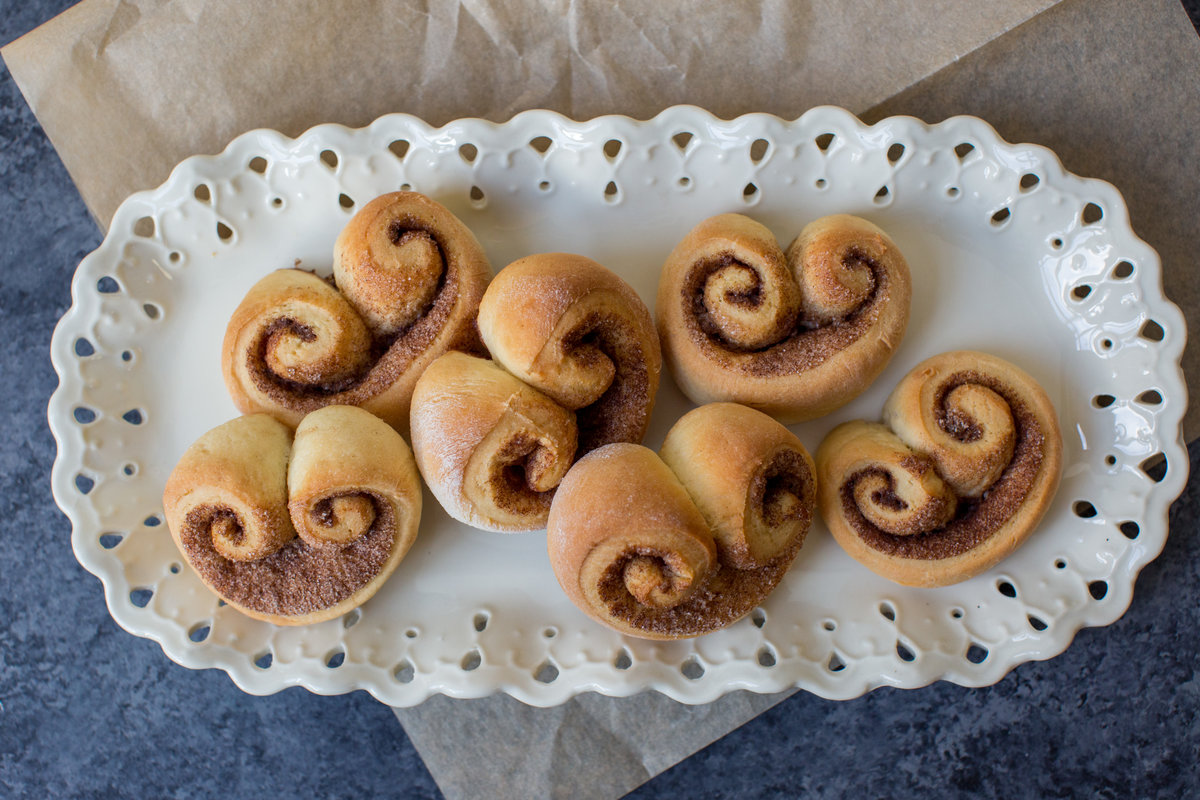
Our St. Lucia Buns recipe inspired another shaping technique for you to try the next time you’re making cinnamon buns at home.
Roll the dough into a rectangle approximately 10" by 15", about 1/4" thick. Spread butter and then cinnamon filling evenly over one half of the dough the long way; the cinnamon-covered area should be roughly 5" by 15" long.
Pick up the bare long side of the dough and fold it over the cinnamon filling to meet the edge on the other side. Pinch the ends and long seam shut.
Cut the dough into even strips about 3/4" to 1" thick.
Pick up a single strip and pinch it slightly to seal in the cinnamon filling. Roll it between the palms of your hands to round out the edges, turning it into a twisted log of dough.
Place the log onto a parchment-lined baking sheet. Take one end of the log and roll it toward the middle, making a swirl. Stop rolling once you reach the middle of the log.
Now roll the other end of the log toward the center in the opposite direction. Tuck the ends of the logs under the center of the dough to keep them from unraveling. Your goal is to end up with a swirled S-shape.
These S-shaped cinnamon rolls look like fancy Swedish cinnamon knots, twisted up in all their cinnamon sugared glory. They’re a treat for the eye and your taste buds, too.
If you’re making cinnamon rolls for people who aren’t afraid to get their hands sticky, make pull-apart cinnamon rolls! They’re inviting and informal; perfect for kids who want to dive in with their hands.
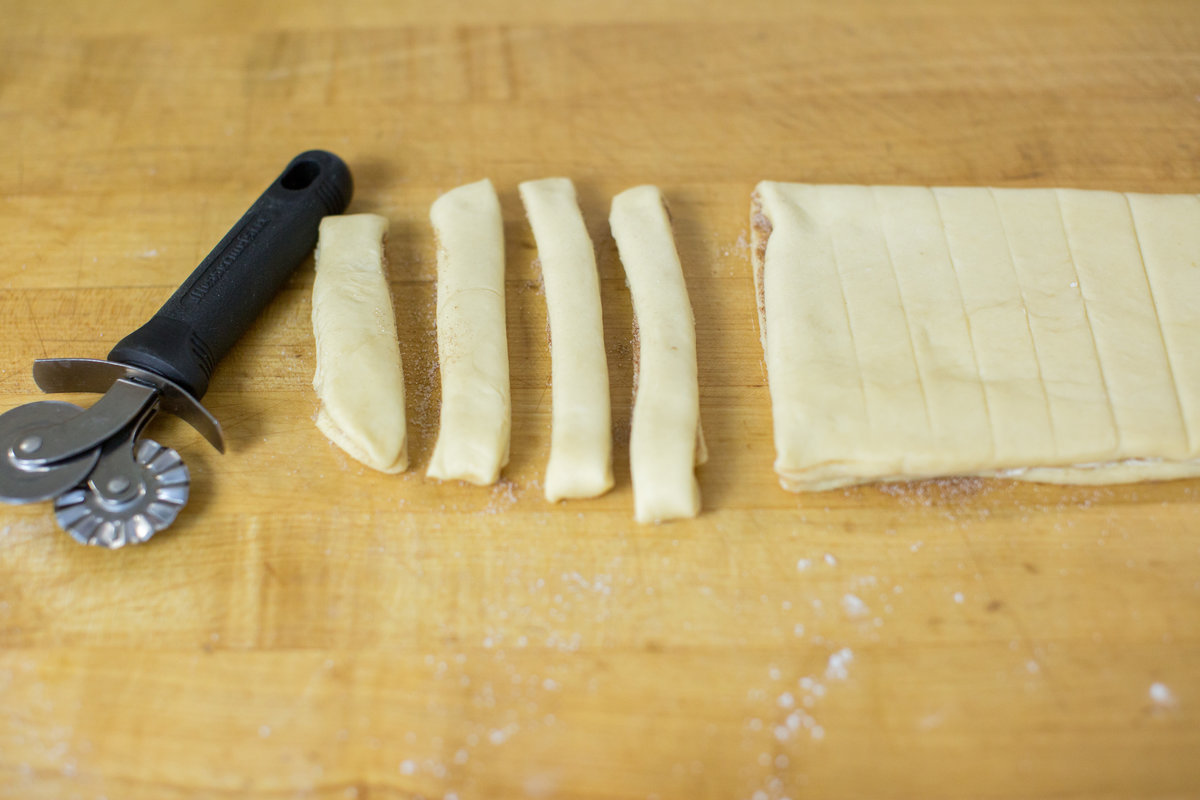
Roll your dough into a 1/4"-thick rectangle and spread the butter and cinnamon filling almost all the way to the edges. Cut the dough in half the long way so you have two long strips.
Place one strip on top of the other so the cinnamon filling is facing up.
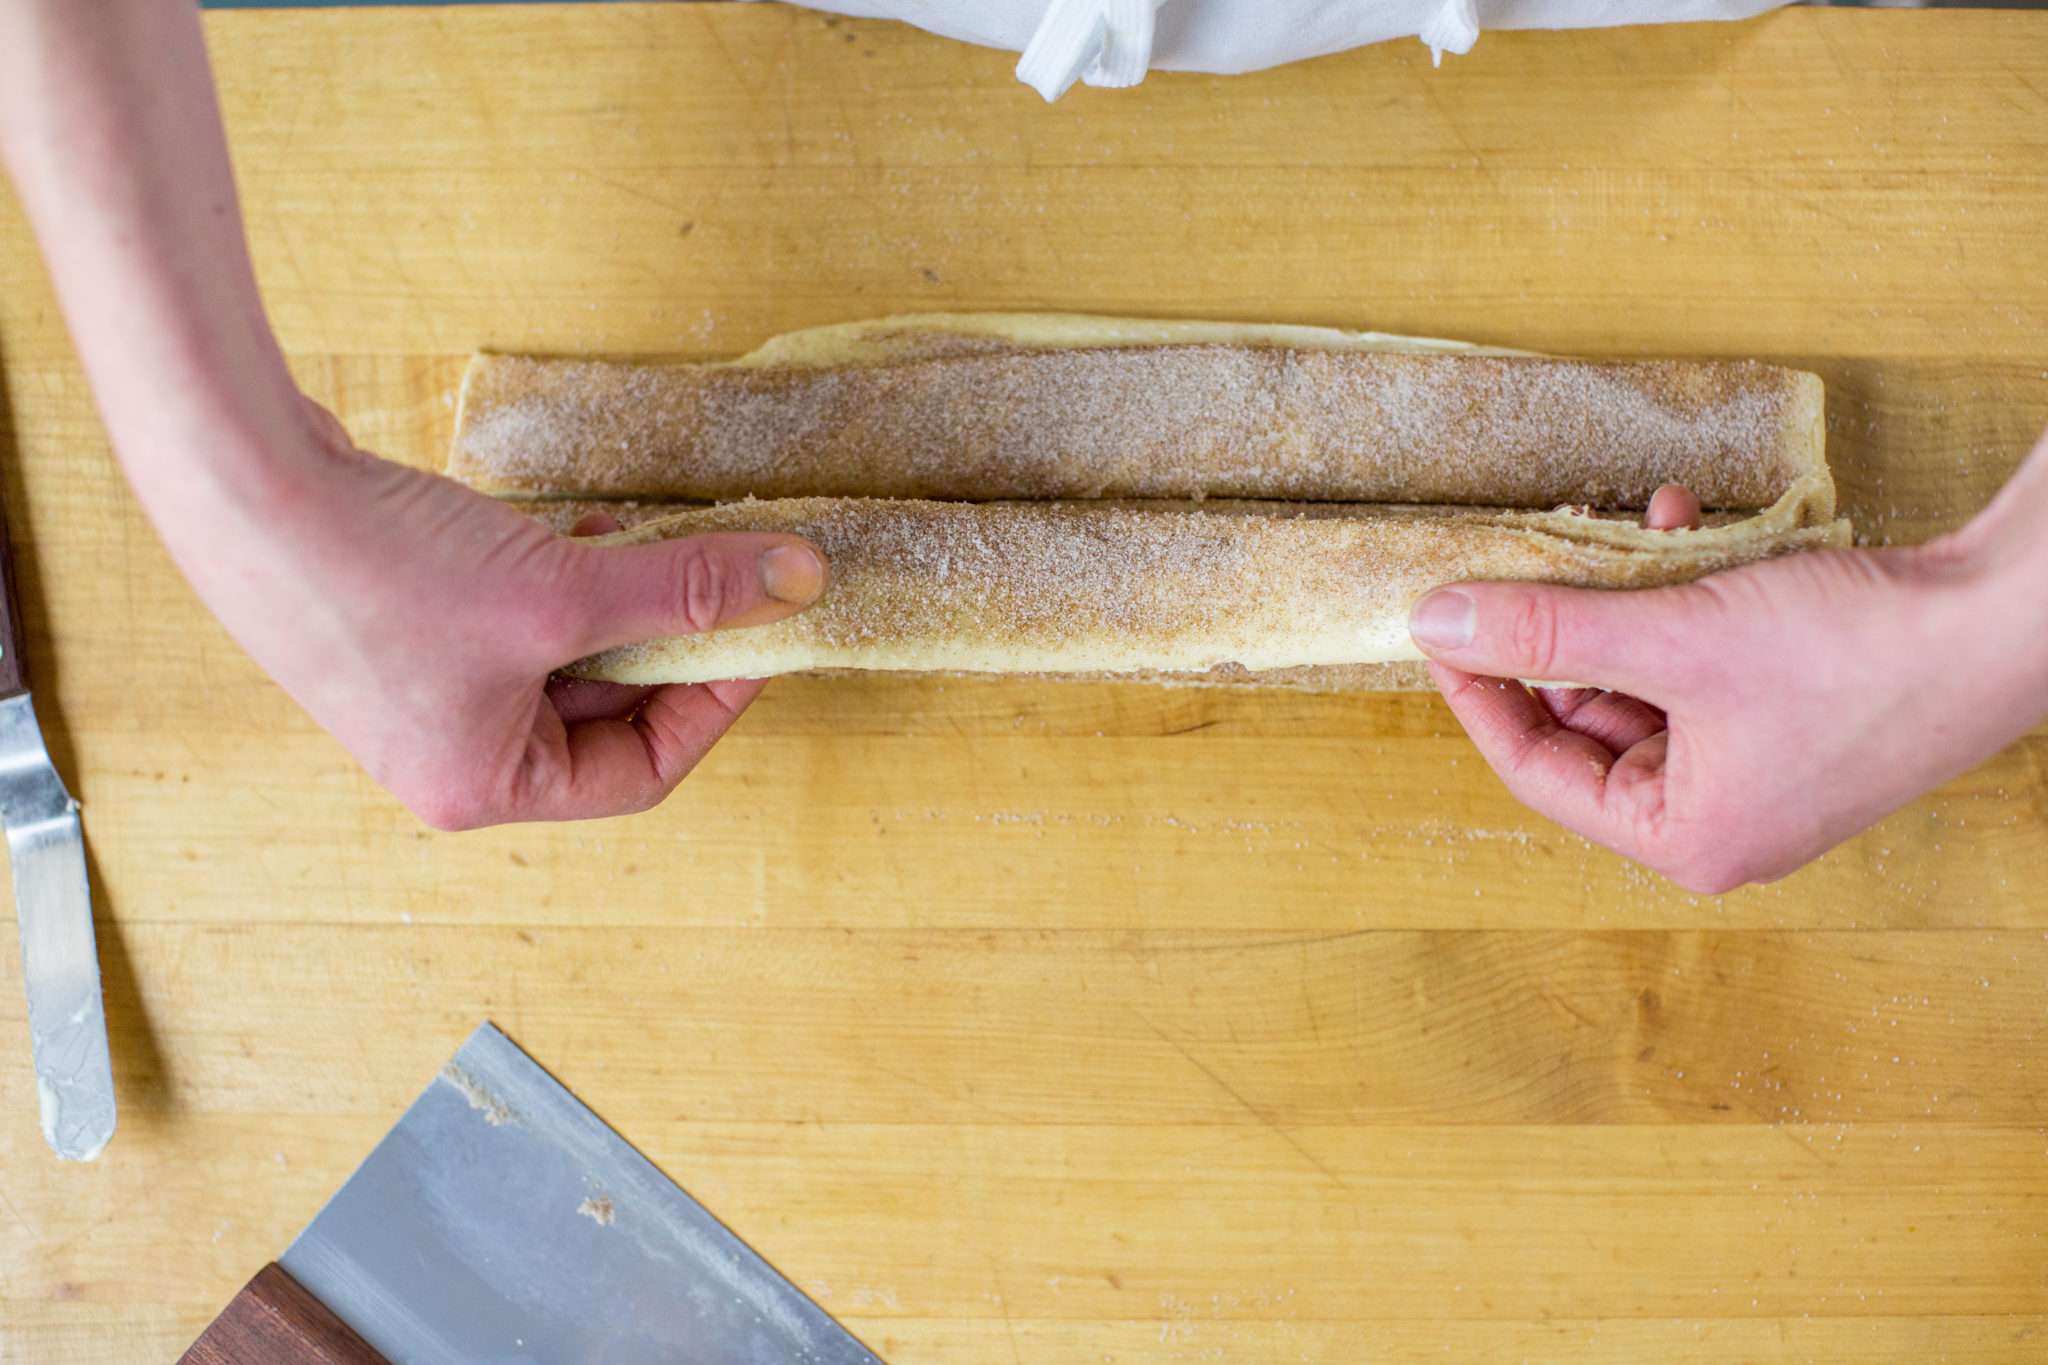
Now cut the stacked strips into thirds. Carefully pick up one strip and place it on top of the other. Repeat the stacking process with the last strip. You should end up with one long strip made up of six layers of dough.
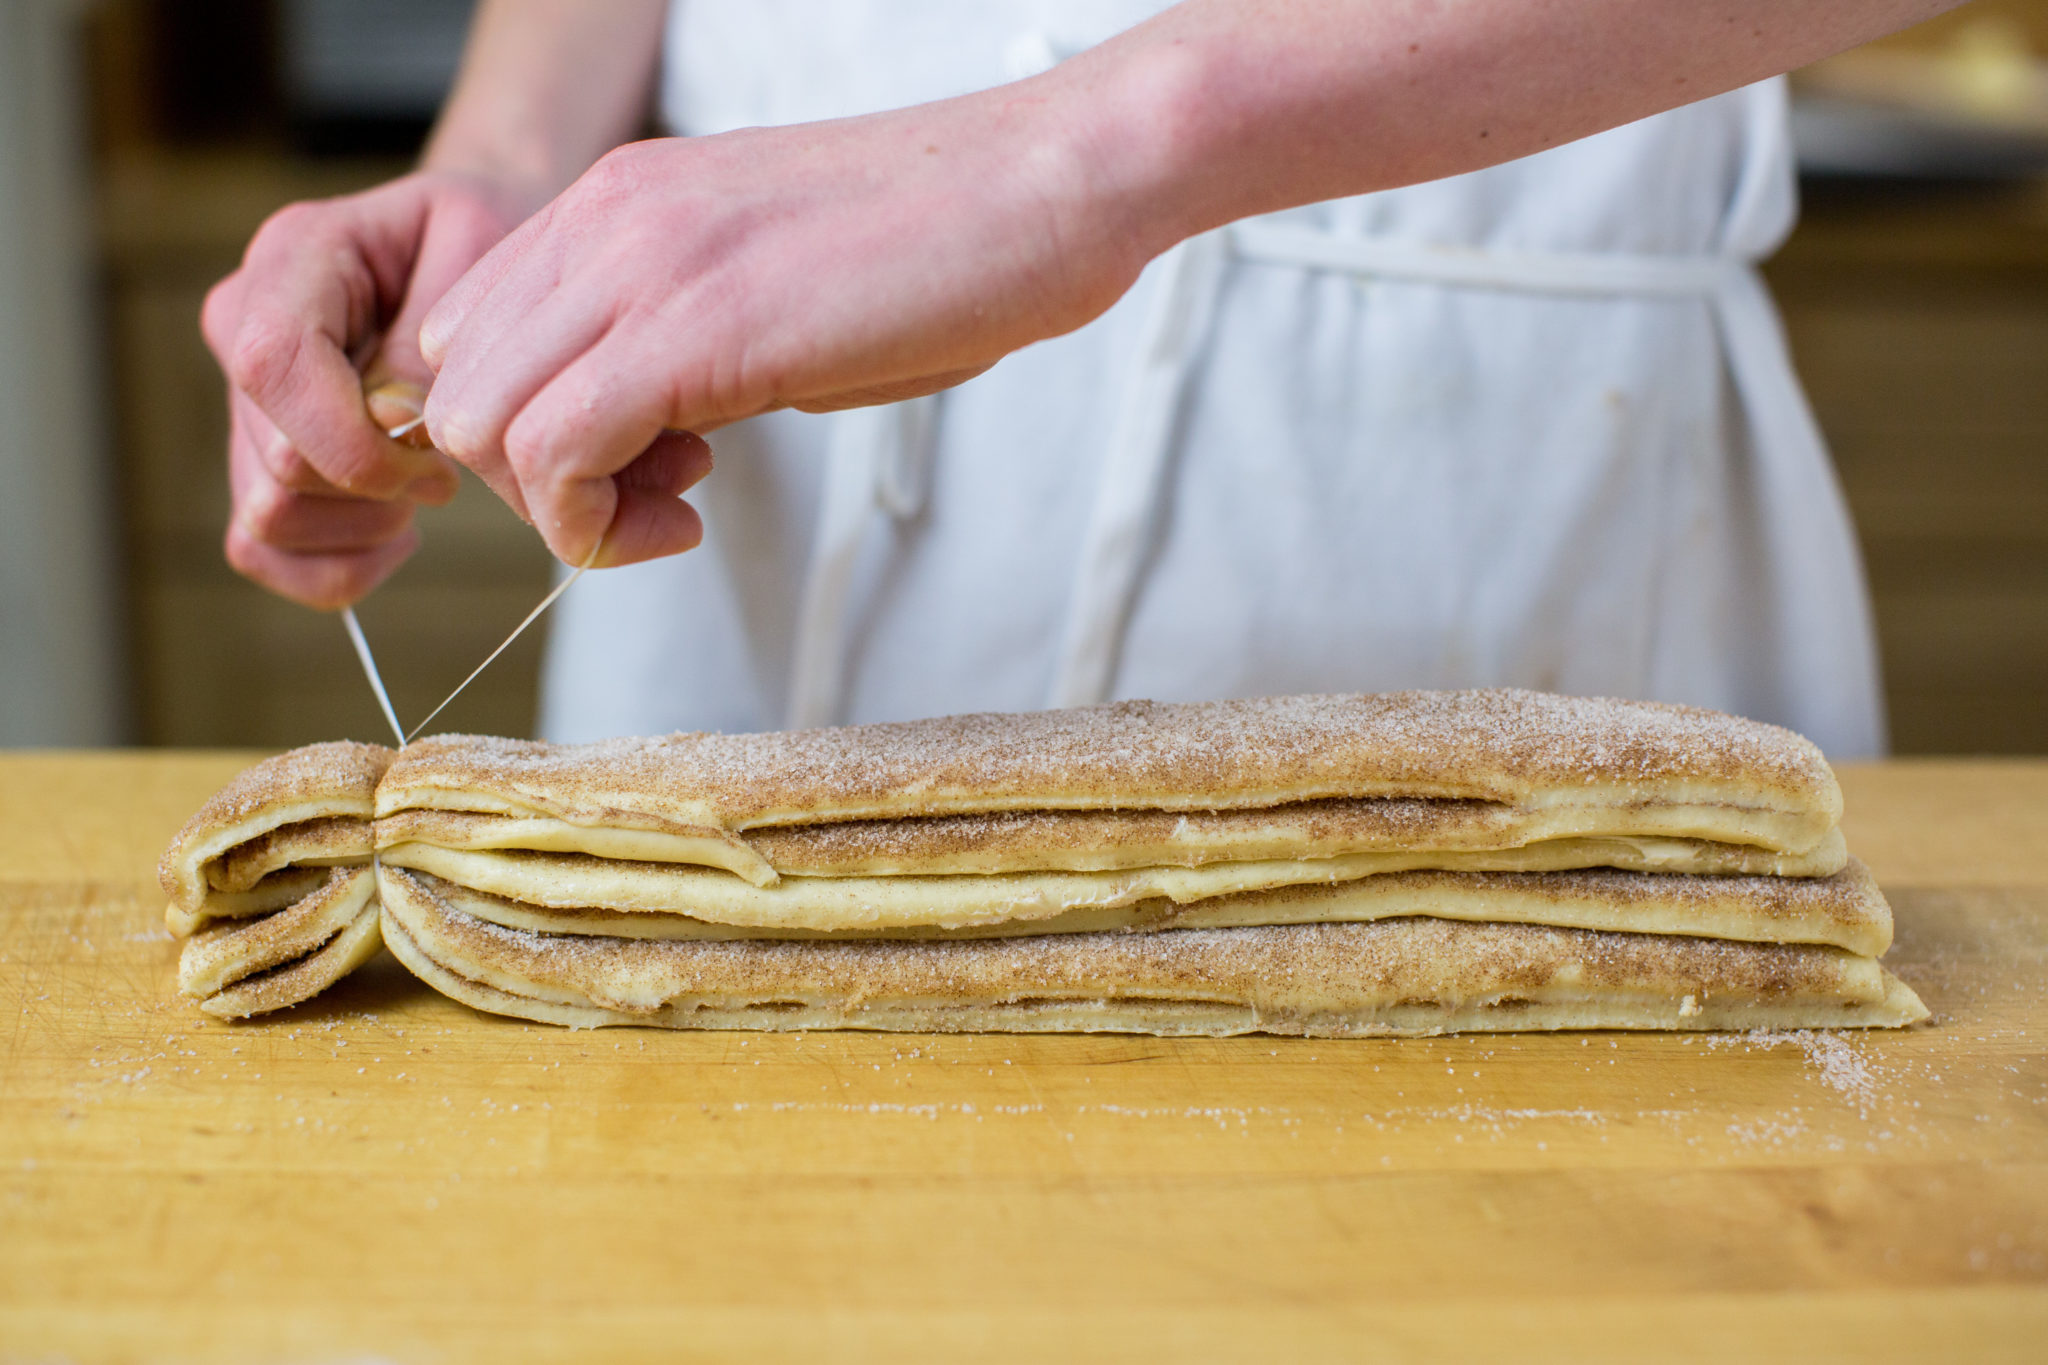
Slice the dough (using dental floss or a sharp knife) into 2” portions. Each portion should look like a little fan with lots of layers of dough, cinnamon filling, and butter.
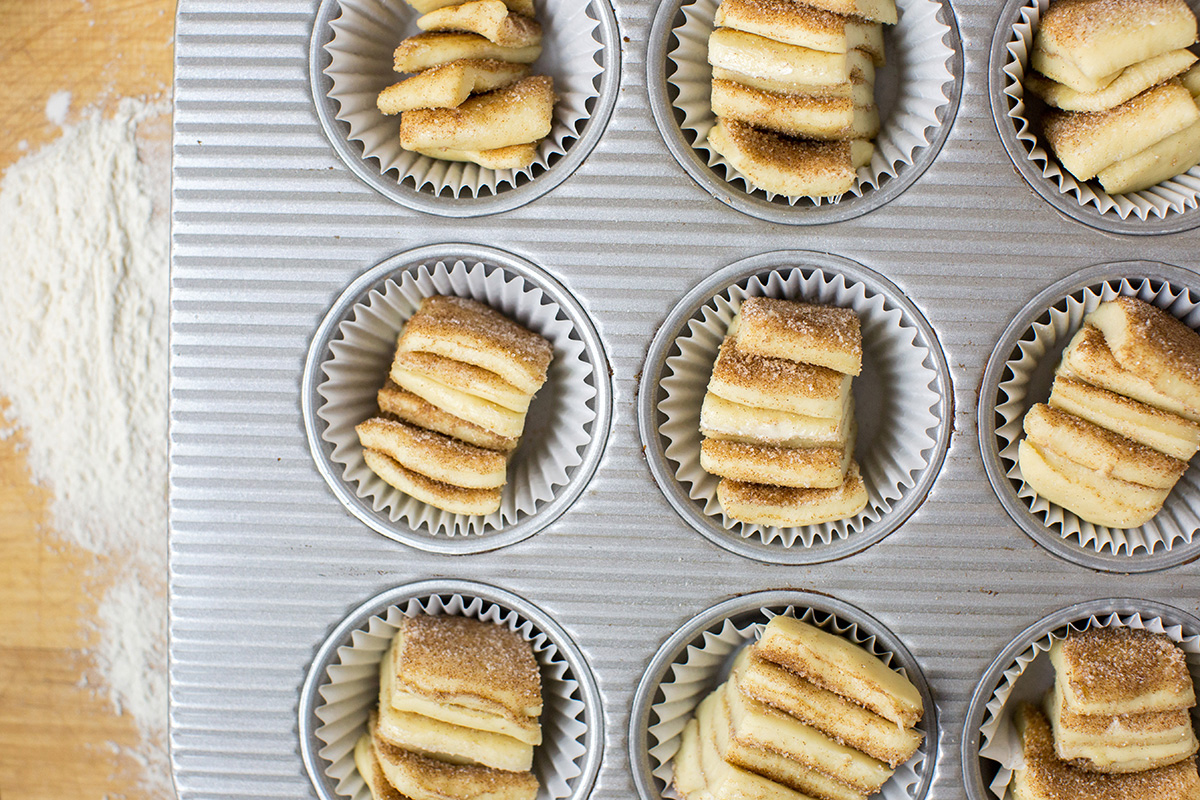
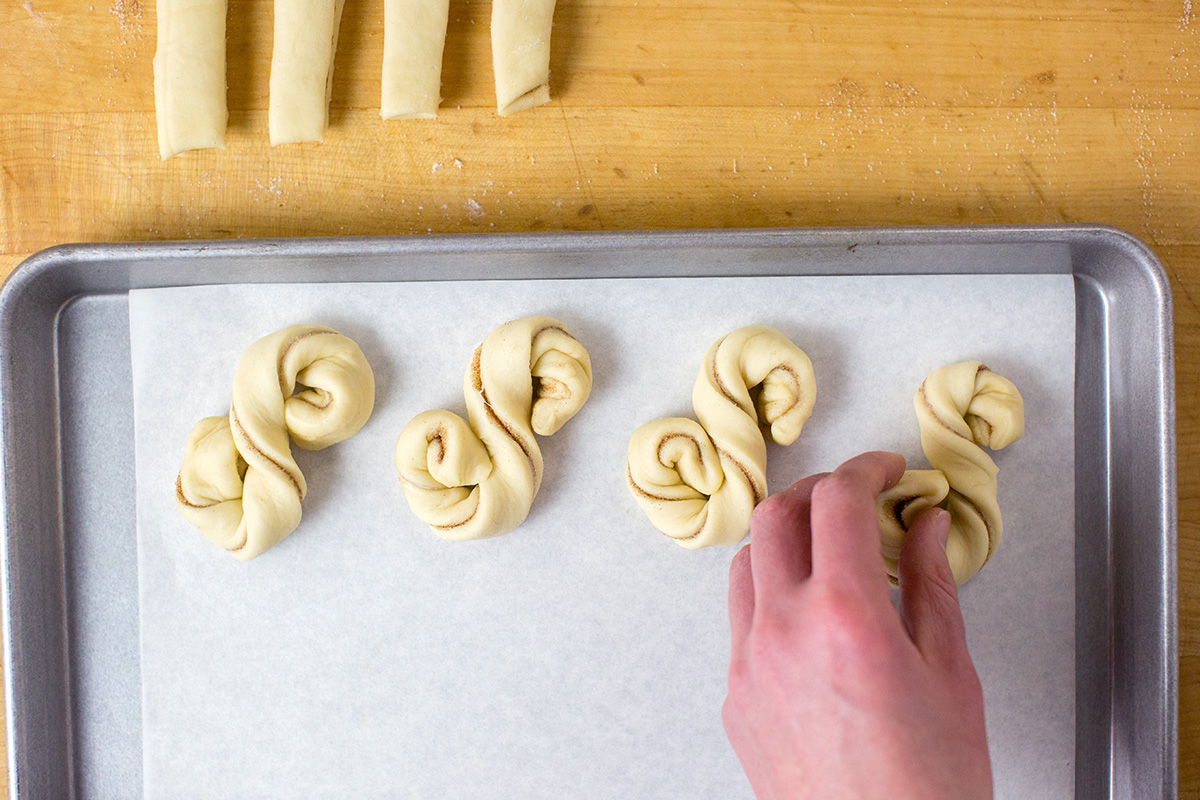
Place the portions of dough in a lightly greased muffin pan so the layers are standing on end.
Make your pull-apart cinnamon rolls extra decadent by drizzling them with melted butter and sprinkling with additional cinnamon sugar. (I love using our Cinnamon-Sugar Plus for extra ease and rich flavor. It’s not a necessary step, but it’s a nice touch that boosts the flavor.)
Let the pull-apart rolls rise a final time before baking as directed in your recipe. They may bake slightly faster than a full pan of cinnamon rolls so check for doneness about 5 minutes early.
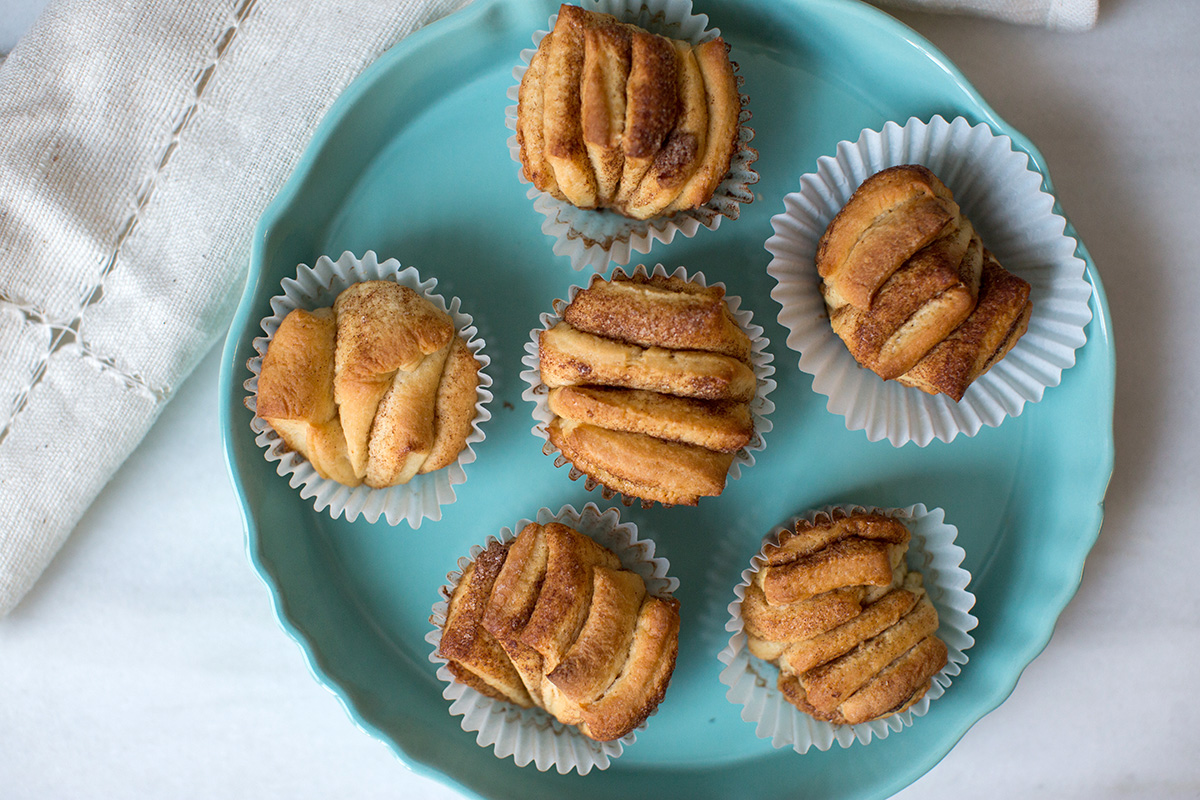
Once baked, it’s time to serve and enjoy! Pull the layers apart and eat one at a time, or just take a big bite. It’s your choice.

Making cinnamon rolls at home is an experience every baker should have — and our Big-Batch Frosted Cinnamon Rolls recipe makes it easy to personalize this classic breakfast treat. We hope you'll whip up a (big) batch the next time you need something sweet to share.
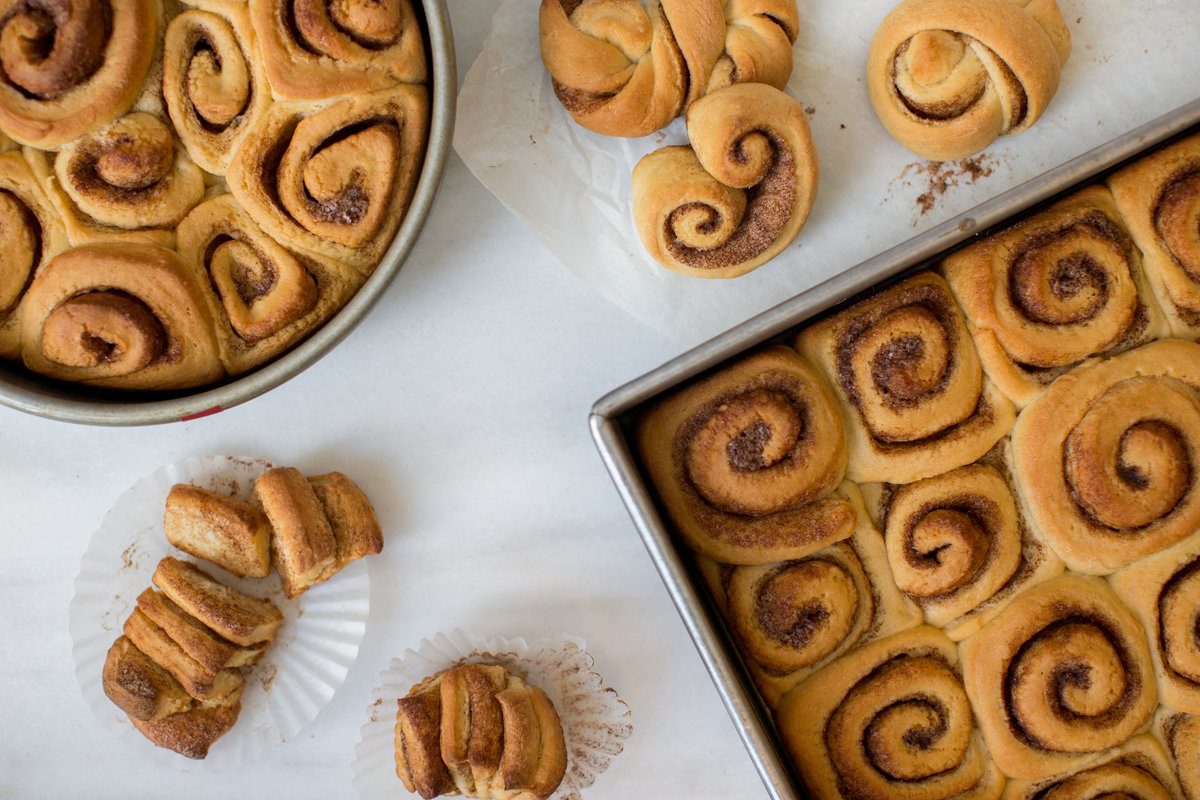
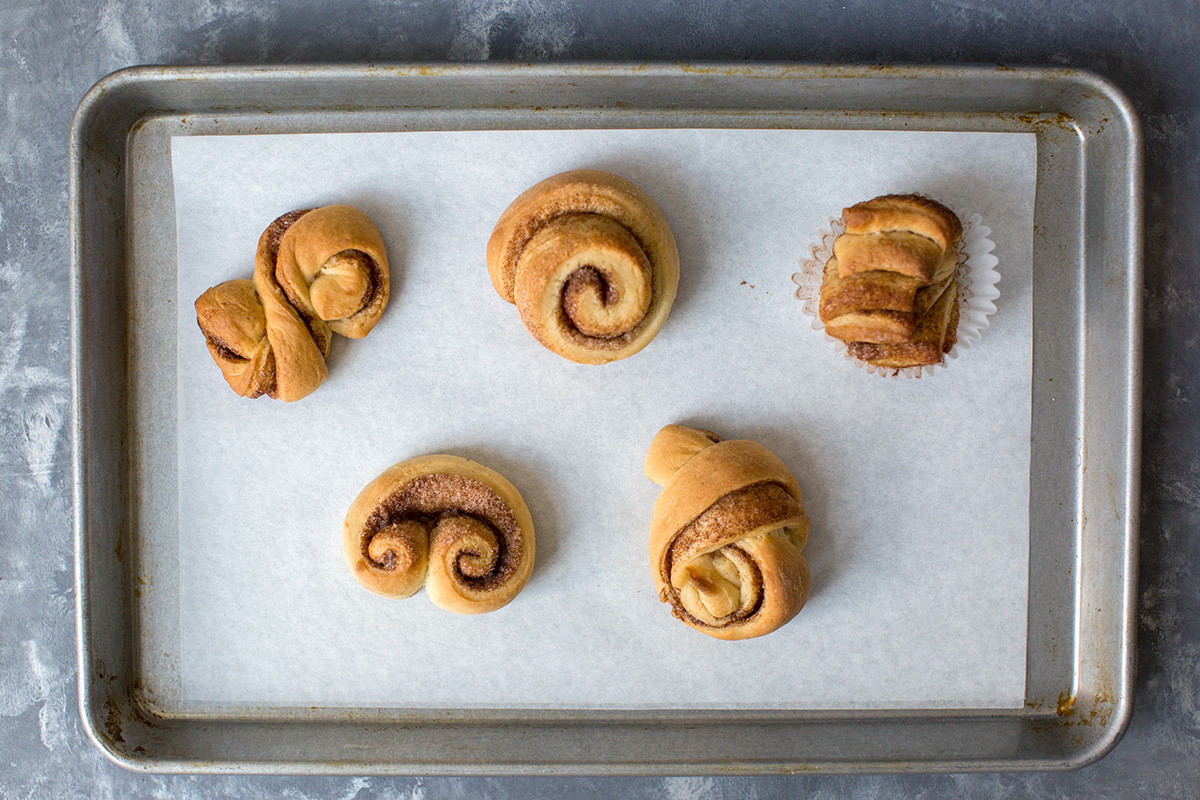
Be playful and try your hand at some of these shaping methods. Use a quarter of the dough to make a 9" cake pan of traditional swirled rolls. Then mix and match, using the other three quarters of the dough to try some of the other shaping methods.
You'll end up with a variety of shapes, all unique, beautiful, and delicious!
What's your favorite memory of making cinnamon rolls at home? We hope you'll share what makes cinnamon rolls special for you in comments, below.
Thanks to Anne Mientka for taking the photographs for this post.