-
Weigh your flour; or measure it by gently spooning it into a cup, then sweeping off any excess. Stir all of the ingredients together. Cover the rough, sticky dough and let it rise at room temperature for 24 hours. After this first rise, you may choose to refrigerate the dough for up to six days, which will help develop its flavor.
-
With a rack in the center, preheat the oven to 500°F to 550°F with a baking steel or stone inside. Make sure the oven is at least 500°F for a full 30 minutes before baking your pizza, in order for the steel or stone to preheat thoroughly.
-
Divide the dough in half. Working with one piece at a time, transfer the dough to a well-floured surface.
-
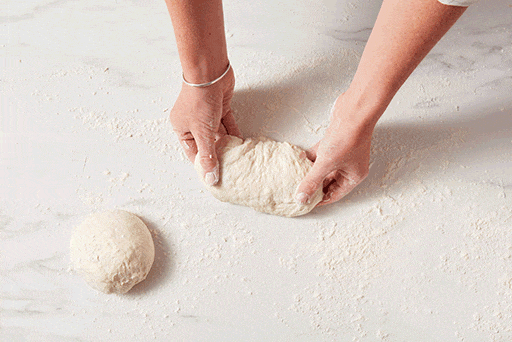
Stretch and fold it, as follows: Holding onto the dough at both ends, pull one end away from the other, then fold it back onto itself. Repeat on the other side so that all four corners of the dough have been stretched and folded.
-
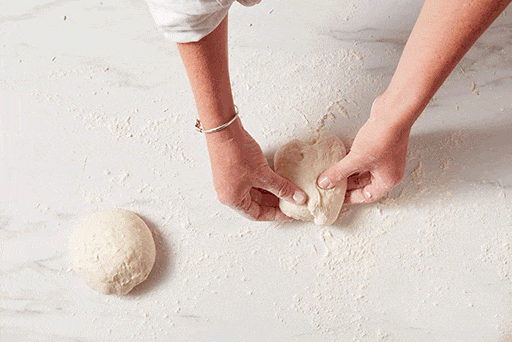
Next, pull the ends of the dough toward the middle, then turn it over. Using your fingers, pull the dough under itself to make a smooth, round ball with the seams tucked into the bottom. Repeat with the other piece of dough. Place each ball seam-side down into a floured bowl.
-
Cover the bowls and allow the dough to proof (rise) for 45 minutes to an hour, while your oven preheats.
-
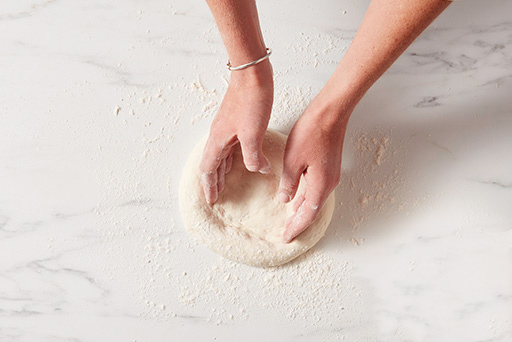
Working with one piece at a time, transfer the dough to a well-floured work surface and dust the top with flour. Use your fingertips to gently depress the surface, being careful not to touch the outer edge of the crust; you want it to remain thick.
-
Lift up the crust and use your knuckles to gently stretch it into a circle about 10" to 12" in diameter. Move it to a well-floured pizza peel or floured sheet of parchment. If you're using parchment, trim the excess around the dough to prevent it from burning.
-
Lightly sauce the dough, then add your toppings of choice. For special toppings easy to prepare in advance see "tips," below.
-
Turn on the top broiler in your preheated oven and transfer the pie to the steel or stone. Be sure there's at least 8" of space between the surface of the pizza and the broiler. If you have an oven with the broiler on the bottom (usually in the bottom compartment of the oven), or on top in a smaller, separate compartment, make sure there's at least 8" between the broiler and the cooking surface. If there isn't, don't use the broiler. Your pizza will still be great without being broiled, though it may take a few more minutes to bake.
-
Gently slide the pizza (or pizza and parchment) onto the steel or stone. Bake the pizza for approximately 6 minutes on the steel (or 7 minutes on the stone), until bubbly and charred on the edges. Remove the pizza from the oven and top it with freshly grated Parmesan, if desired.
-
Repeat with the remaining dough and toppings.