-
To make the dough: Weigh your flour; or measure it by gently spooning it into a cup, then sweeping off any excess. Combine all of the ingredients in a mixing bowl, or the bowl of your stand mixer. Mix and knead to make a supple, elastic dough. If you’re using a stand mixer, mix on low speed for 3 minutes to incorporate the ingredients, then on medium speed for about 5 minutes, or until the dough looks fairly well developed.
-
Cover the bowl with plastic wrap or a reusable cover and allow it to rise for 45 minutes.
-
Uncover the bowl and, using a bowl scraper or spatula, run the scraper or spatula down the inside far wall of the bowl. Bring the dough up from the bottom of the bowl and fold it over on top of itself. Turn the bowl 90° and repeat; repeat twice more (for a total of four times), turning the bowl 90° each time. This process, which helps develop the dough, is called a fold. Re-cover the bowl, and let the dough rise for another 45 minutes.
-
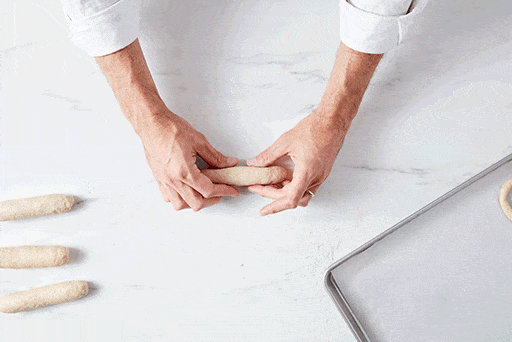
Gently deflate the dough and divide it into 10 pieces; each will weigh about 100g. Shape each piece into a rough log, cover, and let rest for about 20 minutes; this rest will make the pretzels easier to shape.
-
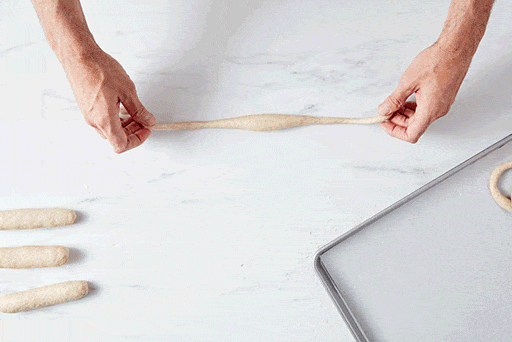
To shape the pretzels: Working with one piece of dough at a time, roll it into an 18” to 22”-long rope.
-
Twist each rope into a pretzel. Place shaped pretzels on a couple of lightly greased or parchment-lined baking sheets.
-
When all the pretzels have been shaped, cover them with lightly greased plastic wrap (or your favorite dough cover). If your kitchen is particularly warm, place the pans into the refrigerator immediately. Otherwise, let the pretzels rest and rise for about 30 minutes before refrigerating. It will take about 60 minutes for the pretzels to chill thoroughly.
-
While the pretzels are chilling, preheat your oven to 450°F. Prepare the water bath by bringing the water and baking soda to a boil in a wide pot.
-
To boil the pretzels: Put 3 or 4 pretzels at a time into the boiling water and cook for 1 minute without turning over. Transfer boiled pretzels back to their baking sheets. Using a sharp knife or lame, slash each pretzel horizontally across its base.
-
Sprinkle the pretzels with coarse sea salt, kosher salt, or pretzel salt, if desired.
-
To bake the pretzels: Bake for 14 to 16 minutes, or until the pretzels are well-browned. Remove them from the oven, and cool on a rack.
-
Store any leftover pretzels, well-wrapped, for up to 3 days on the counter; freeze for longer storage.