New Year, new cookies, it’s all in the details.

 snowflakecookiec9f.jpg

Hurray! It’s one of my favorite times of year again – cookie decorating time! Sure, you can decorate cookies at any time of year (and I do), but there’s something special about decorating holiday cookies. Last year, my very first blog ever was about decorating cookies, so this blog is special in that I feel like I’ve come full circle. It’s been a great year, and I’ve loved every minute of it.

Looking back at that first blog recently in preparation for this blog, I can see many changes. First, the name of that first blog has changed. Back in 2008, PJ had written a post calling herself the “lazy” cookie baker, so I flipped the title and called my first post The Other Cookie Baker.

As we prepared for a cookie decorating blog this year, Janet, our designer, said, “You know, that title just doesn’t make sense any more.” She’s right. of course. If you happened to read the two posts in sequence it makes perfect sense, but here we are 12 months later. I can barely remember what I did this morning, let alone last year, so we’ve updated the title to Cookie Decorating for the Holidays.

Hmmm, what else has changed since last year? I gave up dying my hair, and cut most of it off. I traded in my clunker of a Jeep for a sporty new Matrix (thanks Mike S. at Toyota, you rock!). It’s the first brand-new car I’ve ever owned, and I am lovin’ the mileage. It makes me feel good to be greener, too.

Speaking of cars,  this year my daughter is old enough to get her learner’s permit. I have a bit of a hard time with this one, because I very clearly remember getting my own permit and it truly doesn’t seem to be that long ago. I sort of wish I still had the beat-up old Jeep for her to practice in. It was a tank of a car and made you feel safe. The day I backed into the porch, I broke the railing and post, but the Jeep was just fine. How exactly does one survive their children learning to drive? I have a feeling that blindfolds will play a major role in 2010.

I’ve met some great people this year, too. Paul in Ohio is a frequent Live Chat customer. We talk baking and dogs. Paul’s Toby is a Golden Retriever and my Toby is a Golden Lab cross. Not many chats here contain “woofs,” but Paul’s do.

Here at King Arthur Flour, I’ve gotten to know Paula, Molly, and Julie in customer service, and Irene on the Baker’s Hotline. Irene, she’s a pip. Who else out there owns socks with Grant Wood’s American Gothic on them, and gives out handmade patience awards to her co-workers? Yep, she’s a pip and they have all made my year the brighter for being in it.

I guess I’m starting to sound like the last newscast on New Year’s Eve, so let’s depart from looking back and start looking forward, into the cookie jar. This year, our cookie-decorating lessons are going to focus on really fine piping work, and how to get those delicate little details on your cookies. The secret is something you most likely have in your kitchen already, a King Arthur year-round favorite. Yes, it’s… parchment paper!

To begin, we’ll need some cookies.

8-cookies-plain.JPG

Our holiday favorites for decorator cookies are our Holiday Butter Cookies and Gingerbread Cookies. They hold the shape from the cutters and don’t puff too much, so details still show up.

We also need a big batch of Royal Icing for the piping. Here’s how to put the icing together.

1-meringue.JPG

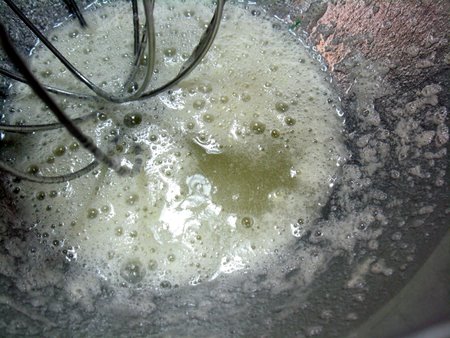
Soak the meringue powder in cold water for a few minutes while you gather the rest of your ingredients. It isn’t a necessary step, but helps keep the mix lump-free.

2-whipped.JPG

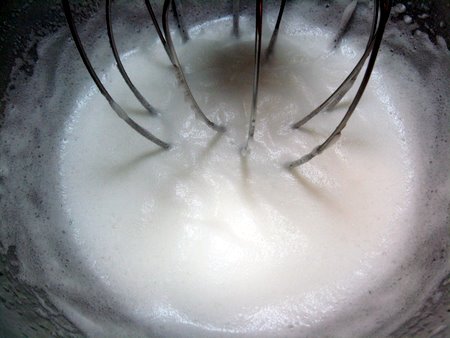
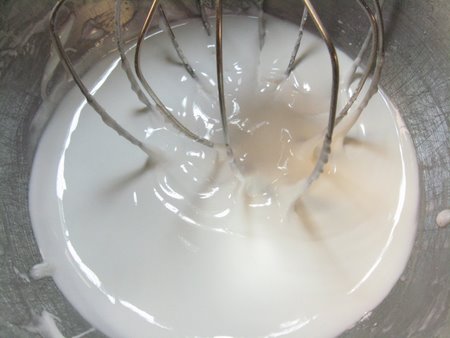
Whip the meringue mixture until foamy and soft peaks have formed.
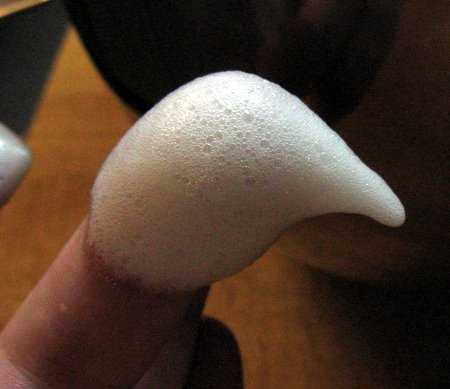
3-birds-beak.JPG

This stage is also known as the bird’s beak stage, and you can see why. The foam won’t hold up stiffly on a finger, but will fall to the side, forming a beak. (Yes, I made a few bird noises with my “finger puppet.” What a geek! )
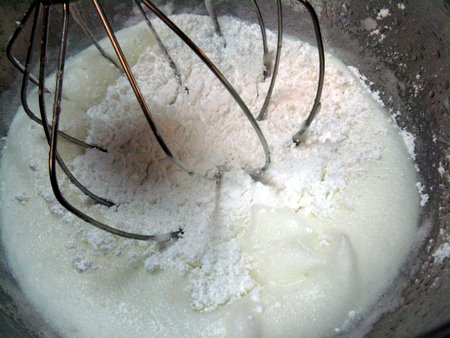
4-adding-sugar.JPG

At this point, you’ll want to start adding your sugar. It’s a good idea to sift your sugar, to avoid lumps in the icing. This is especially important for fine piping work. Beat in the sugar 2 cups at a time on low speed.

5-soft-texture.JPG

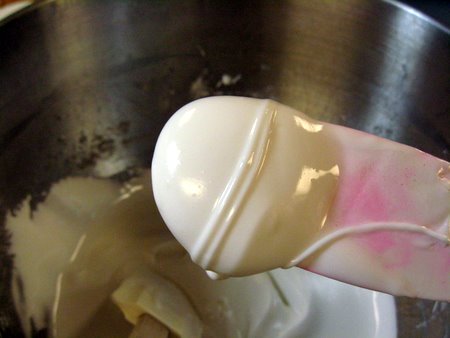
The finished texture should be soft and smooth but not fluffy at this point.

6-finger.JPG

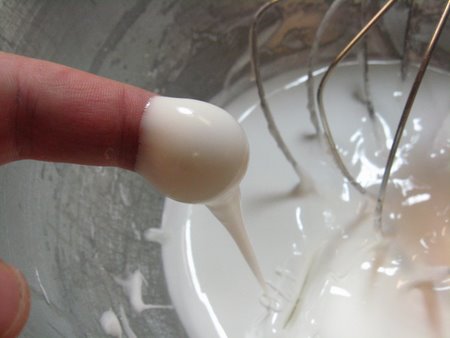
Back to our digital tester. The icing should flow off your finger or a spoon, and disappear back into the rest of the icing by the count of 10. The little drizzles should just seem to melt away back into the rest of the batch. If not, add a little more water. If the icing slides off your finger and appears too thin, add a bit more sugar.

14-cut-tip.JPG

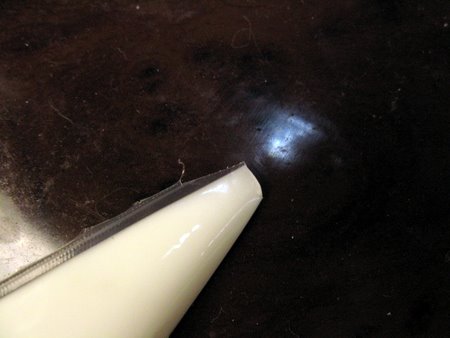
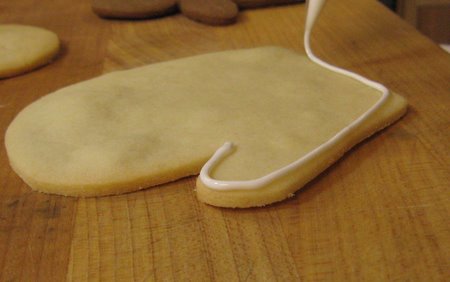
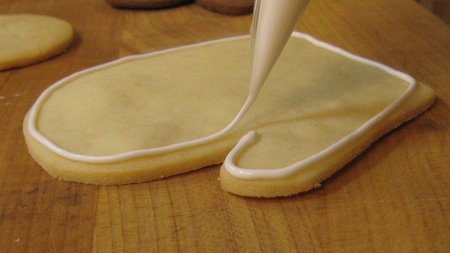
Once your icing is at the right consistency, it’s time to pipe. For outlining and flooding the cookie, you’ll want a larger tip than for the fine detail work. I like to use a disposable plastic piping bag with the end cut off, no special tips. I finding cutting a bit of the seam off as well helps keep smudges to a minimum.

9-begin-outline.JPG

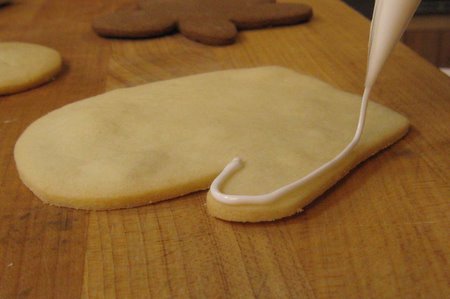
One key to piping a smooth outline is to hold the tip of the bag above the surface of the cookie and let the icing flow downward. You need to stay close enough so that the string of icing doesn’t break, but far enough away so that you don’t rub the surface of the cookie with the tip of the bag.

10-outline.JPG

Slow and steady as she goes.

11-finish-outline.JPG

To finish, drape the end of the icing string to meet up with the beginning, and stop squeezing. Allow the two ends to “melt” together.
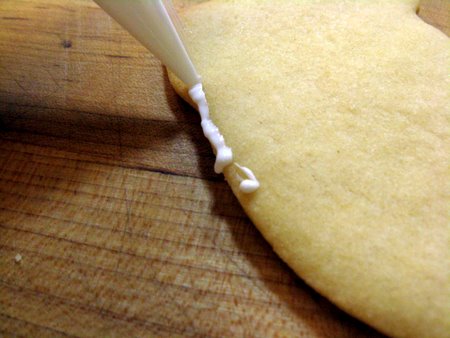
12-wrong-way.JPG

Just thought you’d like to see what holding the tip too close to the surface would look like. There’s no room for the icing string to form, so you end up with smudges.

15-flooding.JPG

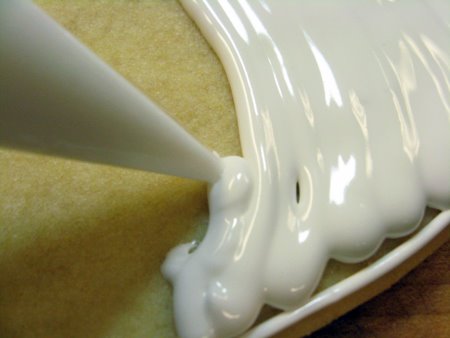
Flooding is the name given to covering a large area of the cookie with icing. To flood, pipe out a thick line of icing, and keeping the tip buried in the icing. Move in lines or small circles, filling in the area completely. The outline you piped earlier will keep the icing from spreading over the edges of the cookies.

16-poor-flooding.JPG

If the icing is at the correct consistency, it will self-level and you’ll have a smooth, even layer of icing over the whole cookie. If the icing gaps and doesn’t flow together like in this photo, add a touch more water. If it overflows the edges, or seems watery, add a touch more sugar.

Let the iced cookies set at room temperature for at least an hour, until the surface is quite dry to the touch.

17-whole-parchment.JPG

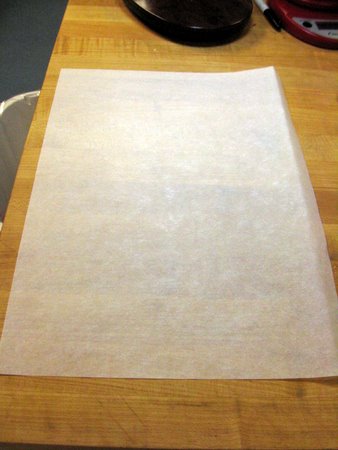
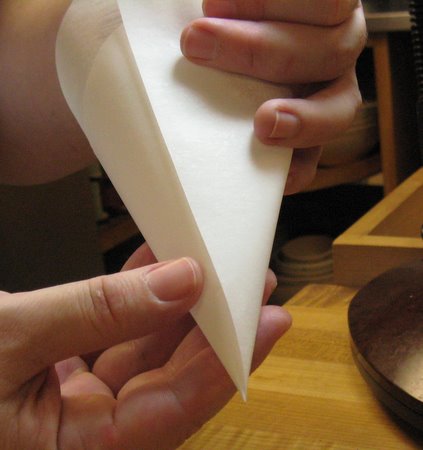
In order to make very fine lines for decorating, you’ll need to form your own piping cones from parchment paper. Begin with a long rectangle or square.

18-half-triangle.JPG

Cut in half to form a large triangle.

19-small-triangle.JPG

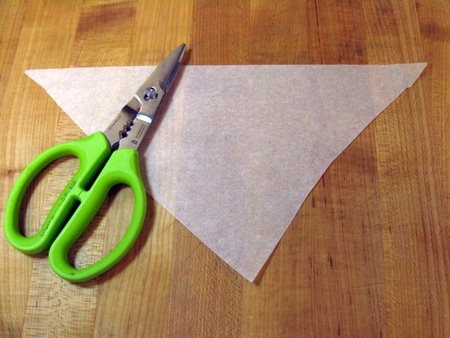
Cut in half again to form a small triangle.

20-begin-cone.JPG

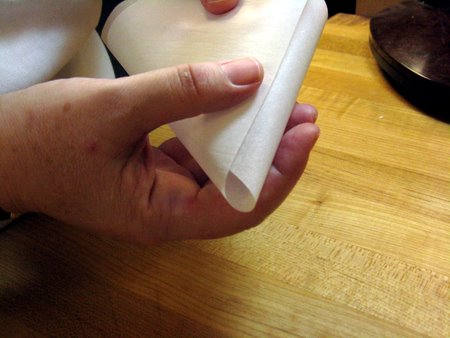
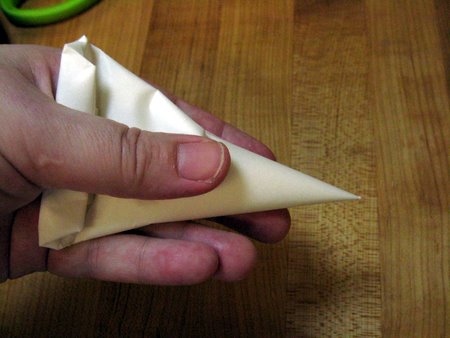
With the long straight side facing out, and the point facing you, begin to roll the paper in on itself to form the cone. If you ever made paper party hats, it’s the same thing.

21-finish-roll.JPG

Pull the cone tight until the tip is a sharp point with no holes, no gaps. You’ll have three points meeting up by the top of the cone. These will be folded down into the cone to hold the shape. Some folks like to add a bit of tape or a staple to hold the top together. I typically don’t do this, but if it makes you feel more secure, go ahead.

23-fill-cone.JPG

These cones will be fairly small, so only use a few teaspoons to fill the cone just under half full.

24-fold-one.JPG

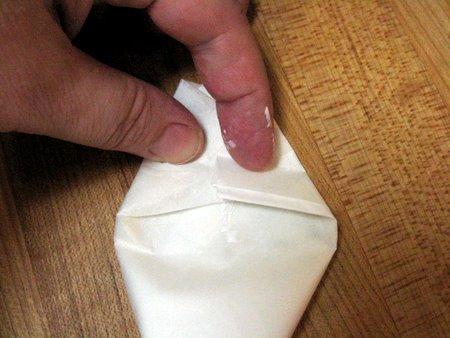
To avoid having the icing squirt out of the top of the bag, you’ll make a number of folds. First, fold in both sides to the center.

25-fold-2.JPG

Next, fold the top down to where the top of the icing is.

26-fold-3.JPG

Last, fold that fold in half again.

27-how-to-hold.JPG

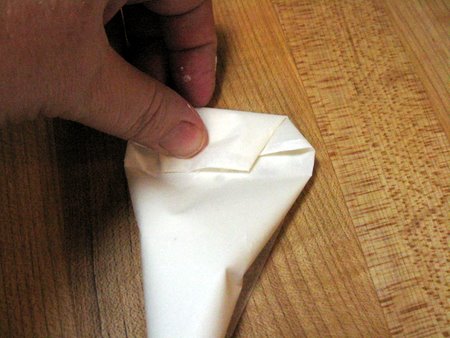
Holding a bag for fine icing is different from holding a bag for larger piping. The entire bag is held in the hand, with the folds snugged up under the thumb, and the thumb controlling the flow. To use, snip off the smallest possible tip of the cone. If you look closely at the tip of this cone, you can see a tiny bead of icing, just perfect for fine work.

28-straight-lines.JPG

Practice piping straight lines first. Remember to hold the tip above the cookie and let the icing drape.

29-dots.JPG

Add tiny dots for detail. Keeping the tip buried in the icing helps the shape stay round. Stop squeezing before you lift the tip up, and your dots will be more rounded on top than pointy.
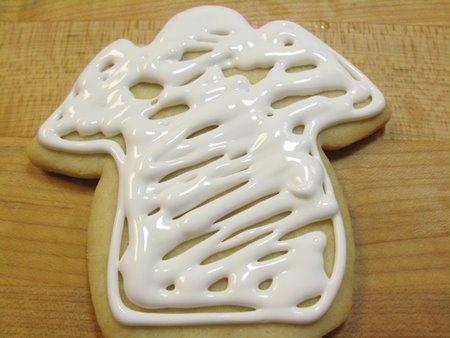
30-more-dots.JPG

It’s surprising how stripes and dots can combine to make intricate and detailed cookies without being overly complicated.
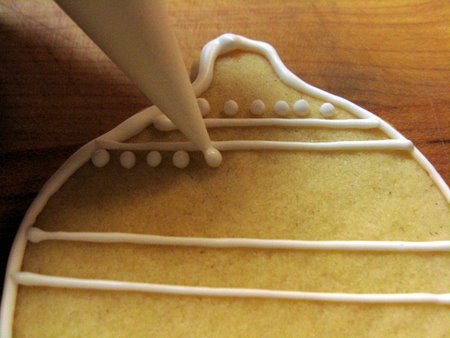
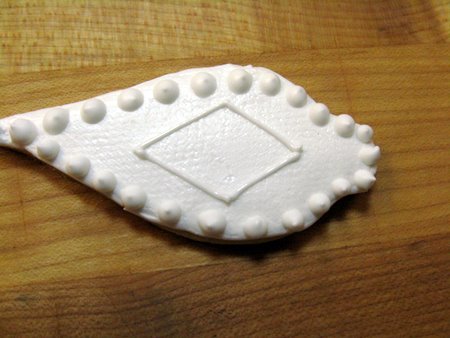
32-flooded-and-piped.JPG

Let’s try combining stripes and dots over a flooded cookie for a stunning white-on-white look. First, add large dots around the outer edge of the cookie. The two lines in the center are the beginning of a diamond.

33-begin-diamond.JPG

Add the next parallel lines to finish the diamond. This will be finished with a crosshatch design. Use these first lines as guides so that all of your other lines will be parallel.
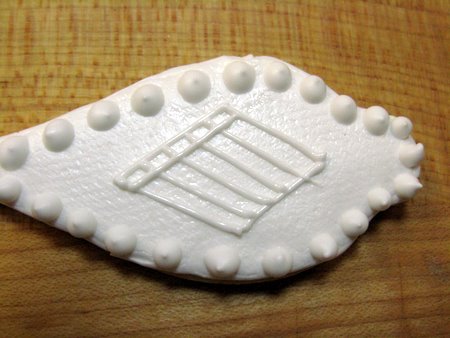
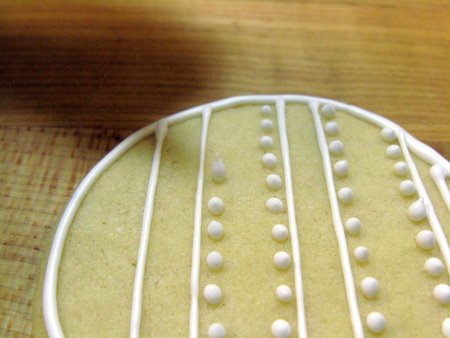
34-crosshatch.JPG

I’m a big fan of symmetry. To ensure that the crosshatch is even, count the number of lines in each direction. Here there are six lines from top to bottom, so make six lines from left to right as well.

35-finished-crosshatch.JPG

You counted the lines, didn’t you? And right now you’re double counting, right? OK, I confess! There are six lines in one direction, and seven in the other. Good thing I’m not teaching math anymore, eh?

36-added-dots.JPG

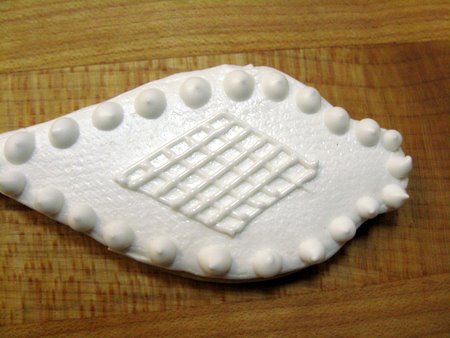
Add tiny dots around the edge of the diamond. Begin with the four corners, then add even numbers of dots on each side.

37-added-details.JPG

Add a few more straight lines in the empty spaces at the top and bottom.

38-finished-orn.JPG

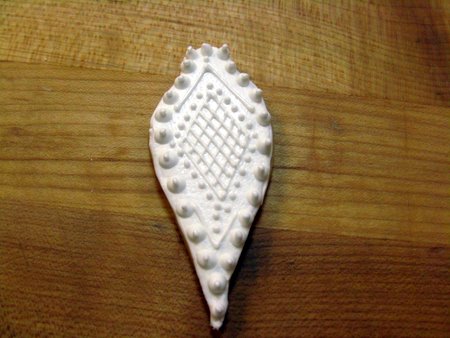
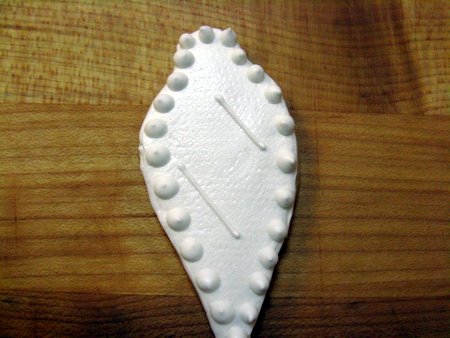
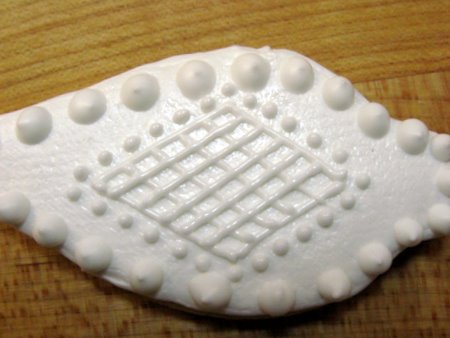
A final few dots and you have a unique white-on-white cookie using just a few basic shapes.

39-finished-cookies.JPG

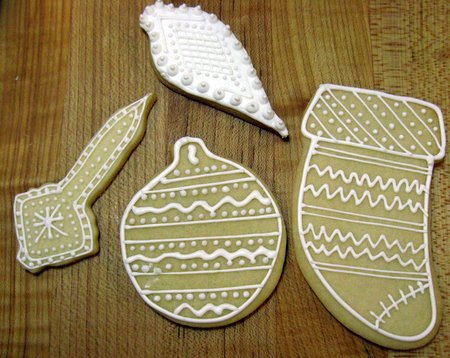
So using a few sheets of parchment, some fun cookie shapes, stripes, dots, and your imagination, you can produce some special cookies for someone special this holiday season, and all year long. Happy baking - and decorating!

38 Comments on “New Year, new cookies, it’s all in the details.”

  1. Becky Says:

    I laughed when I the page loaded this morning. Just yesterday I bought 3 snowflake cookie cutters and snowflake paper plates in preparation for making/giving snowflake shortbread cookies as gifts this Christmas! What a perfect post! Now I know how to decorate the cookies. Thanks for this perfect post seemingly made just for me :)
    Well Becky, we aim to please. :) Have fun with the snowflake cutters. I use holiday catalogs and gift wrap for “decoration inspiration”. ~ MaryJane

  2. Amy Says:

    I love to make Christmas cookies, but cut-outs never seem to make the cut (pun intended). I don’t know why considering that I have bag after bag of cookie cutters. I just don’t like to eat sugar cookies as well as I like to eat the others I suppose.

    You’re right about how lines, dots and squiggles can give a cookie a nice design without being overly complicated. I’ll have to try it some day this holiday season.

    The picture of the soaking meringue powder threw me there until I read what it was. I was thinking “she wants us to use real eggs???” I was relieved to see that it was meringue powder which is totally safe to eat uncooked. Even better is that I have a big canister of the stuff from when I took cake decorating classes.
    Hi Amy,
    While you could use real egg white, the meringue powder is 1. very convenient and 2. safe to eat. I would always use pasturized eggs if I were using fresh. Have fun decorating. ~ MaryJane

  3. Beth Says:

    Mary Jane, you make it look so easy. I don’t have a real steady hand. Do you think using decorating tips might work better for me? And here’s another question: Have you ever used those old-fashioned metal decorating tubes that you fill with the icing, and then sort of pump out the icing using a variety of metal decorating tips? Would they work with royal icing? I am really anxious to finally be able to decorate cookies. I’ve never used royal icing (I do have the meringue powder). Thanks for sharing all your great decorating projects.
    Hi Beth,
    If you are new to decorating, I would say Yes, use the tips. You don’t have to worry about how big to cut the hole, or stretching the bag by accident. You can get a nice starter set on our website here.
    I have only used the pump tubes a few times, many years ago. I found them hard to control, but I do use a pump style cookie press to make spritz cookies each year.
    If you have parchment paper, it’s easy to practice piping right on the paper, then scrape up the icing and practice some more. I used to spend hours doing that when I was a teenager. Practice, practice! :) ~ MaryJane

  4. Renee Says:

    Beautiful!! I always feel so happy looking at decorated cookies of any kind.
    How did you get the textured appearance on the filled in part of the ornament cookie?
    Hi Renee,
    I love to look at photos of all kinds of pretty desserts. The texture on the cookie was an experiment. I had read that if you place a damp paper towel over the damp icing, it would give you a very smooth texture. I found that it was a pretty big mess to deal with, and you ended up with the towel design in the icing, so I didn’t use it in the blog. I prefered the old fashioned flooding, but try the towel sometime to see how you like it. ~ MaryJane

  5. Joe-Mike Burroughs Says:

    I wanted to let you know that I have had great success directly mixing the meringue powder with the powdered sugar prior to adding the water and beating to the consistency that I want. Saves a step or two. I was also wondering if you textured the flooded cookie on the white on white cookie ornament (it doesn’t appear smooth from your photos). I have heard that cake decorators use paper towels to texture cake frosting. Do you know if it will work on cookies?

    Thanks for a great and informative post!
    Hi there,
    Yes, that is exactly what I tried with the ornament. I personally didn’t care for the technique, but as you can see it really does add some texture. Do give it a try and see how you like it. ~ MaryJane

  6. Tracey Says:

    Thanks for posting such a great tutorial! I’ve decorated cookies with royal icing a few times now, but I’m still not completely confident in my technique so I always appreciate more instruction. The cookies look marvelous and I love that you made them look so beautiful with only white icing! I don’t always want to spend the time tinting the icing all kinds of different colors so this post thrills me :)
    HI Tracey,
    I like the white on white and the white on cookies a lot too. It isperfect for when you don’t want to deal with 27 little bowls of colors. ~ MaryJane

  7. Jennifer Says:

    Thanks for the primer on making the Royal Icing. I made some a few weeks ago. It was way too thin… and I even added more sugar. It’s nice to have a better idea on well the proper consistency will flow. So next time it will go better.

    I only recently discovered Royal Icing. It’s the best for decorating cookies to send into school with the kids. No cupcake crumbs for the teachers to clean up, no lots of sugary icing to get over everything and I have yet to meet a child who will not eat cookies.

  8. Marcia Says:

    I am new to your site and have had success with several recipes of late, especially the apple crisp!

    I will try this technique with my 11-yr-old granddaughter who loves to bake. It has become a Christmas tradition for us to “cookie” together.

    I also identified with the beginning of this post. I, too, quit dying my hair and bought a Prius this year. Kindred spirits?
    I’m sure your granddaughter will have so much fun decorating cookies. Be sure to tell her I’d love to see photos of her work.
    We Q-tips will have to stick together as we get whiter and whiter on top. Wear that hair with pride! ~ MaryJane

  9. Mary Says:

    I think white on white might be the new red on green for me! Love how simple that looks and I think it would sing especially on that gingerbread. Thanks for this post!

  10. Beverly Says:

    I’ve just finished making the Gingerbread cookie dough. Can you tell me what the consistency of the dough should be. I like to weigh all my ingredients so after adding the flour, the dough was VERY wet. I checked to make sure I weighed everything correctly and thought maybe I was off on the molasses being 9 oz. After weighing only 3 oz. of molasses I realize that 9 oz. is correct for 3/4 cup. I ended up adding another 1 1/2 cups of flour to make a soft dough that didn’t stick to my hands. So is the flour amount off? I’m making these cookies for decorations on a tree so they probably won’t be eaten but I’d like to know if they have a chance of retaining their shape while baking. I also realize that the dough will firm up with chilling. Do you think the dough will be okay? This is a soft dough, not a stiff gingerbread dough. It does firm up with chilling. Mary @ KAF

  11. Steph Says:

    Thanks so much for posting this! This will be really helpful when I make my sugar cookies.

  12. Steph Says:

    What does the meringue powder do? Does it have to be Wilton?
    Hi Steph,
    The meringue powder takes the place of the raw egg white in the royal icing recipe, providing the lift and body of the icing. Any good brand of meringue powder is fine. Have fun!~ MaryJane

  13. Sue Says:

    I noticed here and in the catalog you have beautifully decorated snowflake cookies. I purchased snowflake cookie cutters two years ago and never had enough time during the holidays to make the cookies using the cookie cutters with all the other baking I do each year with pies and cakes and all. However, after seeing these beautifully decorated cookies; I feel inspired to make a couple of dozen using some of the techniques you have demonstrated here. Thanks a whole bunch.

  14. Sue Says:

    Oh my!! When I saw this post I just knew that Mary Jane was the author. Those are some gorgeous cookies! I wish, I wish, I wish I had the patience for this! I’m perfectly content appreciating the beautiful decorating work of talented people like you.
    Is powdered egg white the same as meringue powder?
    Hi Sue,
    I never consider myself a patient person, but I do really groove on fine details. Nothing makes me happier than straight lines, except maybe for a perfectly clean piece of white paper.
    Powdered egg white is not the same thing as meringue powder, but would work fine in the royal icing. I’ve used both with success. ~ MaryJane

  15. Amanda Says:

    Very cool that this should be posted today. I JUST completed my first attempt at decorating cookies with royal icing. i was really pleased with how they came out. They were for my son’s football team and they all loved them. I’m all jazzed up to make all kinds of cookies now! LOL I love the parchment paper cone idea. I used the disposable bags, but for smaller amounts of icing the parchment is so much more practical.
    You go girl! Cookie decorating is addictive, so beware! :) ~ MaryJane

  16. Erik Says:

    Thanks for the great post! I’ve always wanted to try icing cookies like this, but I just wasn’t sure of the proper technique. Now I feel inspired to give it a shot for the holidays.
    That’s great to hear Erik! If you have any questions, don’t hesitate to give the hotline a call, we’re happy to help.
    ~ MaryJane

  17. Stephanie Says:

    Again… thank you for the photos and step by step instructions for beginners like me! I think I have the ammunition to now try these out! Beautiful ideas!

  18. danielle Says:

    Air bubbles!!!! How do u avoid them when adding water for flooding?
    Hi Danielle,
    Be sure to mix very slowly. It takes longer, but it really helps with the bubbles. Also, I let the mixed icing sit for 20 minutes or so before beginning, to let any bubbles rise to the surface. Hope this helps. ~ MaryJane

  19. Paul from Ohio Says:

    Woof Woof MJ - thanks for the mention - and a Happy and Many more Anniversaries with KAF.
    HI Paul, Hi Toby! Thanks for chiming in. Toby and the poodles say Woof as well. ~ MaryJane

  20. yael Says:

    This was a perfect post for me. I’m an avid cookie decorator but always have trouble with the “fine” work. You gave some great tips for solving my problems and I am going to give them a try right away. Thanks so much!

  21. Jill Says:

    I, too, love making decorated cookies. This is a tip for actually making the cut out cookies that I thought I would share as it made me want to make the cookies more often. Instead of putting the dough in the refrigerator immediately and then trying to roll it out, I put appropriate sized amounts of dough between 2 layers of parchment and roll it out while the dough is soft immediately after mixing. I put the flat pieces on top of a cookie sheet in the refrigerator for 10-15 minutes and then cut the cookies. It is SO much easier to roll out the dough.
    Thanks for sharing Jill. Flat dough does chill so much easier, and more evenly. Great tip!~ MaryJane

  22. Liz Says:

    Does this icing dry hard enough to stack cookies in a tin?
    Also how long do these cookies stay fresh. I bake a lot of cookies and don’t often tackle the cut outs due to the decorating time but this look so pretty! I like how you are using just the self made round tip - no tips to wash!
    HI Liz,
    Yes, this icing dried quite hard, and it good for shipping decorated cookies. For edible cookies, you can make the cookies about a week ahead, and decorate over the course of a few days. For display cookies, you can make them several months ahead of time. Have fun! ~ MaryJane

  23. Jamie Says:

    Do you have to roll them out super thin? Could I make them thicker and have a softer cookie? I like my cookies to be more soft and tender than thin and crisp. My oldest daughter loves sugar cookies (they are one of the only sweets the child will eat) and I’d love to make some sugar cookies with and for them around Christmas this year.
    Thanks so much! You could roll them a bit thicker, but they may not hold the detail as much as the really thin ones will. Mary@ KAF
    Jamie

  24. Anna-Marie Says:

    I use a ketchup squirt bottle to decorate my ginger bread cookies with.

  25. Dee Says:

    Even more beautiful works of art on this blog! Thank you!

  26. Marsha Says:

    I purchased the snowflake cutters a couple of years ago. I decorated the cookies with royal icing and before the icing set up I sprinkled them with edible white glitter. They looked as though they had just been snowed on. I took them to the church cookie sale where they were snapped up very quickly.

  27. Lynda Says:

    I also mix the meringue powder with my confectioner’s sugar and then mix to the desired consistency. Every year I decorate my gingerbread snowflakes with the white on white or white on cookie look and have received rave reviews. I sprinkle a few with edible glitter and attempt to make each one look unique…no two snowflakes look alike! Any tips on how to keep your hand from cramping when holding the pastry bag? I have carpal tunnel and experience numb fingers for weeks after I pipe the cookies.

  28. BakingSpiritsBright Says:

    When working with a small amount of icing at a time will the remaining icing dry out or begin to harden? How can that be prevented? Cover the unused portion with plastic wrap. mary @ KAF

  29. Tessa Says:

    Thanks for the great tips! I love cookies and baking and frequently make cut out cookies with my kids. They are never very beautiful (my kids are 2 and 4) but always fun and tasty.

    I was wondering why you make the parchment paper piping bag instead of just cutting a smaller hole in a regular bag? Is it the smaller hole, or is it because you end up with a smaller bag? Perhaps easier to control? Just curious. I’m going to give it a try soon!! You get a smaller hole and a smaller bag that is easier to control. you were right on the money! Think what wonderful memories you are making with your kids. Mary @ KAF </strong.

  30. Tessa Says:

    Speaking of cookies… have you heard of this: Drop in and Decorate - http://www.dropinanddecorate.org/ A few of my friends and I are going to do it next month.

    Yes, Tessa, we worked with them a couple of years ago. Good program - enjoy! PJH

  31. Stacy Says:

    I’ve been putting off reading this post because I liked seeing the beautiful cookies on my feed reader for a few days! I have only piped royal icing once and loved the concept, so I am excited to try these techniques to improve my icing prowess!

  32. Emily W. Ziegler Says:

    I just read the instructions for icing cookies. Wonderful! I’m one of those people who need to see what it’s supposed to look like before I can do it. Can’t wait to send this to my two grown daughters who love to make pretty things to eat.
    Thanks. Emily Ziegler, Key Largo, Florida

  33. LaJuana Says:

    Fantastic instructions! I’m looking for cookie recipes that can be made ahead for baking later…always so many to do at the last minute for gift giving. Would these two recipes work well in that regard? I’ve always had terrific success with your recipes…know these would taste wonderful, now if they’ll only “keep”. Thanks in advance!

    Yes, these are the perfect cookies to make ahead. You could make the dough in advance, store in your frig or freezer until you are ready to roll it out. Or you can make the dough, chill then roll, cut, freeze and bake when you are ready to bake. You can successfully bake these doughs at least 1 week in advance and decorate a little each day or all at one time. Elisabeth @ KAF

  34. edible christmas gift ideas Says:

    I’ll bet you write a Christmas letter every year. Bless you for having the patience to produce these detailed step-by-step decorating pictures. And you use real meringue too!

  35. Megan Says:

    Hi Mary Jane! I love the blog. Everyone has different specialties so we get a little bit of everything. Your cookie decorating and that incredible gingerbread house have inspired me to try both this year. Now that school is out and LSATs are over I can have fun with all of the great ideas I’ve gotten from the blog! Can’t wait!

  36. Kari Says:

    First off, let me say I am not good at decorating. I can sit in front of a canvas for hours getting details right, but when it comes to cookies a smear of colored buttercream is usually the best I can do. So for 2 weeks prior to making these cookies, I was telling myself “think art project.” And it worked! I must say the photo at the top of the page was truly inspirational, and what convinced me to give it a try in the first place. (I guess I should say I used the holiday butter cookie recipe. :) ) The cookie dough was amazing, no spread, kept the cookies looking like snowflakes and not flowers. Stick a bake-able lollipop stick in the mix and you get Glenda the Good Witch’s magic wand. Thanks again!

    Good show, Kari - thanks for sharing. Hope they’re delicious, too- PJH

  37. Kristi Says:

    I had a problem with this recipe. I tried piping onto cookies using #1 and #2 wilton tips but the designs didn’t hold a firm bead like in your pics and my designs frequently squished down and bled together. I added more sugar to firm up the icing, but that made it too difficult to squeeze out of the bag. Any suggestions or an alternate icing recipe? I’m really looking for an icing that holds its shape like the pic at the top of the post. Thanks!
    Hi Kristi,
    Next time, try beating the icing a bit longer, instead of adding more sugar. This will incorporate air to give body to the icing, but you should still be able to easily pipe it. ~ MaryJane

  38. jami Says:

    These are beautiful. I’m about to try my hand with royal icing. I have the icing made and colored, but I am not sure where/how to store it over the next day or so while I’m decorating. If I thin it - say, to flood consistency - can I leave it in the piping bag? Will it thicken again? Should I squeeze it out of the piping bag when I’m done for the night, and if so, should it go in a tupperware? At room temp or in the fridge? Thanks!
    Hi Jami,
    I have saved royal icing overnight, both in the bag and in bowls/tupperware at room temperature. It does tend to thin out overnight, so if you need it thicker, it’s best to take it out of the bags and re-whip the next day. If you do leave in the bag, be sure to test it out on parchment first, so that you don’t flood a bunch of cookies and have the icing run off. I usually leave the detail icing, like black for eyes, in the bag as you are using just a very small amount. Hope this helps! ~ MaryJane

Post a comment