Why can’t I make a round pizza?
Having trouble with misshapen pies? Here’s how to make round pizzas.


But worry no more! Here’s how to make round pizzas, every time.
To make a round pizza, set yourself up for success before you begin stretching the dough. If you start with a round ball of dough, all you have to do is maintain that shape. Begin with a misshapen blob instead? You can guess what might happen.
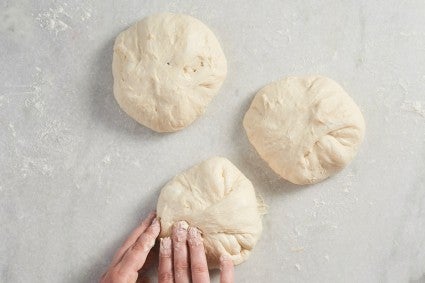
A round ball of pizza dough begins with the preshape. As its name implies, the preshape comes before shaping. It typically involves dividing the dough after bulk fermentation (first rise) and shaping it into a loose round. Then, the dough is left for 10 to 15 minutes on the counter, which gives the gluten time to relax. This resting period makes it easier to stretch the pizza dough without it springing back.
Don’t skip this step, or consider adding it to your pizza dough recipe. Here are instructions on how to preshape.
A rolling pin isn’t the best choice for rolling out pizza dough. Using a rolling pin to stretch and shape can cause irregular sections and uneven edges. (Plus, it will make it hard to maintain a puffy outer crust, something you want for pizza that’s nice to look at and easy to eat.) Instead, always use your hands to gently stretch and shape your pizza.
Follow King Arthur baker Martin Philip’s tips and start by pressing, not pulling. As he demonstrates in the video below (skip to the 1:02 mark!), start at the center of the dough and gently press outward. This will get your pizza mostly shaped without having to do any pulling, which can misshape the dough.
As you can see in the video above, you should constantly rotate your dough as you stretch it. This helps keep the shape even; spend too much time on one section without rotating, and you’ll have a misshapen, elongated edge. Plus, the dough is more likely to stick if you don’t keep it moving, which can also ruin your rounds.
Let gravity do most of the work for you while shaping. It’s gentle enough that it will slowly stretch the dough while still maintaining its original round shape, without pulling one side of the dough too much.
Once you’ve used the “push, don’t pull” method to extend the dough to a medium-sized circle, lift the dough onto the back of your hands and use your knuckles to gently move the dough in a circle, allowing gravity to stretch the edges of the dough circle further. Manually pulling the dough, by contrast, will stretch the center more than the edges, introducing the possibility of tearing a hole in the dough or creating an uneven round.
After you’ve shaped your pizza dough into a perfect round, you must nail one final step: loading it in the oven without collapsing it in on itself or ruining the nice circle shape. This final hurdle is where things can often go wrong: If your pizza dough sticks to the peel, it can lose its shape and turn into an oval (or worse). (Check out our stress-free tips for loading pizza in the oven for a full guide.)
Ensure this doesn’t happen by prepping your peel correctly. Build your pizza on a circle of parchment paper or sprinkle your pizza peel with an even layer of semolina. Both approaches will help the dough slide off the peel and into the oven effortlessly. (And if you don’t have a peel, you can use the back of a baking sheet or cookie sheet.)
Finally, deposit the pizza on your baking stone or steel correctly. Physically place the point of the peel at a downward angle where you want the pizza to land on the baking surface. Allow the pie to gradually slide down and off the peel as you jiggle continuously, slowly scooting the peel backward out of the oven and depositing the pie in the process.
More pizza pointers:
Cover photo by Rick Holbrook; food styling by Kaitlin Wayne.