What’s the best way to turn your bowl of scone dough into tender, delicious scones? It’s up to you: There are several techniques to choose from, depending on the results you want. Here are some factors to consider before making your choice:
With these questions in mind, let’s examine the three most common ways to shape scones, starting with the simplest.

The quickest, easiest way to shape scones is to simply “drop” the dough by the spoonful onto a prepared baking sheet.
The upside: This is a quick and failproof way to shape scones, perfect for beginner bakers (or those in a hurry!). And if you like moist, cake-like scones (rather than more crumbly ones), higher-moisture drop scones are the way to go.
The downside: The resulting scones can be baked only as rounds, not triangles or squares. They’ll also potentially be flatter than normal scones, due to the extra moisture in the dough encouraging them to spread out as they bake, rather than rise up.
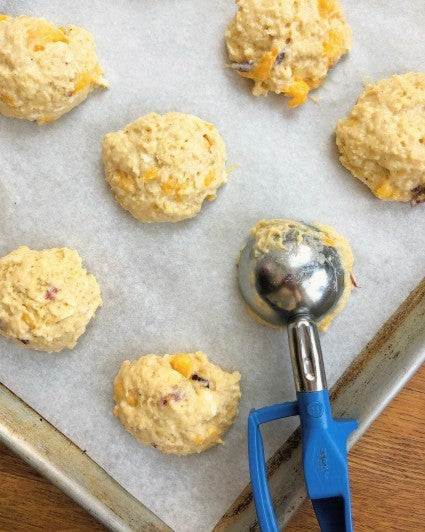
How to do it: Scoop the soft dough with a large spoon or, better yet, a 1/4-cup Scone and Muffin Scoop, which encourages scones that are similar in size and shape. Drop each mound of dough onto a lightly greased or parchment-lined baking sheet, leaving several inches between them. Bake as directed.
Tip: Drop scones depend on a softer-than-normal scone dough. If your recipe calls for scooping and dropping, you’re all set. But if the recipe directs you to roll or pat the dough and then cut it into shapes, you’ll need to drizzle in a bit of extra milk or cream as you’re preparing the dough, just enough to make it scoopable.

For perfectly shaped wedge (triangular) scones with never a crumb out of place, treat yourself to a scone pan. The standard pan shapes and bakes eight full-size scones; the mini version makes 16.
The upside: Using a scone pan requires little more effort or skill than making drop scones, and the pan is equally accommodating for either soft (drop) scone dough or stiffer, pat-and-cut dough. If you value appearance, the resulting scones are all perfectly identical, with crisp, sharp lines.
The downside: The pan may not be a perfect fit for every scone recipe out there. But if you have too much dough for the pan, you can always hand-shape a few scones with the leftover dough; if you don’t have enough scone dough to completely fill the pan, simply fill fewer of the wells.
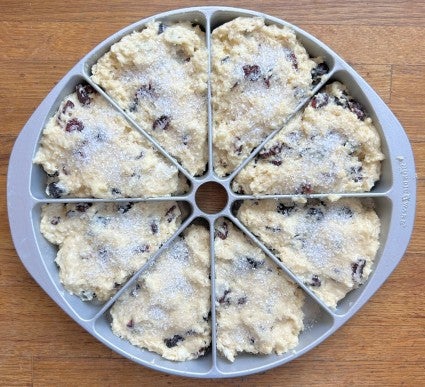
How to do it: Simple arithmetic is all it takes to divide your dough into the number of scones the pan will hold. Weigh your dough; divide by the number of wells in the pan, then drop or press that amount of dough into each well. Bake as directed, checking the scones several minutes before the recipe indicates; the sides of the pan help bake the scones a bit more quickly than those baked freeform.
Tip: Beware of the color and material of the scone pan you choose. Cast iron or other dark metal pans may brown your scones too quickly, yielding a hard crust. Silicone pans tend to under-brown, leaving scones pasty on the bottom. For best results, choose a metal pan with a lighter-colored interior.

Most scone recipes call for you to roll or pat the dough into one or two 3/4" to 1"-thick disks, then cut into wedges. While a bit more involved, this method doesn’t require a pan or any special tools. And it offers you much more control over the final shape and size of your scones.
The upside: It’s simple to control both the size and shape of your scones, as well as how many you want to make from your batch of dough. And all you need is a sharp knife for wedge or square scones; or a biscuit cutter for round scones.
The downside: Unless you’re very precise, the scones may vary in size and appearance.

How to do it: Most scone recipes will tell you how to shape scones freeform. For triangular scones, you’ll typically divide the dough in half, pat each half into a thick disk, and cut the disk into wedges; cut more wedges for smaller scones, fewer for larger ones. For triangular scones with distinctly sharp corners, pat the dough into a large square first, then into smaller squares, finally cutting each square in half diagonally to make triangles.
For round scones, roll or pat the dough into a single disk, then use a biscuit cutter to cut out rounds, cutting close together to avoid having to re-roll and cut a lot of excess dough.
For square scones, pat the dough into a square or rectangle. Gently flattening the dough into a square cake pan may help you here, so long as you have the right amount to fill the pan about 3/4" to 1" thick. Cut the shaped dough into smaller squares with a sharp knife.
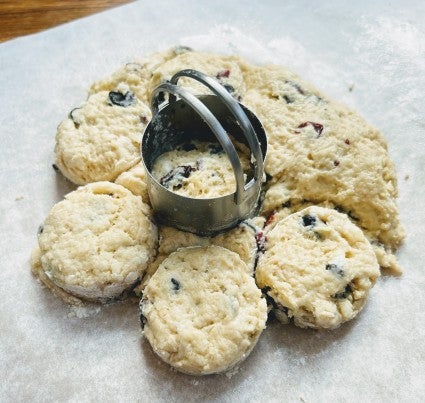
Whatever shape you choose be sure to use a sharp tool, like a good-quality biscuit cutter or chef’s knife, to cut the dough. Using a drinking glass or jelly jar isn’t your best choice, since those tools tend to compress the sides of the scones and inhibit their rise in the oven.
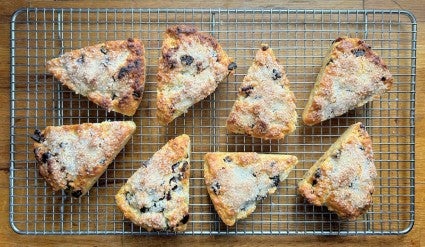
Tip: With triangular or square scones, the less you separate them before baking, the softer they’ll be. Separate the cut scones only a bit (say 1/2" or less), and they’ll expand into one another as they bake. When done, you’ll need to carefully pull them apart, and their sides will be soft and moist (think pull-apart yeast rolls). Scones that are barely separated also tend to be softer inside, since there’s less surface area for evaporation.

On the other hand, if you separate the shaped scones entirely (leaving at least an inch between them on the baking sheet), their sides will be browned and a bit crunchy; and their interior a bit drier and more biscuit-like.
Do you like your scones super-moist and cake-like? Check out an easy way to shape scones.
Cover photo (Lemon Scones) by Kristin Teig; food styling by Liz Neily.