A popular flatbread in many parts of Southeast Asia, roti canai is an irresistible, nearly unbelievable combination of flaky, stretchy, crispy, and soft. The bread gets its characteristic pull-apart layers from being stretched out very thin, then oiled, coiled, and rolled flat. While this recipe — which comes to us from chef Thomas Pisha-Duffly, who owns Oma’s Hideaway and Gado Gado in Portland, Oregon — is certainly a time commitment, it’s worth it for the experience of fresh roti canai at home.
Prevent your screen from going dark as you follow along.
To make the dough: Weigh your flours; or measure by gently spooning them into a cup, then sweeping off any excess. In the bowl of a stand mixer, place the flours and add the salt. Use the dough hook to combine.
Crack the egg into a small bowl or liquid measuring cup and whisk to fully combine the yolk and white. Measure 1 1/2 tablespoons (25g) and discard the rest or save it for your next batch of scrambled eggs. To the remaining egg, add the sweetened condensed milk.
With the mixer running on low speed, pour in the egg and sweetened condensed milk mixture; mix until combined. With the mixer still running, gradually pour in the water and mix until just combined. Stop the mixer to feel the dough — it should feel very soft when pinched in certain areas and somewhat hard in others. Cover the bowl and let the dough rest for 30 minutes at room temperature.
Uncover and knead the dough on medium speed for 3 minutes, or until the dough pulls away from the sides of the bowl. The dough should feel uniformly soft, easy to pinch, and slightly tacky. Form the dough into a ball, then flip it over so the smooth side is up.
Spray the dough with nonstick spray, cover with plastic or your favorite reusable wrap, and let it rest for 1 hour at room temperature.
Transfer the dough to a lightly greased surface and divide it into 6 equal pieces (about 120g each). Shape each piece into a smooth ball by pulling the outer edges into the center, turning the dough over, and rolling it in a circular motion with your cupped hand against the work surface.
Place the dough balls onto a baking sheet sprayed with nonstick spray, then spray the balls themselves. Cover with plastic or your favorite reusable wrap and let them rest for at least 4 hours and up to overnight at room temperature.
To make the roti oil: While the dough rests, in a small bowl, whisk together the margarine and oil until homogenous. Set aside, covered, at room temperature until ready to shape. (If resting the dough overnight, this mixture can be made on day 1 and stored at room temperature until day 2.)
To shape the roti canai: When you’re ready to start shaping, clear a smooth work surface that can get oily. (A stone, wooden, or metal countertop or cutting board works well.) Spray the work surface lightly with nonstick spray. Working with 1 piece at a time, use a rolling pin to roll the dough out into a flat disk, about 7" in diameter.
Lightly oil your hands with some of the roti oil and use gentle but even pressure to pull the dough with both hands in all directions, stretching it into an ever-widening, nearly translucent circle measuring between 16" and 18" in diameter. Do your best to avoid tearing the dough, but some small holes are OK. As the dough stretches, it may want to snap back. To prevent this, press the dough onto the work surface to hold the dough in place.
Using your hand or a pastry brush, smear 1 tablespoon (10g) of the roti oil evenly across the surface of the dough.
Starting at the top, fold a third of the dough down onto itself like a letter. Then fold from the bottom edge up over the top half to overlap. The folded dough should now resemble a rough rectangle about 17" long and 6" tall.
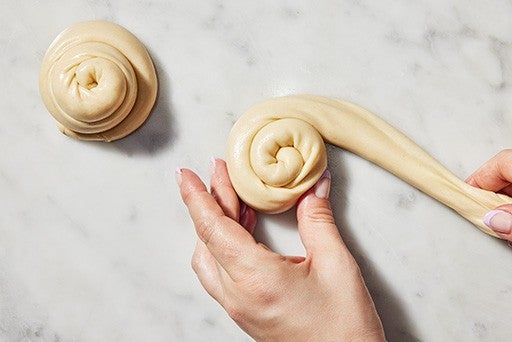
Starting from the edge farthest from you, roll the dough onto itself to form a tight tube. Gently pull on both ends to return the tube to about 17" long.
Working quickly, coil the tube into a cone shape, with the middle of the coil higher than the sides. To avoid rolling the coil too tightly, aim for a finished “snail” that is 3" wide and about 1 1/4" tall. Place the shaped dough on a greased baking sheet and cover.
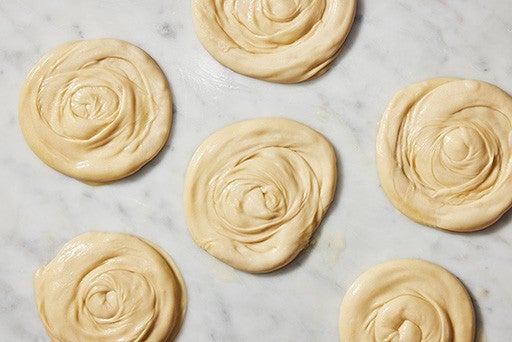
Repeat the shaping process (steps 9 through 14) with all of the pieces of dough, then let them rest for 1 hour at room temperature; this allows the dough to relax before it’s rolled out. (At this point, the dough can be refrigerated and used the next day or frozen for 1 month. If frozen, allow the dough to thaw in the refrigerator overnight before using.)
Remove the chilled dough from the refrigerator. Use a rolling pin to flatten each of the dough “snails” into disks about 7 1/2" to 8 1/2" in diameter (roughly 1/16" thick). If the dough resists rolling, set it aside while working on the other dough pieces to allow the gluten to relax. The rolled-out disks (roti) are ready to be cooked.
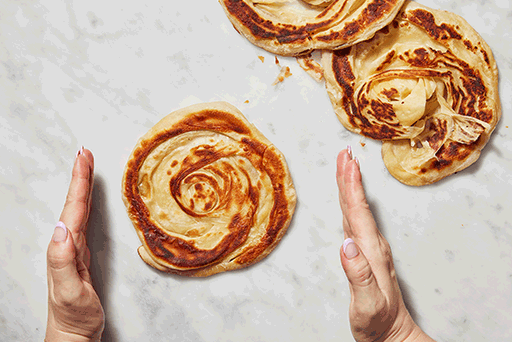
In a large skillet, heat about 1 teaspoon vegetable oil on medium-low until shimmering. Carefully place a roti into the pan and cook for 1 minute. Flip the roti and cook the second side for another minute. While cooking on the second side, the roti should puff slightly in places, indicating that steam trapped inside the layers is cooking the interior. Press lightly on the surface of the roti with a spatula to redirect steam to places where it has not yet puffed.
Flip the roti again and cook for 1 more minute, or until it is golden brown to dark brown and beginning to char in spots on both sides. Transfer to a clean kitchen towel to drain briefly.
While the roti is still hot, transfer it to your work surface. Place your hands on either side with your palms facing the center of the roti. Bring your hands together once or twice in a clapping motion so that the roti is scrunched up in between. (You can also do this step between a towel to protect your hands.) The goal is to puff steam from the dough, separating the layers and creating a flaky, light texture. The interior should be cooked but soft and very flaky.
Wipe out the pan with a dry towel and repeat with the remaining roti.
Serve the roti canai immediately with warm curry, a drizzle of sweetened condensed milk, or as a side accompanying a meal. Roti canai should be eaten on the same day.
Tips from our Bakers
While not at all traditional, we found that a blend of King Arthur Unbleached All-Purpose Flour and ‘00’ Pizza Flour approximates the right balance of tenderness and extensibility for achieving this classic Southeast Asian flatbread at home.
The combination of margarine and oil makes the roti canai easy to roll out and contributes to its discrete layers and distinctive flavors. Neither butter nor shortening make good substitutes for the margarine.