How to shape baguettes
While baguettes can be difficult, with a few tips and tricks you can make beautiful bread.


In the 17 years, one month, and 14 days that I've been a professional baker, I estimate I’ve baked hundreds of thousands of baguettes. And yet each time I go to make them, I get a little uneasy. Half joking, half serious, I tell people, if you aren’t fretting about baguettes, are you even a baker?
From sticky doughs to uneven shapes, poor cuts, and “ears” that don’t open, the baguette has more pitfalls than almost anything else in baking. But there is good news, too. Though you may find yourself daunted or struggling more than you’d like, beautiful baguettes are achievable. It just requires practice, and in one area more than any other: shaping. So, roll up your sleeves. We’re going to dive in where things often get off track — and (literally) set things straight.
While great baguettes begin with a good recipe, dough hydration, and development through time and folds, let's assume that we’ve done our job there and that we have a nice dough that’s ready to divide and shape.
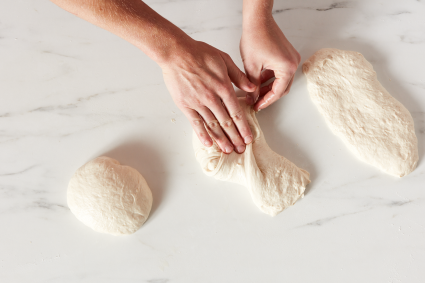
Before we get to the final shape, one thing we can do to set ourselves up for success is perform a preshape.
What’s a preshape? A preshape is a step between dividing the fermented dough and shaping our final loaf. During the preshape, the dough is gently degassed and loosely shaped into a round or tubular form. By making the dough smooth and regular before final shaping, we increase the odds that the form will be even and regular from end to end. In this way, the preshape sets us up for success.
To preshape, first divide your dough into pieces by weight (for a home oven I use a 250g to 300g dough piece for a 16" to 18" baguette, depending on the size of your baking stone or steel). Dough pieces that are the same weight will be closer in length and circumference — even forms are beautiful forms!
Gently pat the divided dough piece to degas, then fold or gather into either a tubular or round form. Once preshaped, the divided pieces should all be the same shape and size, setting you up for the most regular, even forms possible during final shaping.
Cover and rest the dough seam-side-down on a lightly floured surface until relaxed, about 10 to 15 minutes.
After the dough has relaxed (enabling it to more easily extend to the desired length), proceed to shaping. One note here: Knowing if a dough is ready for shaping takes time and experience. If, when you go to shape, you feel like the dough is fighting you, resisting the elongation process, give it a few more minutes to further relax, then try again. A good baguette should be coaxed, not forced.
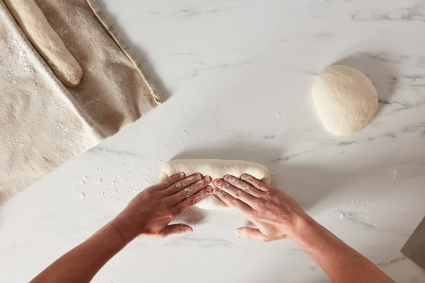
To make the final shape, place a preshaped piece of dough seam-side up on a lightly floured surface. Pat gently to remove any air bubbles, elongating it slightly to the right and left in the process. (I like to think of dough pieces in cardinal directions — in this case, I’m elongating the dough to the east and west, or to my right and left, creating an axis that runs perpendicular to the direction I’m facing.)
Once the dough is slightly elongated and degassed, begin the shaping process with a letter fold. To do so, start with the edge of dough furthest away from you and fold the dough two-thirds of the way towards yourself along the long, east-west axis, then press gently to seal. Turn the dough 180° and repeat the fold: Take the edge of dough furthest from you and fold two-thirds of the way down, pressing gently to seal. At this point, the dough piece should be 6" to 8" in length.
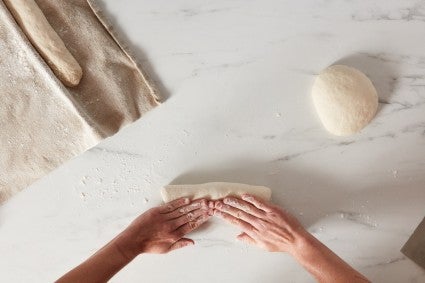
Next, fold the dough in half along the long, east-west axis, bringing the far side to the edge nearest to you. Press gently to seal either with your fingertips or the heel of your palm. During this process, the dough will naturally elongate slightly.
Now it’s time to roll. Beginning in the middle of the tubular dough piece with the seam-side down, roll the dough back and forth with a cupped hand, beginning in the middle. At first, the shape will look like a dog bone, with a thin middle and thicker ends. This is normal.
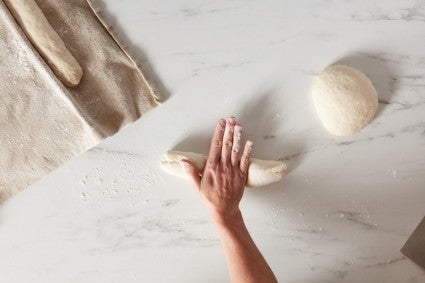
Next, starting in the center of the narrow middle section, bring both hands in and roll gently back and forth, moving your hands outward towards the tips as you do so, evening out the high spots while in motion.
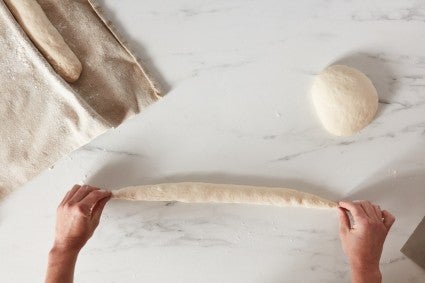
Once you reach the end of the dough piece, apply a slight amount of pressure to taper the ends between your palms and the bench. Once shaped, loaves should be placed seam-side up on a lightly dusted couche or baker’s linen to rise before baking.
I realize that reading about shaping is like learning to knit (or get out of a cave?) with words alone — if you’re like me, your eyes may be crossing. For visual learners, I highly recommend watching our recent baguette video:
Or check out our shaping tips video from a couple years ago for additional insight:
After shaping, proof the shaped loaves, preheat your oven, and get ready to score, steam, load, bake, and crunch your way through your loaves. Are they perfect? Are you proud? Or will you lose sleep over the result? One thing is sure: The more you make, the better the baguettes will be. And that brings me to the last thing I’ll offer.
Like an instrument or foreign language, improvement requires repetition. Before you can make your perfect baguette, you have to make a few (maybe even more than a few) rough ones. And the sooner you start, the sooner you’ll arrive to the good ones. So grab your recipe and let’s get rolling!
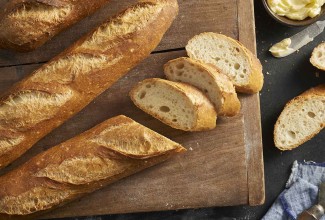
Cover photo by Martin Philip.