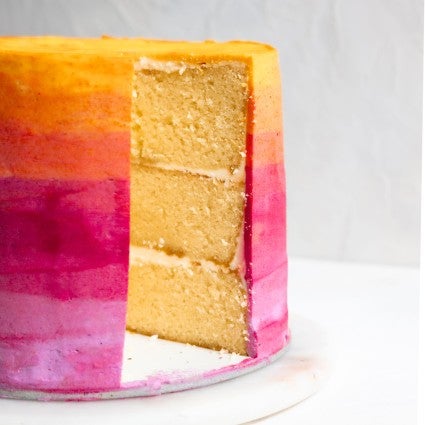
I love incorporating color into my bakes, from marbled cookies to checkboard cakes and more. But lately, ombre cakes have been one of my favorite decorating techniques. They’re a great way to experiment with different palette combinations — in this ombre cake, late summer hues were a major source of inspiration. Shades of gold peaches, majestic summer sunsets, and ripe summer berries came to life with a few drops of food coloring, and all it took was an offset spatula and a little patience to transform them into a beautiful cake.
Inspired? Here’s how to make your own ombre cake.
Here’s the equipment I recommend:
Pick your favorite cake recipe: I used King Arthur’s Classic Birthday Cake. I divided my batter into three 6" cake pans to make a taller cake — this provides more room to create a gradient for the ombre design.
Since the frosting will be fussed with quite a bit when mixing the colors, you want to pick a frosting that has some structural integrity (and is also tasty!). Two great options are Italian Buttercream and American Buttercream. Avoid cream cheese-based or whipped cream-based frostings, as these frostings can become thin and weepy with too much mixing. I recommend 5 to 6 cups of frosting — enough for the crumb coat and the decorative colored layer.
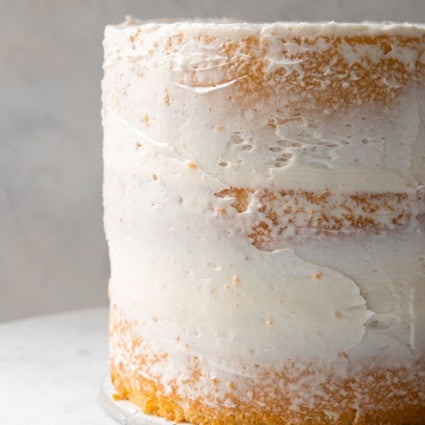
Layer and crumb coat the cake. Use an offset spatula to spread a thin layer of frosting over the whole cake. This thin frosting layer traps all the little crumbs that come loose while frosting, ensuring a smooth, crumb-free finish when you frost the final layer. Once frosted, place the cake in the fridge for 15 to 20 minutes to chill. See more details: How to crumb coat a cake, or watch it in action: How to frost layers with a crumb coat.
For an ombre cake, you want tones of color that shade into each other, graduating from light to dark, so it’s best to stick with three to four colors that are adjacent in the color family. For example, I’m using the colors pink, red, orange, and yellow, which are inspired by the sunset. You can also do light to dark hues in the same family for a monochromatic look. Using these tips while choosing your color palette will allow your ombre to smoothly transition without giving you any muddy colors.
Take a few spoons of plain frosting and set it aside. It’s always good to have a little extra plain frosting in case you need to patch something up or adjust one of the colors. (If you’re decorating the top of the cake white, reserve the same amount of frosting as the other colors.)
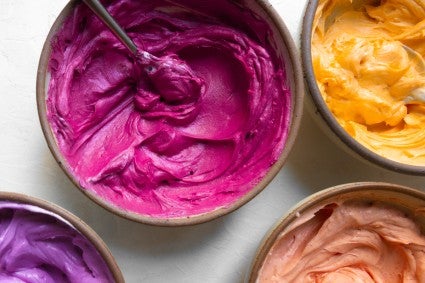
Evenly divide the remaining frosting between three to four bowls (depending on how many different colors you want to mix). Once evenly divided, add your food coloring to each bowl. Adding a little color at a time gives you the most control over the final color. Repeat this step for all your colors.
Place a medium or large round tip into a pastry bag and snip the end. Push the tip until it fits snug into the pastry bag. Fold half of the pastry bag over itself and place it into a tall heavy glass. This will help you fill the pastry bag with frosting. Start off by filling the pastry bag with the frosting color that you want to be on the bottom of the cake. If you’re doing a monochromatic gradient, start with the darkest color here. Push any air from the bag by gathering the frosting toward the tip — a straight edge like a bench knife is helpful here to scrape the frosting toward the bottom of the bag.
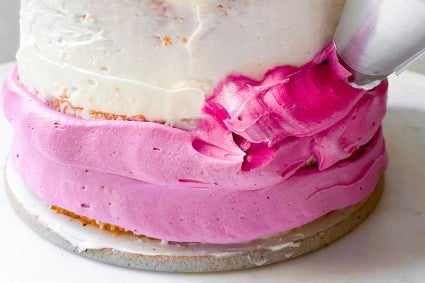
Pull your chilled cake from the fridge and place it on the turn table. Start by piping a band of frosting on the bottom of the cake. (If you’re doing a monochromatic gradient, start with the darkest color and move to the lighter color as you move up the cake.) It’s okay if it’s a little jagged or crooked, as it will be blended and smoothed later — just try your best to keep it even. Once you pipe a full ring of frosting, empty out the remaining frosting back into its bowl. Push as much frosting out of the bag as you can.
Gradient: To create a smooth gradient, we will add a little bit of the next adjacent color. For example, if we started with red, now we’ll add a small amount of orange to the remaining red frosting to create a color that is somewhere in between red and orange. Mix the two frostings together until fully incorporated. Refill the same bag with the newly mixed color. Pipe the next band of color on top of the previous ring of frosting. (It might overlap a bit — that’s OK.)
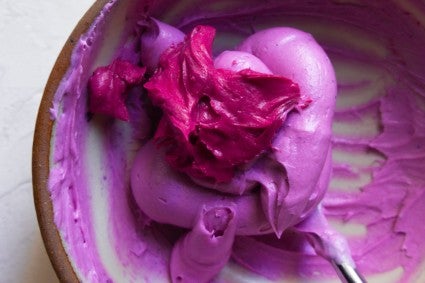
Once you’ve piped the second band of frosting, empty out the contents from the piping bag into that first bowl and add all of the remaining frosting from the second color, mix well, and refill the bag. There is no exact science to mixing the colors; we just want to keep mixing a little bit of the next color into the previous color to keep creating shades that gently blend into one another.
Keep repeating these steps until you reach the last color. If the last color will be the color for the top of your cake, do not mix all of it into the previous color to create a gradient. Save half of it for the top of the cake.
Decorating the top: Using an offset spatula, dollop the color you decided for the top of your cake on top. If doing a monochromatic gradient, this should be the lightest color. Gently, smooth it out using your offset spatula until it is spread all over the top. It’s okay if a little bit of the frosting mixes with the frosting on the sides of the cake — it’ll get blended later.
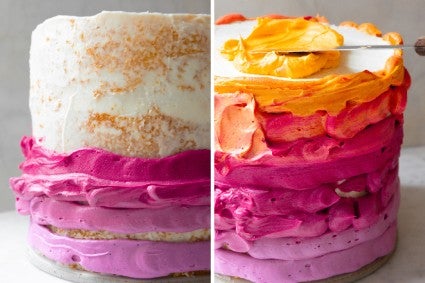
At this point, all the colors should be piped on in horizontal bands, and the top of the cake should be frosted. Use the tip of your offset spatula to create horizontal bands of zig-zags into the frosting. This will help blend the frosting colors and give you a smooth look rather than distinct rows of colors.
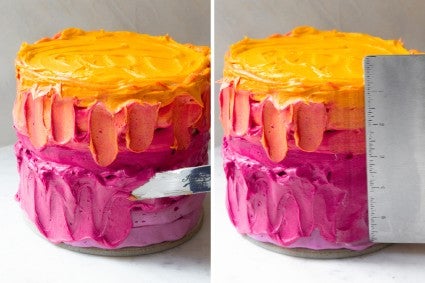
After you have blended all the frosting colors, use the bench knife or a clean offset spatula to smooth out the frosting. Hold the bench scraper or offset spatula parallel to the cake. Gently, and with a light hand, glide the bench scraper across the colors to smooth everything out. After each motion, remove the excess frosting that collects on the scraper into a spare plate or bowl. If you’re using a rotating cake stand, gently rotate the cake as you smooth the frosting.

To smooth the top, use the offset spatula to blend the top of the cake with the sides of the cake. Go around once more with the bench scraper until everything is smooth and even. If there are any gaps in the cake, you can use the leftover buttercream with an offset spatula to fill in those gaps.
There you have it, a beautiful ombre cake perfect to wow any crowd! Pick up some plant-based food colors, bake your cake, and get ready to start decorating.
Make sure to nail your cake, too. Kye Ameden shows you how: